• Welcome to ClassicBroncos! - You are currently viewing the forums as a GUEST. To take advantage of all the site features, please take a moment to register. It's fast, simple and absolutely free. So please join our community today!
    If you have problems registering or can't log into your account, please contact Admin.

Heater Motor Upgrade

JakeAlex

Sr. Member
Joined
Sep 7, 2009
Messages
654
Loc.
New Albany, MS
Ok…I need a lesson in heat 101. I have completely rebuilt my box. I tested with a 9 volt and she works. I hooked up to the existing wires, and no dice. tried with the key on...no dice. Next step was to check fuses. I replaced all fuses, but still didn’t work. I decided to order a new heater switch. Just installed it but it still doesn’t work. I have the ground attached to the heater box and it worked with the 9 volt so I assume I should be good. all this being said, I figure Id add some pics so maybe one of you fine gents can get me on track.

few other questions I have...
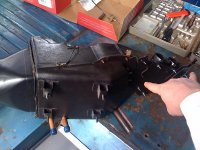
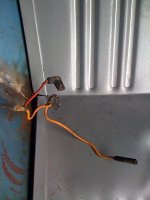
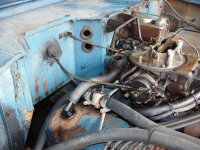
Can someone tell me if it matters which color wire (in pic) is hooked to which post on the back of the heater (left of my pointer finger in pic of motor)? I know the longer wire hooks to my motor. I’ve tried hooking each wire to each side but I still don’t get a working heater.

This thread mentions "pull for heat" several times. that being said, in the pic of the heater, you'll see I’m pointing at two levers for the directional flaps. when I took the heater out to rebuild, none of the cables where hooked up. according to my dash, I have 3 cables to hook to the heater but I only see the two "levers" that I'm pointing to. I’m sure I know where two of the cables hook to but where does the "pull for heat" cable hook on the heater?

I've read through this post a few times but didn’t remember reading anything about my issues. hopefully I didn’t overlook it if it was mentioned. At this point I feel the wiring is hooked up correctly and I’m mainly in need of knowing where the 3 cables hook up at. This being said, can anyone tell me what else I can look for since my heater still doesn’t work? Thanks in advance to any help you can provide.

Jake
 

Attachments

  • heater.JPG
    heater.JPG
    46.2 KB · Views: 220
  • heater wires.JPG
    heater wires.JPG
    35.8 KB · Views: 177

Heus33

Bronco Guru
Joined
Jun 1, 2005
Messages
7,408
I bet your ground is bad. I had the same thing happen to me. Don't ground it at the heater box, groud it to the back fo the dash on bare metal.

As for the flaps, if you get under there the hookups only reach the flaps that they're designed to go to. It should make sense if you can see them.
 

JakeAlex

Sr. Member
Joined
Sep 7, 2009
Messages
654
Loc.
New Albany, MS
I bet your ground is bad. I had the same thing happen to me. Don't ground it at the heater box, groud it to the back fo the dash on bare metal.QUOTE]

ok I will try the new ground and see what happens..

As for the flaps, if you get under there the hookups only reach the flaps that they're designed to go to. It should make sense if you can see them.

Understand but I have 3 cables (defrost, heater switch, and temp). I know that two of the cables hook to the lever/flaps things that Im pointing to in the pic. I assume the temp and defrost will hook there. If so, any idea where the "pull for heat" cable hooks? thanks for the quick response..
 

taipeichris

Bronco Guru
Joined
May 11, 2006
Messages
1,752
I did the chevy heater motor upgrade with the squarel cage, $30 bucks at Kragen, thank you China.

Got what I thought was going to be an easy install and ended up taking the entire box out and really trimming it up to get it to fit.

So it works great now, I even have a defroster, the first time I turned it on dust came flying out the defroster vents going everywhere. But for some reason I'm still cold at night.

Maybe I should put the top back on.
 

W650Mike

Sr. Member
Joined
May 5, 2009
Messages
528
Loc.
Eastland, Texas
Jake,

The “Pull for TEMP” goes to the water control valve under the hood. It needs to pass through the firewall and go to the in-line control valve on the heater hose going to the heater core. The heat control valve can be on either of the hoses; mine is on the return to the manifold, and is located just right and rear of the carb. This valve opens to allow the hot water through the core.

Edit: I meant "Pull for Temp" instead of "Pull for Heat" as originally written. Sorry if that misled anyone.
 
Last edited:

thirdtime

Full Member
Joined
Jan 27, 2009
Messages
253
The third cable goes under the hood to the valve that lets the water run to the core. You can manually cycle the valve to test it.
 

JakeAlex

Sr. Member
Joined
Sep 7, 2009
Messages
654
Loc.
New Albany, MS
Thanks guys for your responses. I removed the ground wire from the heater box and placed it on the tub but still didnt work. Keep in mind, my main concern is that I have NO power to turn the motor. even with new fuses, key on and a new switch.....turning the knob gets me no where. any other ideas on what I can check to get power to the motor?

W650Mike and thirdtime - When I purchased the EB, the hoses were bypassed but by reading the forum, I understand how the new hoses should be hooked up to the new core. thing is, the heater switch cable is VERY short. so short that Im not sure how it would be long enough to go through the firewall and reach the control valve. Also, what hole is used for this cable to pass through the firewall. Pics would be great as none of this was hooked up and Im working blind. Thanks again for the responses...

Jake
 

Viperwolf1

Contributor
electron whisperer
Joined
Aug 23, 2007
Messages
24,342
Jake,

This is the complete heater circuit. Red wire to one side of the resistor and 2 orange wires on the other side. Make sure the motorplate has a good ground. You can run that to the back side of the heater box (it will be gounded when bolted in place) or up under the dash somewhere.

Other things to check are 12V on both sides of fuse #1. If you only have voltage on one side-the fuse is bad. No voltage on either side-check to see if the black-green wire is attached to the stud on the ignition switch.

Pull for heat cable goes to where your finger is on your first pic. Temp cable goes to valve in heater hose under hood. Defrost cable goes to lever near defrost ducts.
 

Attachments

  • heater.jpg
    heater.jpg
    25.3 KB · Views: 66
  • heater 2.JPG
    heater 2.JPG
    36.2 KB · Views: 73

casadejohnson

Bronco Alchemist
Joined
Jan 21, 2005
Messages
3,587
When I did this upgrade the first time, the good people at autozone gave me the incorrect blower fan. The fan was a little to deep and being metal instead of plastic, it would contact the back of the heater box and ground out blowing the fuse. You might do a continuity test from the heater fuse to the power lead for the fan. It could just be a bad/cut wire. Also, is the heater installed again or are you just testing it before the install? The heater needs to be installed for the stock ground wire to actually ground because it grounds to the vehicle body by bolting it to the firewall. If its not installed yet use a jumper wire to ground the heater to the vehicle body.
 

thirdtime

Full Member
Joined
Jan 27, 2009
Messages
253
My truck is in the process of a rebuild but I found a picture from the teardown process. You can get a good idea of how the valve works from the photo. Hope this helps.
 

Attachments

  • P1110017.JPG
    P1110017.JPG
    130.4 KB · Views: 272

kwspony

Bronco Guru
Joined
Apr 28, 2003
Messages
1,114
Loc.
Roseville
i just pulled my chevy setup out and installed a switch, resistor and motor from a late 80's Ford Ranger. It has 4 speeds and a bigger fan. It moves a lot more air than the chevy setup!! It isn't installed in the bronco yet though but I did test it. The motor is a bit louder and I am hoping it will quiet down once installed with all the ducts. Had to modify a few things but it was very easy. I used to be able to post pics here but not anymore. I have a few on our site. www.norcalbroncos.com in the project broncos section. Thread name is time for a few upgrades, page 4.
 

feitctaj

FNG
Joined
May 3, 2003
Messages
4,319
Loc.
Group W Bench
Mmmm, I pulled mine apart after doing the chev upgrade, I did not like the noise , so I pulled out the metal cage and reinstalled the plastic stock one and it is very quiet and has the same defrost ability
 

kwspony

Bronco Guru
Joined
Apr 28, 2003
Messages
1,114
Loc.
Roseville
my stock blade was metal too. did they go plastic at some point? I am not sure if the noise is the motor or the fan pushing the air.
 

2horsegarage

Full Member
Joined
Jul 17, 2007
Messages
245
Loc.
Denver Colorado
Jake,

The “Pull for TEMP” goes to the water control valve under the hood. It needs to pass through the firewall and go to the in-line control valve on the heater hose going to the heater core. The heat control valve can be on either of the hoses; mine is on the return to the manifold, and is located just right and rear of the carb. This valve opens to allow the hot water through the core.

Edit: I meant "Pull for Temp" instead of "Pull for Heat" as originally written. Sorry if that misled anyone.

So.... on mine, the wire pulls off the valve control every time I try and push the knob back in. Ideas?
 

kwspony

Bronco Guru
Joined
Apr 28, 2003
Messages
1,114
Loc.
Roseville
interesting. The ranger fan is plastic and is not quiet. Guess I need to mount it and run the ducts before final install.
 

acarlotto

Jr. Member
Joined
May 18, 2009
Messages
131
Loc.
Charlotte
Just did my chevy motor conversion and it works like a charm. I had it on in about 40 deg. with to top off and was not that bad. I did replace all the seals and used the old cage wheel. Props to whoever figured that one out. super easy even to take the whole box out and clean it up. Did not have one problem putting the whole box back in and I am new to all of this.
 

kwspony

Bronco Guru
Joined
Apr 28, 2003
Messages
1,114
Loc.
Roseville
the ranger setup is installed and working but is still noisey. It moves a lot more air too. The noise starts in the med-hi and hi speeds. I am thinking about putting the chevy fan blade back on and trying it.
 
Top