• Welcome to ClassicBroncos! - You are currently viewing the forums as a GUEST. To take advantage of all the site features, please take a moment to register. It's fast, simple and absolutely free. So please join our community today!
    If you have problems registering or can't log into your account, please contact Admin.

Help with welding

jason.k

Jr. Member
Joined
May 16, 2012
Messages
138
Loc.
Gulfport Ms
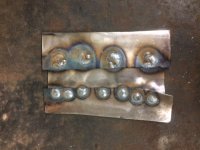
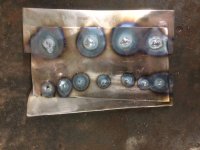
Ok guys here is my problem. I have used #8 3/4" sheet metal screws holding my rear floor pan in place. So today I went out to the shop to practice my spot welding before I touched the bronco. I didn't have any luck. I got a good butt weld that I could not break it just bent the metal. Got a good plug weld and it held. Problem is I don't have either of those welds to do. My question is when you drill through 2 pieces of metal with the screws mentioned above I do not get very good penetration. I did 7 screws and they all could be pried apart with a flat head screwdriver. I repeated this process several times and adjusted head and wire speed with same results. I called my neighbor over to give me some lessons and he is a very experienced welder with a few builds under his belt and he couldn't get a good weld on this little hole either. So what is the technique you guys are using? The only way I got this to work was pull a screw and then use a much larger drill bit to drill the top piece of metal then I could get to the bottom piece and build up much like a plug weird. Any help is appreciated.
 

Hazegray

Sr. Member
Joined
Aug 10, 2004
Messages
795
I would use a copper plate for a backer behind the hole if possible. I have flattened out a 1/2" copper pipe and held it behind the hole while welding, moving from outside towards the middle. The weld should not stick to the copper...
 

Skiddy

Bronco Guru
Joined
Oct 8, 2003
Messages
11,557
try short bursts, also might try starting a little off to the side of the hole
 

phyler

Jr. Member
Joined
Jul 14, 2007
Messages
66
Loc.
Denver area
The only way I got this to work was pull a screw and then use a much larger drill bit to drill the top piece of metal then I could get to the bottom piece and build up much like a plug weird. Any help is appreciated.

This is exactly what I did. I used a 1/4" or 3/8" drill bit to make the hole in the top metal. Not too big of an issue. Drilling the bigger hole in the top metal also allowed me to fine tune the fit ever so slightly as I was installing.

Sent from my Venue 8 7840 using Tapatalk
 

hankjr

Contributor
Bronco Guru
Joined
May 11, 2013
Messages
1,760
FWIW, I used a HF spot weld cutter to make larger dia holes in new panel only and in between screws. Welded rosettes in those for strength and just plug welded the screw holes to clean them up.

Hank
 

bronconut73

Bronco Guru
Joined
Aug 7, 2012
Messages
9,916
fwiw, i used a hf spot weld cutter to make larger dia holes in new panel only and in between screws. Welded rosettes in those for strength and just plug welded the screw holes to clean them up.

Hank

/\/\this/\/\
 

bronkenn

Contributor
Bronco Guy
Joined
Apr 27, 2017
Messages
2,667
Loc.
Southeast Ohio
I use a pneumatic punch to put the holes in. They're pretty cheap and save a lot of time and sore hands from drilling. Astro makes good ones and they also double as a flange tool for marrying panels together. Very useful tool in the shop. Like the others I also weld up the screw holes to finish it up. Ken
 

kip60

Full Member
Joined
Feb 7, 2015
Messages
238
As Ken said. I used a pneumatic punch from HF. Used the screws to hold everything in place. Screws are every 3-4 punch holes. Once punches are all welded. then I start taking out screws and welding those in for cosmetic reasons. Punches are all structural.
 

Justafordguy

Bronco Guru
Joined
Sep 26, 2009
Messages
6,253
X3 on the pneumatic punch, worked great for me and is much faster than drilling.
 

hankjr

Contributor
Bronco Guru
Joined
May 11, 2013
Messages
1,760
Basically a plug weld, but looks like a rosette due to the way the metal builds up as you work around the diameter. The larger diameter hole makes I easier to start arc inside hole and then build out to walls and then in a circle.

I'm out of country on bidness but can get some pics when I'm home later this week

Hank
 

redfishtony

Full Member
Joined
Apr 17, 2008
Messages
209
Loc.
Thomasville GA
As Hazegrey stated get you a piece of copper pipe and flatten it out. If you can get to the backside put the flat copper plate behind the hole and weld it up. If your having issues with them coming apart just weld them a bit larger than the hole diameter. You may need to turn your welder up a bit also but with the copper behind it shouldn't burn through. May take a little practice. Good Luck
 
OP
OP
J

jason.k

Jr. Member
Joined
May 16, 2012
Messages
138
Loc.
Gulfport Ms
Basically a plug weld, but looks like a rosette due to the way the metal builds up as you work around the diameter. The larger diameter hole makes I easier to start arc inside hole and then build out to walls and then in a circle.

I'm out of country on bidness but can get some pics when I'm home later this week

Hank

Hank thanks for the answer and yes I like pics. Helps me understand things a little better
 
OP
OP
J

jason.k

Jr. Member
Joined
May 16, 2012
Messages
138
Loc.
Gulfport Ms
As Hazegrey stated get you a piece of copper pipe and flatten it out. If you can get to the backside put the flat copper plate behind the hole and weld it up. If your having issues with them coming apart just weld them a bit larger than the hole diameter. You may need to turn your welder up a bit also but with the copper behind it shouldn't burn through. May take a little practice. Good Luck

I will practice this method this weekend. Thanks
 

LilMixedUp

Full Member
Joined
Feb 27, 2016
Messages
163
Loc.
Bonaire
while you're at Harbor Freight, they have a cooper backing tool in the welding area with a handle already attached, was pretty cheap and works perfect for this type of job
 

sykanr0ng

Bronco Guru
Joined
Aug 11, 2014
Messages
5,363
When you ask for the copper backing tool you may find they know it as a copper welding spoon.
Well worth having one in your toolbox.
 

hankjr

Contributor
Bronco Guru
Joined
May 11, 2013
Messages
1,760
Thanks guys. Looks like I'm on my way to harbor frieght to get a penumatic punch. Love this sight!

while you are there, grab as many spot weld cutters as you think you will need, then double that (unless HF is real close to you). nothing more frustrating than getting in the groove and then breaking the cutting bit. they are reversible but too cheap to not have a few extra lying around

Hank
 
OP
OP
J

jason.k

Jr. Member
Joined
May 16, 2012
Messages
138
Loc.
Gulfport Ms
while you are there, grab as many spot weld cutters as you think you will need, then double that (unless HF is real close to you). nothing more frustrating than getting in the groove and then breaking the cutting bit. they are reversible but too cheap to not have a few extra lying around

Hank

They are about 15 min away but I quickly learned I was going to need a few. I think I have stock piled about 15 of them in my tool box now but every time I walk in there I buy a few more. I have lots of metal to replace! I think the only thing I'm saving is rear wheel wells, inner quarter panels, fire wall and...... Well the rest will be replaced I think
 
OP
OP
J

jason.k

Jr. Member
Joined
May 16, 2012
Messages
138
Loc.
Gulfport Ms
Ok after practicing this weekend these are my results. first pic is from the top side. bottom row is using #8 sheet metal screws with a welding spoon behind the holes. the top row I used a hole punch and the metal underneath did not have a hole in it so a plug weld. Second pic is the view from the underside. You can see with the screws and a welding spoon most of them did not get great penetration and the plug welds did. that being said I tried to pry the two pieces of metal a part and the screw holes did hold together.
 

Attachments

  • IMG_6152.JPG
    IMG_6152.JPG
    118.5 KB · Views: 52
  • IMG_6153.JPG
    IMG_6153.JPG
    117.1 KB · Views: 51
Top