• Just a reminder that you won't be able to start new posts or reply to existings posts in the Archive forum.

    This is where all the old posts go so they can still be used for reference and searched.
  • Welcome to ClassicBroncos! - You are currently viewing the forums as a GUEST. To take advantage of all the site features, please take a moment to register. It's fast, simple and absolutely free. So please join our community today!
    If you have problems registering or can't log into your account, please contact Admin.

How do you attack this rust?....74 Build Start

OP
OP
aaron6920

aaron6920

Sr. Member
Joined
Sep 26, 2010
Messages
405
Loc.
Dorchester, IA
IT RUNS!!!! After the initial running of the fuel pump we had a leak on the left side of the injectors. We had to take the upper back off and get the bracket bent differently. After that she fired right up!! I was stoked! After some tweeting of the distributor it ran perfect no misses. I had to take off to Iowa for a few days right after initial startup so I didn't get go run it a whole lot but it was pretty cool to be injected :)
 
OP
OP
aaron6920

aaron6920

Sr. Member
Joined
Sep 26, 2010
Messages
405
Loc.
Dorchester, IA
Well I finally got the fenders back on the beast ;D;D

They turned out to be a complete nightmare to get to fit properly. I was not impressed with the gaps and just how far off the fenders were. I should have taken some pics of the first trial fit. :cry: But here is a pic of the rig with fenders back on. I still have to drill out for the side markers and hook back up the electrical but you get the idea.
 

Attachments

  • IMG_2031.JPG
    IMG_2031.JPG
    110.1 KB · Views: 58
OP
OP
aaron6920

aaron6920

Sr. Member
Joined
Sep 26, 2010
Messages
405
Loc.
Dorchester, IA
I also put a new exhaust system on her. I got the two into one kit from BC Broncos and that turned out to be a two week event in itself. I broke off an exhaust stud on one manifold and don't own a torch. After inspection they all looked really bad so I took both manifolds off and down to my buddies place that has a torch and with heat they still were extremely stubborn. I got the other three off but ended up breaking the stud that I had to replace originally :mad::mad:. So I had to drill that stud out and use a 7/16 Heli-Coil for the new stud.

I had to order the heli-coil online so it took a little while to get here. But the BC bronco exhaust kit does fit very well. I welded the seams together on the tailpipe. I only used clamps on the muffler so I can actually take it apart again. I welded to the an exhaust clamp so that if I needed to replace I didnt have a muffler hanger welded to both pipes. %)
 

Attachments

  • IMG_2020.JPG
    IMG_2020.JPG
    65.1 KB · Views: 36
  • IMG_2029.JPG
    IMG_2029.JPG
    98.2 KB · Views: 45

Stutsmo

Contributor
Bronco Guru
Joined
Jan 24, 2009
Messages
2,549
Looks good from here! What fenders did you get the Dynacorns or the cheaper ones?
 
OP
OP
aaron6920

aaron6920

Sr. Member
Joined
Sep 26, 2010
Messages
405
Loc.
Dorchester, IA
The kit does not include a tailpipe, I made one from pieces that you can buy from AutoZone. It actually turned out pretty well for a cobbed together tailpipe. Cheaper than taking to a muffler shop also.
 

Attachments

  • IMG_2024.JPG
    IMG_2024.JPG
    100.7 KB · Views: 39
  • IMG_2028.JPG
    IMG_2028.JPG
    72.1 KB · Views: 40
  • IMG_2030.JPG
    IMG_2030.JPG
    78.6 KB · Views: 36
OP
OP
aaron6920

aaron6920

Sr. Member
Joined
Sep 26, 2010
Messages
405
Loc.
Dorchester, IA
Looks good from here! What fenders did you get the Dynacorns or the cheaper ones?

I don't think they are Dynacorn, I think the brand started with an S but I cant remember. They have the pre-drilled holes for the fender emblem and I found after that a better fitting fender has no pre-holes drilled? But oh well after some trimming and taking the fenders out in the lawn to really push on them they ended up fitting alright. :)
 
OP
OP
aaron6920

aaron6920

Sr. Member
Joined
Sep 26, 2010
Messages
405
Loc.
Dorchester, IA
OK, so after moving into our first house last November life has been busy but fun as of late. Have a nice 3 stall garage that I got heated and insulated, 220 plug for the welder, all of this just in time for winter to be over :(.

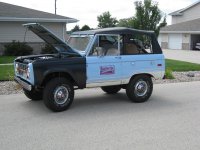
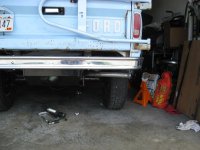
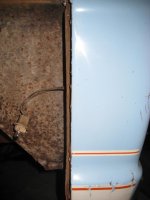
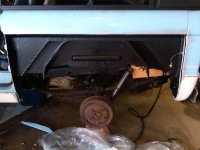
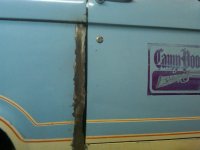
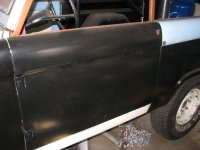
But, nothing got done on the bronco since last summer so the last two saturdays I finally made some forward movement. I have had both new quarter panels from Jeff's bronco graveyard for the past few months. I have cancer at the bottom of the quarter and along the seam. The driver side is also all bunged up with dents and multiple gas tank drillings. SOOO time to Finally get after it.

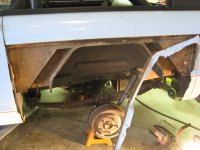
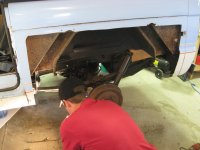
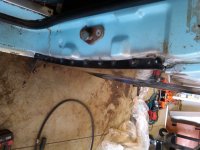
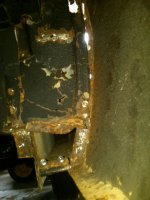
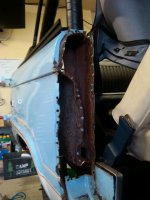
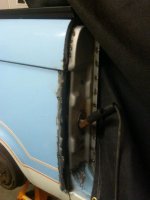
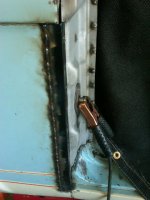
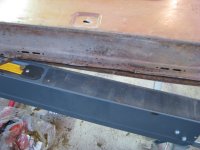
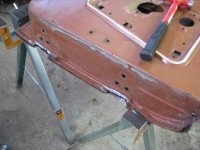
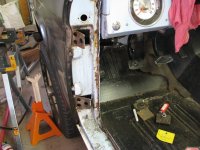
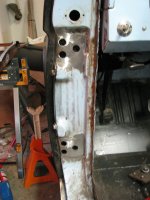
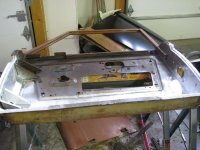
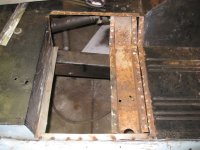
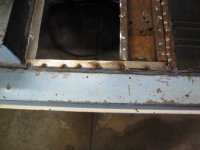
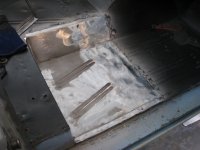
I started by cutting a couple inches from the seam to access the spot welds. Then I was able to get at the many, many spot welds. The tough part is actually the two areas where the quarter is "sandwiched." The first part is lower rocker area and the second the taillight housing area. I tried to take a pic to show that.

This is a real PITA! I had to use by screwdriver and use as a chisel and basically bust out all the welds in these two areas. After you get through those two it is smooth sailing. I went through about 3 harbor freight spot weld cutters. I now have purchased a nice Blair made in USA spot weld cutter that can hopefully last a little longer.
 

Attachments

  • IMG_2209.jpg
    IMG_2209.jpg
    75.7 KB · Views: 50
  • IMG_2208.jpg
    IMG_2208.jpg
    67.5 KB · Views: 49
  • IMG_2202.jpg
    IMG_2202.jpg
    92.3 KB · Views: 55
  • IMG_2196.jpg
    IMG_2196.jpg
    80.7 KB · Views: 52
OP
OP
aaron6920

aaron6920

Sr. Member
Joined
Sep 26, 2010
Messages
405
Loc.
Dorchester, IA
I used Chassis Saver from Magnet Paints after I got the loose rust cleaned up and it really dresses up and protects the inner wheel area. It looks good and I am happy with the results.


Here are some tips from me anyway for fitting the new quarter:

1. You will have to take on and off and trim about 80 million times

2. Get the top seam lined up first and then go to the sides, it really seems to help I had the most trouble getting an acceptable gap along the top seam when I thought I was ok on the sides.

3. Use sheet metal screws to hold up the quarter in place and help you. I used #8 x 3/4" sheet metal screws and they are a life saver.

4. I had to adjust the welder feed up/less heat for the sides and more heat for the top seam. The metal seems like it takes more heat than the sides at least for me.

For being Taiwan fenders they were ok to start, lots of tweeking, the disappointing thing is the metal is much thinner than the original but what can ya do.

Here is some pics. Hopefully more progress to come.
 

Attachments

  • IMG00013-20120505-1417.jpg
    IMG00013-20120505-1417.jpg
    82.5 KB · Views: 53
  • IMG00016-20120505-1713.jpg
    IMG00016-20120505-1713.jpg
    101.3 KB · Views: 53
  • IMG00019-20120505-1715.jpg
    IMG00019-20120505-1715.jpg
    95.9 KB · Views: 59
OP
OP
aaron6920

aaron6920

Sr. Member
Joined
Sep 26, 2010
Messages
405
Loc.
Dorchester, IA
Well just an update on the bronco project I got my passenger side striker replaced that was a real pain in the butt! There are several spot welds to drill out to get the striker out of there. The lip of the quarter panel was also rotten but the rest of the quarter is solid. So I needed to weld onto the quarter panel and smooth it down and it worked pretty well. I just lined up the striker the best I could from eyesight and then clamped and moved ...... until the door finally fit perfect on the striker. Here are some pics.
 

Attachments

  • IMG00065-20120826-1438.jpg
    IMG00065-20120826-1438.jpg
    72.1 KB · Views: 39
  • IMG00066-20120901-1833.jpg
    IMG00066-20120901-1833.jpg
    70.3 KB · Views: 41
  • IMG00072-20120912-1950.jpg
    IMG00072-20120912-1950.jpg
    58.7 KB · Views: 39
  • IMG00076-20120929-1641.jpg
    IMG00076-20120929-1641.jpg
    67.3 KB · Views: 45
OP
OP
aaron6920

aaron6920

Sr. Member
Joined
Sep 26, 2010
Messages
405
Loc.
Dorchester, IA
And a pic with the welds smoothed down. I still have to do a little straightening but overall I am happy.
 

Attachments

  • IMG00081-20121009-1549.jpg
    IMG00081-20121009-1549.jpg
    41.3 KB · Views: 42
OP
OP
aaron6920

aaron6920

Sr. Member
Joined
Sep 26, 2010
Messages
405
Loc.
Dorchester, IA
Now the fun stuff! I ordered an NV3550 and we are going 5 speed :) Got the tranny out and here a couple pics:
 

Attachments

  • IMG_2280.JPG
    IMG_2280.JPG
    97.6 KB · Views: 23
  • IMG_2290.JPG
    IMG_2290.JPG
    117.7 KB · Views: 20
OP
OP
aaron6920

aaron6920

Sr. Member
Joined
Sep 26, 2010
Messages
405
Loc.
Dorchester, IA
Well I wanted to update the bronco progress, I have not been the best at taking pictures this winter but figured I would post a couple.

The NV3550 is in and shifting :), since I had a C4 before I had to replace the column and make it smooth and also utilized a hydraulic slave cylinder for the clutch setup.
 

Attachments

  • IMG_0322.JPG
    IMG_0322.JPG
    201 KB · Views: 24
  • IMG_0323.JPG
    IMG_0323.JPG
    163.4 KB · Views: 24
  • IMG_0326.JPG
    IMG_0326.JPG
    148.9 KB · Views: 22
  • IMG_0318.JPG
    IMG_0318.JPG
    169.7 KB · Views: 22
  • IMG_0328.JPG
    IMG_0328.JPG
    232.9 KB · Views: 25
OP
OP
aaron6920

aaron6920

Sr. Member
Joined
Sep 26, 2010
Messages
405
Loc.
Dorchester, IA
Also reskinned the driver door, my exisiting door was rotten so I bought a used door. I had to reskin it but the aftermarket skin was pretty decent.

I also had one bear of a time with the metal threaded plate that the door bolts into :cry: I had to cut them out, put new in and reweld it.
 

Attachments

  • IMG_0474.JPG
    IMG_0474.JPG
    166.9 KB · Views: 31
  • IMG_0460.JPG
    IMG_0460.JPG
    176.5 KB · Views: 32
  • IMG_0459.JPG
    IMG_0459.JPG
    154.2 KB · Views: 32
  • IMG_0458.JPG
    IMG_0458.JPG
    206.7 KB · Views: 31
  • IMG_0466.JPG
    IMG_0466.JPG
    182.8 KB · Views: 31
  • IMG_0464.JPG
    IMG_0464.JPG
    186.4 KB · Views: 29
OP
OP
aaron6920

aaron6920

Sr. Member
Joined
Sep 26, 2010
Messages
405
Loc.
Dorchester, IA
Had one section of floor that was bad so I just got done replacing that last weekend.

Also filled in the holes for the stock tire carrier, never been a big fan of that :)
 

Attachments

  • IMG_2294.JPG
    IMG_2294.JPG
    127.8 KB · Views: 26
  • IMG_2296.JPG
    IMG_2296.JPG
    94 KB · Views: 25
  • IMG_0471.JPG
    IMG_0471.JPG
    152.3 KB · Views: 26

WheelHorse

Bronco Guru
Joined
Nov 22, 2004
Messages
2,492
Dude, you're kicking butt and taking names. Great work and keep us in the loop.
 
Top