• Welcome to ClassicBroncos! - You are currently viewing the forums as a GUEST. To take advantage of all the site features, please take a moment to register. It's fast, simple and absolutely free. So please join our community today!
    If you have problems registering or can't log into your account, please contact Admin.

Morgan's 1969 Bronco

OP
OP
1969miller

1969miller

Contributor
Jr. Member
Joined
Jan 18, 2022
Messages
146
Loc.
Elk Grove
The full size pitman arms are a bit longer and I think would give me more of a headache. I did take a 791275 and a stock fullsize arm and both were too long. I made a mock up drag link with a stock arm, looks good to start. Can't wait to get some weight on it, see if it clears and then build the track bar to match it.


20240227_205839.jpg

20240227_205917.jpg
20240227_210036.jpg
 

Attachments

  • 20240227_210036.jpg
    20240227_210036.jpg
    248.8 KB · Views: 6

jamesroney

Contributor
Sr. Member
Joined
Sep 11, 2007
Messages
1,792
Loc.
Fremont, CA
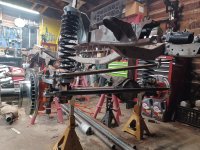
A pair of wooden 4x4's and a ratchet strap are your best friend at this point...with 4.5" WH coils, you are looking at 11.5" from top of tube to bottom of frame. go cut a set of blocks and strap them in. For what you are doing, I'd pull the coil springs and put the gage blocks in now...and ratchet strap the rear. because you need to build your track bar bracket soon, and things start to get cozy.

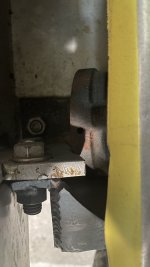
That's where you are going to learn that the tie rod will impact the pitman arm at full stuff. You will either need big bump stops, or you will have to move something.

The first time I went high steer on my front 60, the tie rod stuffed into the tip of the pitman arm, and shot the sector out the top of the 4x4x2 box. Left me with a "not-so-fresh" feeling in my shorts.

At full lock, the pitman arm swings forward. But straight ahead, full compression...they have to clear. At that point, you might have to question your stretch. (...and your sanity.)

It's looking good.
 
OP
OP
1969miller

1969miller

Contributor
Jr. Member
Joined
Jan 18, 2022
Messages
146
Loc.
Elk Grove
About 5min after I posted that last update, saw a bronco out here at UBB with the box pushed forward into the body mount. That's now my plan just to get it out of the way and not worry about it. Thanks for the tips!
 

stout22

Contributor
Bronco Guru
Joined
Dec 13, 2006
Messages
2,723
Loc.
Athens, AL
Amazing mods going on. I'm really interested to see how your steering box and body mount end up.
 

Speedrdr

Contributor
Not so wise OLD owl
Joined
Nov 27, 2017
Messages
1,330
Loc.
Paris, MS
Following as well. Not at the point of rebuilding/upgrading the front end, but looks like moving the steering box may be an easier option (or not) for me.

Randy
 
OP
OP
1969miller

1969miller

Contributor
Jr. Member
Joined
Jan 18, 2022
Messages
146
Loc.
Elk Grove
Here's a general mock up. The box needed to go minimum of 0.75in forward for the tie rod to clear with the stock bronco pitman arm. I'm pushing the box 2.5in forward, and going with a stock 79 bronco pitman arm; it's 1in longer and thicker. Might push the front axle forward another 0.5-1in. The frame will be sleeved and inside frame rail plated. I'll also be cutting frame plates for the entire chassis now. If I've got to plate the front corner for steering box and track bar, I'm doing all of it. I hope I'll thank myself later when I've got solid foundations for sliders and extra rigidity.

Also got the tires mounted so I can roll the chassis around, but mainly so I can have less space in my shop and trip on things...

20240304_191252.jpg

Keep in mind this is still the stock pitman arm length.

20240304_191322.jpg

Looks like I'll be cutting a decent amount away from the crossmember.
20240304_191406.jpg

20240304_192405.jpg

Of course at the end of the day I'll have to notch the core support and maybe clearance the inside of the grill. But glad I'm just getting this overwith now.

20240304_130639.jpg
 

Yeller

Contributor
Bronco Guru
Joined
Mar 27, 2012
Messages
6,189
Loc.
Rogers County Oklahoma
Can’t say what I had to do, I don’t have a bronco chassis…. But this is how far forward mine is and have seen several that far forward. Axle is as far forward as I could get and not rub the headlight a d grill at full articulation and turned straight to full lock. For reference, the yellow is the front of the grill
 

Attachments

  • IMG_1254.jpeg
    IMG_1254.jpeg
    98.1 KB · Views: 26
  • image.jpg
    image.jpg
    150.5 KB · Views: 25
OP
OP
1969miller

1969miller

Contributor
Jr. Member
Joined
Jan 18, 2022
Messages
146
Loc.
Elk Grove
Been busy with side work. Got the chassis moved to work in hopes of getting more done. Dropped the motor in the first day I had it there.
20240531_154524.jpg

Cut off a portion of the lower crossmember for drag link clearance.
20240613_150222.jpg

It will get filled back in once I've confirmed I trimmed enough off.
20240613_150228.jpg


Played with some upper link ideas. Then pulled it all back apart in preparation for the 3 link.
20240613_154138.jpg

20240618_165504.jpg

Switched housings, this is a special retubed 78-79 housing, had it made for another truck that I sold. The tubes are larger, and the Cs haven't been fully welded yet so I can add caster at the end of all this if I need more.
20240619_140311.jpg
 

Yeller

Contributor
Bronco Guru
Joined
Mar 27, 2012
Messages
6,189
Loc.
Rogers County Oklahoma
If you turn the upper link mount on the frame side ways with the bolt vertical you save some significant space. Angle it so the joint is near maximum angle at full bump and you will have plenty of travel as long as your not trying to mount 18” coil overs on a 30” arm. Anything under 14” should be fine.
 
OP
OP
1969miller

1969miller

Contributor
Jr. Member
Joined
Jan 18, 2022
Messages
146
Loc.
Elk Grove
This is looking like my lower link mount placement. Hoping it won't be too low but I think I'll be only able to use the lower bolt hole on the upper link tower, cutting the top 2 mounts off for uptravel. This will leave me with 10in of separation at the axle, upper link 7in above axle centerline, and the lower link 3in below axle centerline.
20240619_163501.jpg
 
OP
OP
1969miller

1969miller

Contributor
Jr. Member
Joined
Jan 18, 2022
Messages
146
Loc.
Elk Grove
I've been doing a ton of work on the 3 link calculator, but at a certain point you need to throw brackets on and see what the real world limitations are. Here's what I've got mocked up so far. I did end up going with a vertical bolt for the frame side upper link for tighter packaging, and the other style would not allow me to remove the bolt if the transmission were installed. Upon final welding I'll clock it so the heim sits in the neutral position at ride height.
20240628_153256.jpg

20240628_155445.jpg

20240628_155508.jpg

20240628_155635.jpg

20240628_124741.jpg

Track bar and drag link are next on the list, then cycling of the suspension!
 

Yeller

Contributor
Bronco Guru
Joined
Mar 27, 2012
Messages
6,189
Loc.
Rogers County Oklahoma
This is looking like my lower link mount placement. Hoping it won't be too low but I think I'll be only able to use the lower bolt hole on the upper link tower, cutting the top 2 mounts off for uptravel. This will leave me with 10in of separation at the axle, upper link 7in above axle centerline, and the lower link 3in below axle centerline.
View attachment 927026
10” is way enough. I’d roll the lower up for better clearance, 10” will support a 42-44” tire, 20-25% of the tire height works well as a rule of thumb, for vertical separation between the links on the axle.

PS: it was great to meet you at super cell Townsend!
 
OP
OP
1969miller

1969miller

Contributor
Jr. Member
Joined
Jan 18, 2022
Messages
146
Loc.
Elk Grove
10” is way enough. I’d roll the lower up for better clearance, 10” will support a 42-44” tire, 20-25% of the tire height works well as a rule of thumb, for vertical separation between the links on the axle.

PS: it was great to meet you at super cell Townsend!
It was nice meeting you as well. Thank you for all the tips I've been indirectly getting from reading some of your posts on here. Good pointers.
 

Yeller

Contributor
Bronco Guru
Joined
Mar 27, 2012
Messages
6,189
Loc.
Rogers County Oklahoma
It was nice meeting you as well. Thank you for all the tips I've been indirectly getting from reading some of your posts on here. Good pointers.
Your welcome. I just try to share the experiences and knowledge. One thing I’ve noticed with the increase in social media and the decline of forums that there has been a general decline of shared knowledge that is searchable, which is leading to a decline of the true ability of the average person to build highly technical things unless you are in certain circles. So I see people trying things that we did 25 years ago as new cutting edge stuff that we walked away from because it didn’t work. We see it in competition, the entry level classes are less capable today than they were 15 years ago, where as if your in the circles of the pro classes the technology is continuing to move forward, to the point that it is now very difficult to challenge those guys without pushing the catastrophic danger envelope. Between the equipment and the drivers it’s unbelievable what they can do.

I’ve said it before, I can’t build them all and if I can help you build a better rig, if we meet on the trail hopefully we’ll be wheeling and not wrenching or winching.
 
Top