• Just a reminder that you won't be able to start new posts or reply to existings posts in the Archive forum.

    This is where all the old posts go so they can still be used for reference and searched.
  • Welcome to ClassicBroncos! - You are currently viewing the forums as a GUEST. To take advantage of all the site features, please take a moment to register. It's fast, simple and absolutely free. So please join our community today!
    If you have problems registering or can't log into your account, please contact Admin.

New Bronco Body Build From The Beginning**Will be at Super Celebration

Velocity Rest.

New Member
Joined
Jul 25, 2013
Messages
25
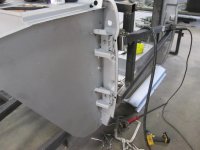
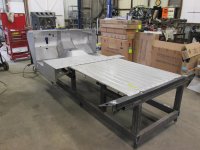
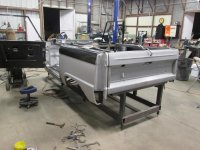
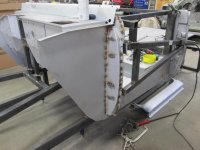
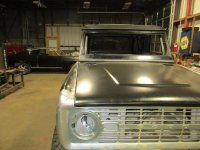
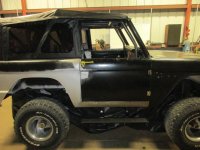
This is a Body that we built with all new metal from Dynacorn here at Velocity Restorations. We built a jig from an original uncut solid Bronco and used that to form the mold for the Dynacorn panels. Let me start off by saying that there is virtually not one panel that they make that did not have to be modified. This was a very intense build and took nearly 300 man hours to build with modifications for proper gaps and panel alignment. I am posting these pictures for anyone to see what they are up against if they set out to build a new tub or a complete body from new metal. I cannot post all of the pictures we have for this build on the forum but if you go to my website velocityrestorations.com you can see the full album. You are more than welcome to email or call me with any questions you might have and I would be more than happy to help you out. Look for us at Super Celebration this year and come take a look at this Bronco.

Contact Info:
Contact: Brandon
Phone: 850-434-6769
Email: Brandon@velocityrestorations.com
 

Attachments

  • IMG_3828 (Copy).jpg
    IMG_3828 (Copy).jpg
    86.7 KB · Views: 529
  • IMG_5013 (Copy).jpg
    IMG_5013 (Copy).jpg
    71.7 KB · Views: 616
  • IMG_4976 (Copy).jpg
    IMG_4976 (Copy).jpg
    104.9 KB · Views: 582
  • IMG_4962 (Copy).jpg
    IMG_4962 (Copy).jpg
    102.9 KB · Views: 547
  • IMG_4957 (Copy).jpg
    IMG_4957 (Copy).jpg
    96.3 KB · Views: 552
  • IMG_4951 (Copy).jpg
    IMG_4951 (Copy).jpg
    88.6 KB · Views: 590
  • IMG_4948 (Copy).jpg
    IMG_4948 (Copy).jpg
    99.1 KB · Views: 551
  • IMG_3884 (Copy).jpg
    IMG_3884 (Copy).jpg
    96.9 KB · Views: 553
OP
OP
Velocity Rest.

Velocity Rest.

New Member
Joined
Jul 25, 2013
Messages
25
Additional Photos
 

Attachments

  • IMG_5132 (Copy).jpg
    IMG_5132 (Copy).jpg
    99.9 KB · Views: 466
  • IMG_5128 (Copy).jpg
    IMG_5128 (Copy).jpg
    100.8 KB · Views: 433
  • IMG_5092 (Copy).jpg
    IMG_5092 (Copy).jpg
    97.1 KB · Views: 437
  • IMG_5061 (Copy).jpg
    IMG_5061 (Copy).jpg
    83.2 KB · Views: 423
  • IMG_5059 (Copy).jpg
    IMG_5059 (Copy).jpg
    93.4 KB · Views: 445
  • IMG_5050 (Copy).jpg
    IMG_5050 (Copy).jpg
    97.6 KB · Views: 444
  • IMG_5049 (Copy).jpg
    IMG_5049 (Copy).jpg
    82.9 KB · Views: 478
  • IMG_5015 (Copy).jpg
    IMG_5015 (Copy).jpg
    84.4 KB · Views: 521
OP
OP
Velocity Rest.

Velocity Rest.

New Member
Joined
Jul 25, 2013
Messages
25
Additional Photos 2
 

Attachments

  • IMG_5390 (Copy).jpg
    IMG_5390 (Copy).jpg
    95.3 KB · Views: 394
  • IMG_5381 (Copy).jpg
    IMG_5381 (Copy).jpg
    95.9 KB · Views: 415
  • IMG_5376 (Copy).jpg
    IMG_5376 (Copy).jpg
    61 KB · Views: 405
  • IMG_5375 (Copy).jpg
    IMG_5375 (Copy).jpg
    80.5 KB · Views: 405
  • IMG_5371 (Copy).jpg
    IMG_5371 (Copy).jpg
    60.4 KB · Views: 419
  • IMG_5370 (Copy).jpg
    IMG_5370 (Copy).jpg
    60.6 KB · Views: 390
  • IMG_5205 (Copy).jpg
    IMG_5205 (Copy).jpg
    105.1 KB · Views: 365
  • IMG_5203 (Copy).jpg
    IMG_5203 (Copy).jpg
    104.3 KB · Views: 389
OP
OP
Velocity Rest.

Velocity Rest.

New Member
Joined
Jul 25, 2013
Messages
25
Additional Photos 3
 

Attachments

  • IMG_0330 (Copy).jpg
    IMG_0330 (Copy).jpg
    107.4 KB · Views: 299
  • IMG_0329 (Copy).jpg
    IMG_0329 (Copy).jpg
    99.2 KB · Views: 328
  • IMG_0328 (Copy).jpg
    IMG_0328 (Copy).jpg
    94.3 KB · Views: 398
  • IMG_5426 (Copy).jpg
    IMG_5426 (Copy).jpg
    77.7 KB · Views: 345
  • IMG_0337 (Copy).jpg
    IMG_0337 (Copy).jpg
    92.2 KB · Views: 383
  • IMG_0346 (Copy).jpg
    IMG_0346 (Copy).jpg
    97.9 KB · Views: 368
  • IMG_5400 (Copy).jpg
    IMG_5400 (Copy).jpg
    93.4 KB · Views: 358
  • IMG_5395 (Copy).jpg
    IMG_5395 (Copy).jpg
    75.2 KB · Views: 411
OP
OP
Velocity Rest.

Velocity Rest.

New Member
Joined
Jul 25, 2013
Messages
25
Additional Photos 4
 

Attachments

  • IMG_0331 (Copy).jpg
    IMG_0331 (Copy).jpg
    85.4 KB · Views: 267
  • IMG_0333 (Copy).jpg
    IMG_0333 (Copy).jpg
    96.5 KB · Views: 308

rcmbronc

Contributor
Bronco Guru
Joined
Dec 15, 2003
Messages
2,717
Loc.
Tomah WI
That is alot of work. Looks great.

The fenders and grill look like a major PITA.

Good job
 

NicksTrix

Bronco Guru
Joined
Aug 1, 2001
Messages
6,389
wait, it all doesn't pop together like Legos? ;)

looks great. huge amount of work to make it right, job well done.
 

BradtheWelder

Full Member
Joined
Sep 3, 2013
Messages
290
Loc.
Moline IL
Velocity, while doing my Bronco I totally know what your saying about modifying every panel. I've needed to do the exact same thing. It's interesting that you guys took the A pillar assembly apart. Why did you guys do that? I'm just wondering.
 

bowhunter

Bronco Guru
Joined
Apr 9, 2005
Messages
1,531
Awesome job and great photo documentation.

Now that the body is almost complete, I'll give you $5K for it?? ;-)~
 
OP
OP
Velocity Rest.

Velocity Rest.

New Member
Joined
Jul 25, 2013
Messages
25
Velocity, while doing my Bronco I totally know what your saying about modifying every panel. I've needed to do the exact same thing. It's interesting that you guys took the A pillar assembly apart. Why did you guys do that? I'm just wondering.
This particular A pillar came in two pieces from Dynacorn coated in weld through primer. We have another tub we are about to start and it is all one piece with the E-coating. Not sure why they did it that way but the two piece with weld through primer would be our preferred way.
 

Traveler25

Jr. Member
Joined
Oct 29, 2014
Messages
52
Loc.
Temecula
Reading other postings on fitting after market front fenders I was curious if you tried fitting the front fenders to grille and the hinge post before you welded the post in place?
You didn't charge your customer for the 300 hours did you?
 
OP
OP
Velocity Rest.

Velocity Rest.

New Member
Joined
Jul 25, 2013
Messages
25
Reading other postings on fitting after market front fenders I was curious if you tried fitting the front fenders to grille and the hinge post before you welded the post in place?
You didn't charge your customer for the 300 hours did you?
We set our A Pillar to our B pillar for proper door alignment, then we build off of that.
We do charge our build hours to the customer because that is what it takes to make these perfect and to have doors a 6 year old can open and shut. There are different levels of builds that require more or less time and this Bronco will be more on the upper level. We have four other tubs behind it waiting to get built.
This post is more of a informational post to give people insight into what goes into building a new tub from new metal and to help people in making the decision on "do I fix my tub" or "do I build a new tub". I hope this helps!
 

JohnJohn

Bronco Guru
Joined
May 6, 2005
Messages
2,159
Loc.
Richmond
Nice work!!!!!!!!!
I spent 4 months aligning my doors and they are only about 90% spot on. If I got to 100% like this bronco I don't think I would drive it for fear of messing it up perfection. :)
 

Justin@WH4x4

Sponsor/Vendor
Jr. Member
Joined
Oct 3, 2013
Messages
104
Looks great guys! Crazy amount of work, but the finished product is outstanding. Thanks for sharing
 

Stutsmo

Contributor
Bronco Guru
Joined
Jan 24, 2009
Messages
2,549
Great pics! this is something I have wondered if I could do if I put my mind to it. What took 300 hours for you would probably translate to 3000 hours for me! Thanks for posting these pics!
 

kb6677

Contributor
Bronco Guru
Joined
Jan 19, 2004
Messages
2,175
Great pics. Nice reality check on "making stuff fit". Adds come very relevant points on "restore a rusty original or buy all new panels". Props to you and crew for attention to detail.
:)
 
Top