Welcome! Yea it looks a little ruff, but from what I see, with your skills. It will be a top notch rig in no time. Looking forward to seeing your progress.


Community
Message Forum
Photo Gallery
Event Calendar
Book Reviews
Bronco Wallpaper
Bronco FAQ
Link Back to CB!
Photo Gallery
Event Calendar
Book Reviews
Bronco Wallpaper
Bronco FAQ
Link Back to CB!
Buy / Sell


Bronco Tech
3 Arm Wiper Setup
Fix Motor Mount
Roll Cage Braces
Throttle Body 65mm
Wheel Alignment
Heat Riser Replacement
Vent Window Repair
Center Console Mount
Straighten Bumper
Ford 6R80 6 spd
More Tech...
Fix Motor Mount
Roll Cage Braces
Throttle Body 65mm
Wheel Alignment
Heat Riser Replacement
Vent Window Repair
Center Console Mount
Straighten Bumper
Ford 6R80 6 spd
More Tech...

Install the app
-
Welcome to ClassicBroncos! - You are currently viewing the forums as a GUEST. To take advantage of all the site features, please take a moment to register. It's fast, simple and absolutely free. So please join our community today!If you have problems registering or can't log into your account, please contact Admin.
You are using an out of date browser. It may not display this or other websites correctly.
You should upgrade or use an alternative browser.
You should upgrade or use an alternative browser.
New member checking in. 1974 Project
- Thread starter Nemisus
- Start date
Nemisus
Jr. Member
Nemi,
It's just an anti-spam feature. Since you posted photos (links) in your very first post it automatically puts you in the moderation queue for me to review. (because spammers always post links immediately)
But you're good to go now and it won't happen again now that you've got some posts under your belt.
Welcome to the site! Nice project you've got there.
Thank you for this feedback. I had wondered if this might be the case. Its actually a very cool feature!
Hey Nemi,
Welcome aboard!! As one of the members put it in a "build thread" that I read, drag that thing over to the shade tree and get out your best cardboard creeper and lets get busy. I'm new to the forum also but have been reading and learning at a fast pace. I am in the tear-down phase on my truck and have just placed a large order for parts. The forum has a lot of information and it takes time to sift through everything. A great place to start is looking at the "build threads". The link for them is at the top of the Bronco Chat section. Those are threads that show bronco builds from the start (like you and me) to the finish. I'm still going through them. I'll attach a quick photo of my truck. Looking forward to comparing notes with you as our builds progress.Wart
This is sound advice and I really can't wait to get started. All I can say is my list is growing by the day.
Thanks for sharing your rig.
71 CA Bronco
Sr. Member
- Joined
- Nov 25, 2015
- Messages
- 764
Congrat's! While that may look rough it actually appears very solid!
Ditto! A little paint will go a long way on that one.
sykanr0ng
Bronco Guru
- Joined
- Aug 11, 2014
- Messages
- 5,363
Don't follow the fad of welding in patches to make it back to an uncut and you won't need to lift it as high for the tires you want.
Consider a 1 inch or 2 inch body lift if it does not have one, and if it does have one look at whether it needs replaced.
Cardboard creeper?
Mac Tools has a nice pad that I've seen, or there is always plywood.
Consider a 1 inch or 2 inch body lift if it does not have one, and if it does have one look at whether it needs replaced.
Cardboard creeper?
Mac Tools has a nice pad that I've seen, or there is always plywood.
CopperRanger
Bronco Guru
- Joined
- Sep 26, 2007
- Messages
- 1,795
Nemisus
Jr. Member
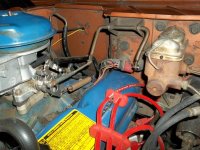
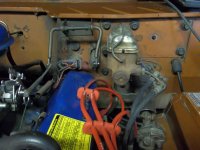
Sorry I didn't get these up yesterday for you, I completely forgot. Hope these help out.
No problem Copper,
Thank you for these though. This will give me a nice place to start should I decide to keep the bell crank set up.
warthog6x6
Jr. Member
Not to be disruptive but an earlier poster mentioned a "throttle cable" instead of using the bell crank method. Anybody have a pic of that alternative? It sounds good though.
Nemisus
Jr. Member
Not to be disruptive but an earlier poster mentioned a "throttle cable" instead of using the bell crank method. Anybody have a pic of that alternative? It sounds good though.
warthog,
not disruptive at all! I too was interested in this alternative method but failed to follow up on it.
;D
70_Steve
Old Guy
- Joined
- Dec 13, 2002
- Messages
- 8,317
Not to be disruptive but an earlier poster mentioned a "throttle cable" instead of using the bell crank method. Anybody have a pic of that alternative? It sounds good though.
I looked on my PC last night for pics of the install I did, and apparently I didn't take any.not disruptive at all! I too was interested in this alternative method but failed to follow up on it.
I decided to install a throttle cable because I had "surging" problems when driving off-road. When trying to drive over an obstacle and adding just a little throttle, the engine torques to the passengers side. This would increase the distance between the carb and the throttle bellcrank, resulting in an unintended amount of throttle opening. Then, when letting off the gas to try to compensate, the engine relaxes back to the drivers side, resulting in the throttle closing too much. Imagine that happening half a dozen times in rapid succession, followed by your wife shooting you one of those WTF looks!!! A throttle cable resolved all of that!
Most of the vendors sell a throttle cable. I chose a Lokar cable purchased from Summit Racing. The install was simple enough. Mount a ball stud on the carb linkage for the cable to attach to. Remove the pedal assy and remove the ball stud from the top, where the mechanical linkage attached, and mound the clevis. The stock pedal assy needs to be bent to the drivers side just a little to get the cable to align with the housing. Mount the throttle cable bracket to the base of the carb. Cut the housing and cable to length. I did have to "fabricate" a small plate to mount the firewall end of the throttle cable housing.
The throttle cable housing does make a pretty tight "S" turn, coming out of the firewall, then doubling back to come into the back of the carb. A call to Lokar technical support, looking for minimum bend radius specs, informed me that, as long as the housing doesn't kink, it's OK.
I'm running EFI now, and just replaced the cut-off Lokar cable with a longer one.
warthog6x6
Jr. Member
Great!! And thanks from those of us that think bell crank linkage looks too 1920's. I'll work on it.
Also, love your signature "If it's got tits or tires it's gonna be a problem". Is that ever the truth! Wart
Also, love your signature "If it's got tits or tires it's gonna be a problem". Is that ever the truth! Wart
Nemisus
Jr. Member
Great information! I now may go a different direction. Still have another project to move before I can really focus on this one. I get super excited every time I think of it.
Cheers
Cheers
Nemisus
Jr. Member
Update
Good evening Classic Broncos!
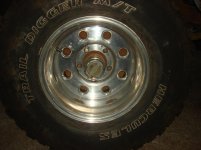
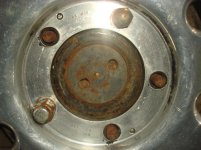
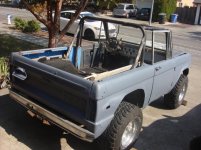
Projects tend to have me constantly searching and shopping for the next purchase. Well this morning I came across a CL ad that I just couldn't pass on. After work today I bought a very nice set of Weld Racing wheels wrapped in 33" tires.
Wheels were the last thing to buy for this build, but I just couldn't pass on a set of matching wheels with decent rubber attached.
While the offset is not my first choice the stance of the bronco has improved! ;D


isn't it amazing how a simple change can transform the entire look?
Thanks for looking
Cheers
Nemi
Good evening Classic Broncos!
Projects tend to have me constantly searching and shopping for the next purchase. Well this morning I came across a CL ad that I just couldn't pass on. After work today I bought a very nice set of Weld Racing wheels wrapped in 33" tires.
Wheels were the last thing to buy for this build, but I just couldn't pass on a set of matching wheels with decent rubber attached.
While the offset is not my first choice the stance of the bronco has improved! ;D
isn't it amazing how a simple change can transform the entire look?
Thanks for looking
Cheers
Nemi
Attachments

Last edited:
Nemisus
Jr. Member
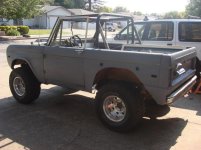
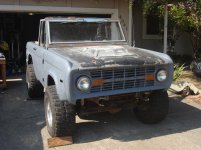
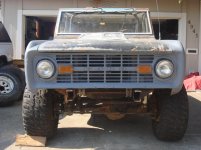
A little something to make the neighbors feel better about looking at an eye sore! Amazing what a little rattle can primer can do.
There were several bare metal areas so I figured it made sense.


I find the solid color primer and matched wheels and tires bring this project a very long way!
Back to the list of things needed.
Cheers
Nemi
There were several bare metal areas so I figured it made sense.
I find the solid color primer and matched wheels and tires bring this project a very long way!
Back to the list of things needed.
Cheers
Nemi
Attachments
Last edited:
bronconut73
Bronco Guru
- Joined
- Aug 7, 2012
- Messages
- 9,916
I really like the Welds man!
Nemisus
Jr. Member
I really like the Welds man!
Thanks Bronconut!
Given what Weld Wheels typically cost I couldn't believe what I paid for these with decent tires too!
I think the next on my list is to get a new hood. Can't decide against steel or fiberglass?
Nemisus
Jr. Member
Pulled the carpet yesterday. (Sorry no pics yet)
I was pleasantly surprised that the rust was minimal. Still bad enough I'll need to replace both front floor plans and maybe part of the forward tunnel.
I'll have some pics up later this week so maybe the pro's can chime in.
I was pleasantly surprised that the rust was minimal. Still bad enough I'll need to replace both front floor plans and maybe part of the forward tunnel.
I'll have some pics up later this week so maybe the pro's can chime in.
Nemisus
Jr. Member
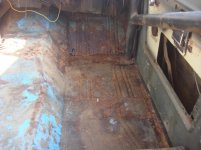
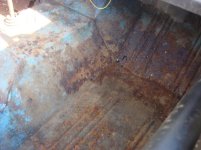
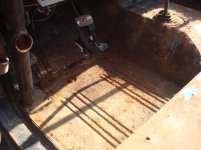
As promised! Here are a few shots of the floor damage. All in all I think it could be a lot worse.


Lighting was terrible so a few of the shots I took were unusable. I am considering just replacing the left and right floor and patching the tunnel, but it might just be easier to do the whole thing. I will be ordering in a few days.
Cheers
Nemi
Lighting was terrible so a few of the shots I took were unusable. I am considering just replacing the left and right floor and patching the tunnel, but it might just be easier to do the whole thing. I will be ordering in a few days.
Cheers
Nemi
Attachments
Last edited:
Nemisus
Jr. Member
Update:
Haven't done much since the last picture posted. Bought a pair of rocker panels to replace the damaged one. I think I will return them though. I should have bought the complete rocker instead of the patch panel.
The good thing is I'll be attending the October 1st show and shine at TBP so I'll be able to swap out in person. I will also be filling a large list of needed parts while I am there.
Yesterday I removed the Roll Bar and decide its not the one I want.
Anyhow, not much of an update... I'll do better in the weeks to come!
Similar threads
- Locked
City: Midland
Price: $250
- Replies
- 3
- Views
- 352