• Just a reminder that you won't be able to start new posts or reply to existings posts in the Archive forum.

    This is where all the old posts go so they can still be used for reference and searched.
  • Welcome to ClassicBroncos! - You are currently viewing the forums as a GUEST. To take advantage of all the site features, please take a moment to register. It's fast, simple and absolutely free. So please join our community today!
    If you have problems registering or can't log into your account, please contact Admin.

New member checking in. 1974 Project

OP
OP
N

Nemisus

Jr. Member
Joined
Aug 13, 2016
Messages
142
Loc.
North Bay, CA
I'd say it's the original engine. The "O" just means it was originally cast for Torino/Fairlane line. But over the years this same casting number was used in other car/truck lines.

Interesting stuff!

It would be awesome if it were the original engine!! Appreciate the link as well. :cool:
 
OP
OP
N

Nemisus

Jr. Member
Joined
Aug 13, 2016
Messages
142
Loc.
North Bay, CA
Just a little update since I haven't posted anything new.

Recently took delivery on a set of Corbeau Baja RS Seats. My first impression are these are great quality seats. My 2nd impression, once thoroughly looked at, are that these are very small framed. I get that the Bronco isn't a very big vehicle, but these seats were not designed around anyone 6' or taller, 200 lbs or heavier. I also found a spot where the vinyl was compromised during shipping. Not cool given how much these things cost.

That being said I think I will find myself loving them once they are mounted. Hard to get a feel for something that isn't in its right place.

Here are a few pictures of the goods:

attachment.php


attachment.php


attachment.php


attachment.php


Anyway there you have it! Next weekend is going to be a good weekend as I'll be taking care of a big shopping list while visiting Medford OR. I'll also be attending the Show and Shine at TBP's.

Thanks for viewing!

Nemi
 

Attachments

  • 43.jpg
    43.jpg
    106.6 KB · Views: 18
  • 72.jpg
    72.jpg
    51.4 KB · Views: 18
  • 73.jpg
    73.jpg
    73.1 KB · Views: 18
  • 44.jpg
    44.jpg
    100.1 KB · Views: 18
Last edited:
OP
OP
N

Nemisus

Jr. Member
Joined
Aug 13, 2016
Messages
142
Loc.
North Bay, CA
I also wanted to add that the brackets sold by Corbeau that are specific to the bronco and are required for these seats are of the poorest quality I have seen given what was charged.

Bolt holes do not line up on the driver side, and the passenger side brackets doesn't even have the holes drilled. Neither side of the passenger bracket lines up to where the holes should be anyway and its terribly uneven. One side is higher than the other causing it to rock from side to side.

I'll have to modify the brackets just to get them to work. Shame given what these things cost.
 
OP
OP
N

Nemisus

Jr. Member
Joined
Aug 13, 2016
Messages
142
Loc.
North Bay, CA
Update:

So the family and I decided to take a road trip. Last week we headed north to Oregon for a long weekend in Medford OR. I was born and raised in a small town south of Medford (CA side) and decided it would be a good time to see some family. It also didn't hurt that TBP was holding a Bronco Show and Shine.

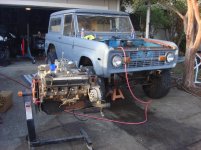
I spent a good chuck of money last weekend but I made a dent in the parts list. The kind of parts that cost a lot of "freight" when shipped.

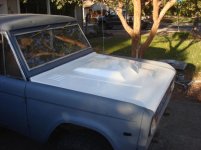
Among the list was a new classic scooped fiberglass hood. Here is a picture of it mocked up.

attachment.php


attachment.php


attachment.php


attachment.php


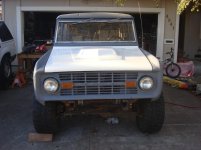
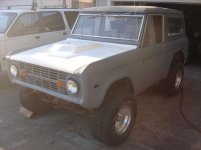
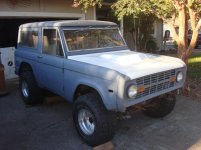
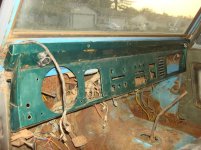
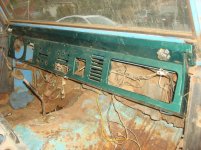
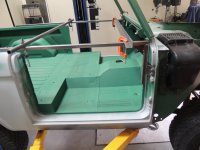
In addition to the hood I purchased both left and right front fenders, rear fender skirts, 3 sided rockers for both sides, driver and passenger side floor panels with passenger rear panel, 4 point Roll Bar, and a take off dash board.

My only complaint is that when I finally got everything home and opened the box with the floor panels the rear passenger piece is unusable. Bent and twisted in a fashion that I just can't figure out how it got that way?

Thanks for looking! The build is slow but steady!

cheers

Nemi
 

Attachments

  • 14.jpg
    14.jpg
    92.5 KB · Views: 18
  • 17.jpg
    17.jpg
    87.4 KB · Views: 18
  • 13.jpg
    13.jpg
    71 KB · Views: 19
  • 15.jpg
    15.jpg
    103.6 KB · Views: 18
Last edited:
OP
OP
N

Nemisus

Jr. Member
Joined
Aug 13, 2016
Messages
142
Loc.
North Bay, CA
Update:

Weekend was "fruitful"... I managed to pull the steering column out as well as all the necessary wires that were spliced in.

My newly acquired dash fits nicely in place and is period correct. Thanks to TBP's for the amazing deal on it too!

I'll have a picture or two up soon. Next step is to get whats left of the Dash harness removed so I can really see what's going on underneath it all.

Thanks for looking
 
OP
OP
N

Nemisus

Jr. Member
Joined
Aug 13, 2016
Messages
142
Loc.
North Bay, CA
as promised here are a few angles of the "new to me" Dash. Needs a little work, but for what I paid its a nice addition. This is just a Mock Up and much is needed to be done before the Dash goes in.

attachment.php


attachment.php


Its not much to show off... obviously the green is coming off and it'll be painted accordingly.

Cheers and thanks for viewing

Nemi
 

Attachments

  • 20.jpg
    20.jpg
    121.7 KB · Views: 43
  • 18.jpg
    18.jpg
    131.9 KB · Views: 43
Last edited:

broncoitis

Bronco Guru
Joined
Jul 23, 2010
Messages
4,449
Nemi, Looks like a great project. Love the Bronco II that you had. Had one myselt and it was a fun little truck. However it was nothing compared to yours. Would love to see some pics of the one you had with the chopped top you mentioned. Otherwise you have a decent starting Bronco. Good Luck with the build! ;D
 
OP
OP
N

Nemisus

Jr. Member
Joined
Aug 13, 2016
Messages
142
Loc.
North Bay, CA
Nemi, Looks like a great project. Love the Bronco II that you had. Had one myselt and it was a fun little truck. However it was nothing compared to yours. Would love to see some pics of the one you had with the chopped top you mentioned. Otherwise you have a decent starting Bronco. Good Luck with the build! ;D

Thanks broncoitis,

I have always been a fan of the Bronco. The BII was my first vehicle after getting my license. It might take some time to locate any good photos of the chopped BII as I lost a lot of pictures over the years. I'll do some digging and I bet I find some.

The SAS BII pictured in the thread was certainly something I let go too easily. Lots of blood sweat and tears into that beast. In the end though I ended up with an Early Bronco with is something I have always wanted.

Congrats Nemisus ,
Nice Bronco ...
74
Looks like Grabber Blue
And C4 ?
Might be an Original Explorer Packege

Thanks BroncoBoom,

Per the Marti Report I recently purchased the color is, you called it... Grabber blue. Does have the C4 and if I remember correctly it has a Ranger Package not the Explorer. At least that is what the report says.

When I get home from work I'll upload a copy for viewing.

Cheers guys and thanks again

Nemi
 
Last edited:
OP
OP
N

Nemisus

Jr. Member
Joined
Aug 13, 2016
Messages
142
Loc.
North Bay, CA
As promised. My recently completed Deluxe Marti Report

attachment.php


Thanks for viewing
 

Attachments

  • 19.jpg
    19.jpg
    167.8 KB · Views: 45
Last edited:
OP
OP
N

Nemisus

Jr. Member
Joined
Aug 13, 2016
Messages
142
Loc.
North Bay, CA
Broncoitis,

Here is a link that I was able to dig up to an article that The Ranger Station (TRS) did on the chop top back in 2004. Click the Feature Tab for a detailed bit on the 88. Sadly I sold it to a friends girlfriend who promptly rolled it being stupid. She walked away but the bronco was a loss. This build isn't nearly as cool as the SAS I did on the 87, but it still carries a cool factor of its own.

http://www.therangerstation.com/Magazine/June04/index.htm
 
OP
OP
N

Nemisus

Jr. Member
Joined
Aug 13, 2016
Messages
142
Loc.
North Bay, CA
Update:

Decided to pull the 302 this afternoon. Went fairly well I think. Next step is to get the TUB off... anyone got any ideas?

attachment.php


For some reason I really like this picture! :cool:
 

Attachments

  • 11.jpg
    11.jpg
    122.6 KB · Views: 44
Last edited:
OP
OP
N

Nemisus

Jr. Member
Joined
Aug 13, 2016
Messages
142
Loc.
North Bay, CA
It is easy to pull the body off but you need to brace it good before you do.

hey fordguy,

any recommendations on where I should brace? I was planning on putting the TUB on a rotisserie. I might just consider just getting it off the frame a foot or so instead of completely off. Just long enough to do a quick inspection and clean up of frame.
 
OP
OP
N

Nemisus

Jr. Member
Joined
Aug 13, 2016
Messages
142
Loc.
North Bay, CA
No worries 904. I may be rethinking my build. While I'd love to do a frame off, I man have the means to do it at this time. I am considering a way that I can raise the Tub off the frame about 6" or so so I can get in and do the work that way. Not idea, but easier than pulling the entire body from the frame.
 

Justafordguy

Bronco Guru
Joined
Sep 26, 2009
Messages
6,253
hey fordguy,

any recommendations on where I should brace? I was planning on putting the TUB on a rotisserie. I might just consider just getting it off the frame a foot or so instead of completely off. Just long enough to do a quick inspection and clean up of frame.

If you lift it at all you need to brace it. The door opening is the most critical but bracing across the bed front and back is a good idea too.

If you have a hard top on it, leave the tailgate and doors closed/latched and support the body from the bottom with blocks as you lift it off the frame you can probably get by. Just lift it off the frame a little and block it up as you go.
 
Top