• Just a reminder that you won't be able to start new posts or reply to existings posts in the Archive forum.

    This is where all the old posts go so they can still be used for reference and searched.
  • Welcome to ClassicBroncos! - You are currently viewing the forums as a GUEST. To take advantage of all the site features, please take a moment to register. It's fast, simple and absolutely free. So please join our community today!
    If you have problems registering or can't log into your account, please contact Admin.

*pics* of my port job

N.FloridaBronc

Full Member
Joined
Mar 30, 2004
Messages
249
Loc.
Tallahassee area
69 351w heads
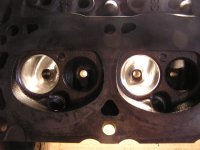
Not done yet, and still have the exhaust side to do but you get the idea...

$48 worth of bits and a LOT of patience. (A good coach helps too)
 

Attachments

  • port1.JPG
    port1.JPG
    64.3 KB · Views: 124
  • port2.JPG
    port2.JPG
    76.1 KB · Views: 104
  • port3.JPG
    port3.JPG
    72.3 KB · Views: 98
  • port4.JPG
    port4.JPG
    66.7 KB · Views: 121

74horse

Jr. Member
Joined
Apr 1, 2004
Messages
96
Loc.
Orlando, FL
Looks good. I am still poking along here in Gainesville. I didn't realize two toddlers could put such a damper on a Bronco project. Good to see your making progress.
 

2badrotties

Just a Bronco guy !
Joined
Sep 10, 2002
Messages
6,854
Loc.
Niskayuna N.Y.
4x4Alaska said:
dude, that's awesome....I wanna try that....more details please!....oooooohhhhh shiney! ;D


Shiney yes. Bigger yes. 69 heads.... NOT ! Those chambers much too big for 69 heads.
 
OP
OP
N.FloridaBronc

N.FloridaBronc

Full Member
Joined
Mar 30, 2004
Messages
249
Loc.
Tallahassee area
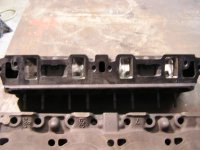
casting number IS "C90E". They are 69's... 60cc chambers. They also have the "L" shaped water ports at either end of the intake surface. To my knowledge the only FoMoCo heads ever made with the water ports shaped like that are 351W heads from 1969 to 1974. Every other 351W head, from 1975 on, is just a 302 head with bigger head bolt holes...

I'll post more pics tomorrow with the casting numbers.
 
OP
OP
N.FloridaBronc

N.FloridaBronc

Full Member
Joined
Mar 30, 2004
Messages
249
Loc.
Tallahassee area
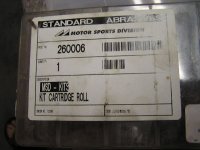
JoshuaTrapp -- I'll get the part number for the kit off the box tomorrow. I ordered it from NAPA.

74horse -- good to hear from you. Well, yeah, I'm making some progress but it's incredibly slow going. I only get a few hours a week to work on it. Feels like I'll never get to drive it. Realisticly... probably a year to go.

Jeff
 

mtkawboy

Bronco Guru
Joined
Jan 28, 2004
Messages
1,525
Loc.
Billings Mt
Dont get your pantys in a wad, I was just helping you to deteremine if you had 69 heads for sure. Im not the guy who said you didnt.
 

broncnaz

Bronco Guru
Joined
May 22, 2003
Messages
24,341
Dont know if its just the pic's or what but the intake ports should not be polished you get better results if left slightly rough. But on the exhaust side plish to your hearts content as it helps keep carbon from sticking. You going to go with bigger valves? like 1.90/1.60s that would really help flow. more than your present porting although you would need to port it slightly for the bigger valves.
 
OP
OP
N.FloridaBronc

N.FloridaBronc

Full Member
Joined
Mar 30, 2004
Messages
249
Loc.
Tallahassee area
joshuatrapp -- (ordered from NAPA) see pics for porting kit part #. I did have to go get another box of sanding rolls, that turned out to be another $42.00. The porting kit doesn't come with enough. But now I'll have a lot left over. I think.

bannind -- the only before pic I have is from the ebay listing. I won the bid at $46.00. see below.

broncnaz -- yeah, that's 80 grit on the intake. I think your right. I think I got a little carried away, had a few beers and was kinda in a zone... they do feel a little rough to the touch but I think I'm going to go back in and rough that back up a little more. I will be polishing the exhaust like a mirror, as well as the chambers. I've got them to the point now where I need to get the valves cut and the sleeves and studs done. Doing hardened exhaust seats with Chebby valves.

It's a painfully slow process. I'm learning that patience and a light touch is important. I have to keep reminding myself to let up on the pressure. Safety glasses are a MUST at all times. The metal dust gets everywhere. In your ears, in your hair, your teeth, etc. There's no way I would try it without experienced help coaching me. It's funny though, every time I would look up he would just be shaking his head and laughing at me. Then he'd crack another beer. %) I hope this motor runs at all. I'll be lucky if it doesn't fall on it's face :-[

I'll post more pics as the process goes on.
 

Attachments

  • KIT1.JPG
    KIT1.JPG
    64 KB · Views: 14
  • KIT2.JPG
    KIT2.JPG
    64.3 KB · Views: 13
  • LSHAPED.JPG
    LSHAPED.JPG
    66.3 KB · Views: 24
  • headsb4.jpg
    headsb4.jpg
    21.8 KB · Views: 23
  • C90E.JPG
    C90E.JPG
    78.9 KB · Views: 15

Madgyver

Bronco Madman
Joined
Jul 30, 2001
Messages
14,754
Nice work but it's the exhaust ports that you would want polished. The intake side needs to be a little coarse on the surface to keep incoming fuel in suspension. If you're removing alot of material be careful, you could do more harm than good. Just help out the radius in the runners and unshroud the intake valves. post more pics....
 
Top