• Just a reminder that you won't be able to start new posts or reply to existings posts in the Archive forum.

    This is where all the old posts go so they can still be used for reference and searched.
  • Welcome to ClassicBroncos! - You are currently viewing the forums as a GUEST. To take advantage of all the site features, please take a moment to register. It's fast, simple and absolutely free. So please join our community today!
    If you have problems registering or can't log into your account, please contact Admin.

Project Crawln68 (New pics 12/11/05)

crawln68

Bronco Guru
Joined
Oct 8, 2004
Messages
3,045
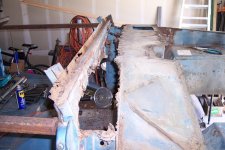
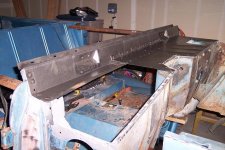
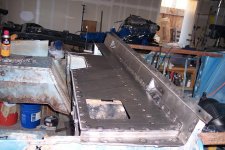
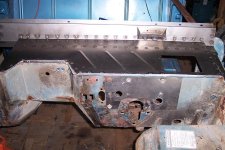
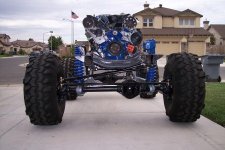
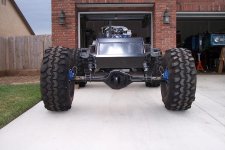
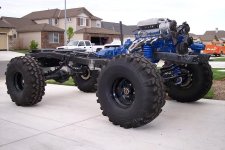
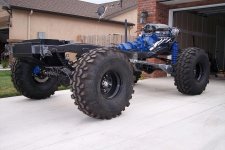
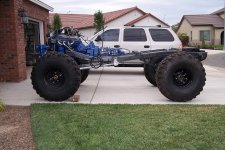
Well....I rolled her out of the garage for the first time today. I feel like a proud daddy! I started this project back in November and I finally have the chassis ready for the body.

Here are the stats:

HO 5.0 EFI
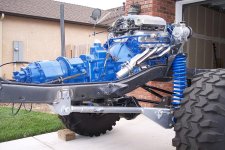
NP435 to NP203/205 doubler
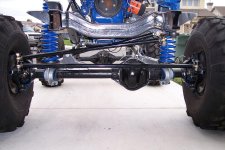
Full Width Heavy Duty 3/4 ton HP D44, 30 spline 4340 Moser axles w/ Super Yukon u-joints, Warn hubs
Full Width FF D60, 35 spline Yukon axles
5:13 R & P
ARB's front & rear
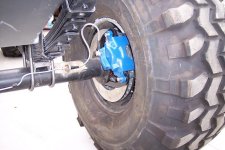
Stone Crusher Steering on top of High Steer arms
Saginaw pump to F-150 4x4 stering box
Four wheel disc brakes
5.5 Wild Horse Rock Crawler Spings and 5.5 11 leaf pack
CAGE extended Radius Arms
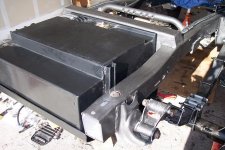
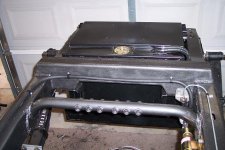
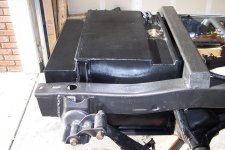
BC 24 gal rear tank w/skid plate
Rear axle is stretched back 4 inches
38.5 x 16 Swampers on 15 inch black steel rims
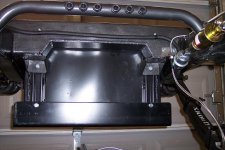
and a lot of custom fab work on the t-case crossmembers and rear frame crossmember, lower trac bar mount, ect...
 

Attachments

  • 100_0419.JPG
    100_0419.JPG
    63.3 KB · Views: 486
  • 100_0422.JPG
    100_0422.JPG
    58.1 KB · Views: 418
  • 100_0429.JPG
    100_0429.JPG
    59.7 KB · Views: 454
  • 100_0430.JPG
    100_0430.JPG
    69.8 KB · Views: 501
  • 100_0428.JPG
    100_0428.JPG
    81.4 KB · Views: 585
  • 100_0424.JPG
    100_0424.JPG
    61.5 KB · Views: 456
  • 100_0423.JPG
    100_0423.JPG
    59.6 KB · Views: 394
  • 100_0421.JPG
    100_0421.JPG
    90.5 KB · Views: 516
Last edited:

mp

Bronco Guru
Joined
Dec 22, 2001
Messages
2,914
Loc.
Austin, TX
Guess I did not pay close enough attention. Can you show some pics of your rear crossmember fab as a reult of the 4" stretch? Did you have to modify Chucks tank at all? Do you forsee and problems with the high steer set up interferring with the front cross member? Any reason you did not kick the front end forward a couple inches?

Looks great, and gives me inspiration. I have a similar concept brewing in my head for my darkside EB.
 
Last edited:
OP
OP
crawln68

crawln68

Bronco Guru
Joined
Oct 8, 2004
Messages
3,045
mp said:
Did you modify the cross member for your rear axle stretch? What about fuel tank? Are you going with a cell in the bed? Are you going to have issues with the high sterr hitting the front cross member? I guess you could always move the front end forward a couple of inches too.

Looks great, and gives me insperation


Yes, I cut out the rear crossmember and fabbed a new one that gives me an extra 3 inches of height so the diff doesn't make contact. I am going to run a 2 inch body lift, so this gave me a little more room to move things up. I moved the crossmember and the gas tank back 4 inches to allow enough room to move the axle back. I considered going to a fuel cell, but I really didn't want to loose my bed. All of the steering linkages look like they will be fine. The pitman arm on the F-150 4x4 box is longer than the stock one. This puts the drag link behind the frame crossmember. ;D I won't know for sure until I get the body on and flex her up. ;)
 

Attachments

  • 100_0359.JPG
    100_0359.JPG
    75.8 KB · Views: 385
  • 100_0355.JPG
    100_0355.JPG
    66.2 KB · Views: 333
  • 100_0354.JPG
    100_0354.JPG
    67.6 KB · Views: 324
  • 100_0353.JPG
    100_0353.JPG
    69.7 KB · Views: 374

MnkyBiz

Bronco Guru
Joined
Jan 17, 2004
Messages
3,758
Loc.
Northern VA/DC
Wow wow wow!

I really want to start custom ground up one day!

Did you begin with a stock frame or with a Matkins?

Cheers on the great work!
 

Blue71

Contributor
Bronco Guru
Joined
Aug 27, 2001
Messages
5,147
Holy Sheep SH!t...Man that thing looks great.

Blue71
 

bigpappa

Bronco Guru
Joined
Mar 5, 2003
Messages
1,035
Loc.
Gardendale Al
Awsome Job. I am going to be doning basically the same thing to mine. Looking good, keep up the good work and keep posting pics!!!!
 

Brewbro21

Sr. Member
Joined
Jul 4, 2004
Messages
919
That does look good. I hope to do a frame off on mine one day in the very distant future.
 
OP
OP
crawln68

crawln68

Bronco Guru
Joined
Oct 8, 2004
Messages
3,045
MnkyBiz said:
Wow wow wow!

I really want to start custom ground up one day!

Did you begin with a stock frame or with a Matkins?

Cheers on the great work!

Thanks to all of you guys. MnkyBiz, I started with a rusty ol' stock frame. ;D
 
Last edited:

Tgure

Bronco Guru
Joined
Jan 2, 2004
Messages
1,152
Loc.
Phoenix
Patrick,

That looks awesome. I like the contrast with the blue, black, and gray of the Cage arms. After seeing yours I should have not made everything black on mine %) Oh well can always take it apart again right? Keep up the good work ;D
 

4x4Alaska

Sr. Member
Joined
Feb 5, 2002
Messages
894
Loc.
Wasilla, Alaska
SWEET!! :eek: I love the look of a tricked out rolling chassis...awesome job man...is the body ready for it? Man, I am slackin' in the garage. :mad: .
 
OP
OP
crawln68

crawln68

Bronco Guru
Joined
Oct 8, 2004
Messages
3,045
4x4Alaska said:
SWEET!! :eek: I love the look of a tricked out rolling chassis...awesome job man...is the body ready for it? Man, I am slackin' in the garage. :mad: .


Thanks. Unfortunately the body needs quite a bit of work before it will be ready to put back on. I need to replace some sheet metal and throw a paint job on it first.
 
OP
OP
crawln68

crawln68

Bronco Guru
Joined
Oct 8, 2004
Messages
3,045
Well I made a little progess on my cowl today. In case you missed when I originaly posted pics of my cowl, this is what I started with.
 

Attachments

  • 100_0440.JPG
    100_0440.JPG
    64.9 KB · Views: 508
OP
OP
crawln68

crawln68

Bronco Guru
Joined
Oct 8, 2004
Messages
3,045
Here it is after I cut out the rusty windshield support and and cowl. Looks kind of wierd, huh?
 

Attachments

  • 100_0441.JPG
    100_0441.JPG
    74.8 KB · Views: 389
  • 100_0442.JPG
    100_0442.JPG
    66.1 KB · Views: 358
OP
OP
crawln68

crawln68

Bronco Guru
Joined
Oct 8, 2004
Messages
3,045
Here is the new windshield support. Yeah, that's looking better. :p
 

Attachments

  • 100_0446.JPG
    100_0446.JPG
    64.1 KB · Views: 304
  • 100_0445.JPG
    100_0445.JPG
    63.8 KB · Views: 308
OP
OP
crawln68

crawln68

Bronco Guru
Joined
Oct 8, 2004
Messages
3,045
And here it is with the new drivers side cowl in place. Lot of work! I'm done for tonight. Tomorrow I'll get the passenger side cowl in. :)
 

Attachments

  • 100_0447.JPG
    100_0447.JPG
    67.5 KB · Views: 271
  • 100_0449.JPG
    100_0449.JPG
    71.5 KB · Views: 299
  • 100_0451.JPG
    100_0451.JPG
    66.6 KB · Views: 327

Tgure

Bronco Guru
Joined
Jan 2, 2004
Messages
1,152
Loc.
Phoenix
Lookin good. Man you work fast. It is too damn hot here I can squeeze about 2 hours before I gotta go jump in the pool. %)
 

MnkyBiz

Bronco Guru
Joined
Jan 17, 2004
Messages
3,758
Loc.
Northern VA/DC
Look very clean!

If you are using the mass produced passenger side cowls, test fit her before you attempt to alter the original shape. The piece I purchased didn't fit my rig at all. I ended up having to look elsewhere.

Congratulations!
 
Top