• Welcome to ClassicBroncos! - You are currently viewing the forums as a GUEST. To take advantage of all the site features, please take a moment to register. It's fast, simple and absolutely free. So please join our community today!
    If you have problems registering or can't log into your account, please contact Admin.

Rebuilding rear leaf springs

Crawdad

Bronco Guru
Joined
Feb 16, 2011
Messages
3,635
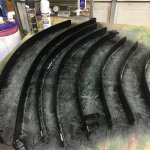
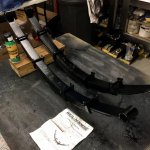
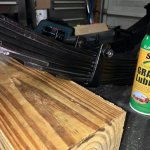
I was able to pick up a used 3.5" SL from Broncomatt a few years ago. I recently had them taken apart and sand blasted individually. Now I'm in the process of priming and painting as you can see. Most of the plastic pads are in decent shape.

I read somewhere that I might want to sandwich in thin sheets of tin??? Is that true? How thick should I use? I've never seen any thin metal sandwiched in between each leaf so that's why I'm asking the gurus. Thanks for any advice!
Matt
 

Attachments

  • IMG_1976.jpg
    IMG_1976.jpg
    186 KB · Views: 65

Tonka7777

Sr. Member
Joined
Nov 15, 2010
Messages
466
Loc.
Greenville
I did the same thing to my Wild Horses 11 pack leaf springs. There are thin pieces of metal between the springs in the center and they had a coating of grease on them. They are 20 gauge and galvanized with a hole in the center for the post.
 

jckkys

Bronco Guru
Joined
Mar 15, 2012
Messages
5,199
I read a post on a Corvette sight that recommended a Teflon sheet between the leaves of OE Vette springs. They also listed a source.
 

ntsqd

heratic car camper
Joined
Jan 30, 2005
Messages
3,351
Loc.
Upper SoKA
It was probably me who posted about the shims. I did it to a set of rears for a 4rnnr project that have yet to go in. I got the idea from the fabled GM 63" leaf springs and decided to try it after noticing the WH springs. When I put the 63's under the rear of my yota Xcab I had to increase the damping in the shocks. This was because the springs have that much less internal friction and those rear springs were one of a couple best-ever mods that I made to that truck.

Ideally the shims are the same thickness as the plastic tip sliders. The idea is to create an air gap so that the leaves only touch at the center and at the tips. Air has a far lower Coefficient of Friction than even teflon. Besides, those teflon strips are known for slipping out sideways unless they a shallow 'U' cross-section.
 

Tonka7777

Sr. Member
Joined
Nov 15, 2010
Messages
466
Loc.
Greenville
Did you make those or did you get them from a local vendor? I'm gonna call around locally.

Those were in the leafs when I took them apart and are still usable. I am sure replacements are available somewhere. I did purchase new plastic discs off ebay.
 
OP
OP
Crawdad

Crawdad

Bronco Guru
Joined
Feb 16, 2011
Messages
3,635
Wanted to give and update to this thread as it may help others. As you recall I purchased a set of well-used 3.5" rear spring. They were very rusty and needed attn. I tagged each set of springs so that I wouldn't forget which spring goes where after I disassembled them for further inspection. I highly suggest tagging each leaf, I used a cut off wheel and made one tiny mark on one leaf pack and two tiny marks of the other leaf pack. I took each leaf pack apart and man all the rust and scale sandwiched in between each leaf! I was an easy decision to have these sandblasted. It cost me $60 to have then blasted. When I got them back the leaves were all mixed together. I'm glad I marked each one so it was easy putting them back the correct way before I took them apart. I bought some of Lowes' best metal primer spray paint. Let dry for 40 minutes and then sprayed semi gloss spray over the primer. I came back 48 hrs later and sprayed Slip Plate in between each leaf. I've used it on farm equipment in the past so I felt it wouldn't hurt. I also slipped in spring inserts. It looks like race car tracks from back in my day. I purchased 20' off Amazon for roughly $20. If you were to do this step I highly suggest get 30'-40' of this stuff. I put inserts between the leaves I felt got most of the movement as seen by the wear on the plastic slides already in place. I couldn't find any metal inserts as noted by Tonka, but he had a very good option to the plastic inserts I used. I also installed some WH 6 degree steel shims since I have a 3.5" llift. I just hope I installed them correctly as their instructions are a lil vague.

Now I may have gone overboard with this rebuild but I hope to get many more years out of these springs. Now I just gotta find the bushings and MIGS shackles.
 

Attachments

  • IMG_1988.jpg
    IMG_1988.jpg
    145.5 KB · Views: 54
OP
OP
Crawdad

Crawdad

Bronco Guru
Joined
Feb 16, 2011
Messages
3,635
Pic of the plastic inserts

Here you can see the plastic "race track" inserts I used. I researched many old car and truck forums and this seemed to keep popping up as a good option. If I had to do this over again I would have purchased 40' and lined all 11 leaves.

I also used a good amount of Slip Plate. It goes on like paint and is dry to the touch in minutes. I use it a lot of my tractor implements as I get tired of squeaks and other various noises. This stuff just shuts it up big time!
 

Attachments

  • IMG_1990.jpg
    IMG_1990.jpg
    142.6 KB · Views: 71

ntsqd

heratic car camper
Joined
Jan 30, 2005
Messages
3,351
Loc.
Upper SoKA
It will be interesting to see how these work for you long term.

The shim plates in my springs I made from simple CRS. Bought it in the right width, cut to length, and drilled a hole in the center of each.
 
OP
OP
Crawdad

Crawdad

Bronco Guru
Joined
Feb 16, 2011
Messages
3,635
Hopefully they last many years. I don't plan to stretch these springs out in ditches or rocks. I just wanted the lift and maybe a car ride feel. There are lots of options out there, I took what I felt was the cheapest route.
 

DirtDonk

Contributor
Bronco Guru
Joined
Nov 3, 2003
Messages
47,916
Sorry the instructions are vague Crawdad. Looks like you have the older ones (here's the current version: http://cdn.wildhorses4x4.com/downloads/WH/1188 02-01-07 A.pdf).
Looks like yours do still touch on the most important part though, and that's the image of the shim pointed in the most common direction.

Depending on the individual vehicle, you might need a shim pointed with the thin end forward or rearward. I've had to use them "reversed" with the thick end forward before on another truck, but 99.9% of the time an EB will take the thin end forward to tilt the pinion back up.

Springs look great. Good idea on adding all the little details to keep them sliding quietly over the years.

Paul
 
OP
OP
Crawdad

Crawdad

Bronco Guru
Joined
Feb 16, 2011
Messages
3,635
Thx Paul! I was able to blow this up a lil bit on my iPad. I didn't know which angle to sit flush to the spring. Blowing the pic up makes me feel I made the correct decision. At first I was confused as to which direction the bolt goes thru but after searching the internet I found the nut goes on top.
 

DirtDonk

Contributor
Bronco Guru
Joined
Nov 3, 2003
Messages
47,916
Yep, just like it came apart originally, with the "head" down because it's now the new alignment pin and not just a bolt for the spring pack.
In case you weren't aware, if you don't already have our springs installed you will have to drill out the original spring perch hole for the larger WH center-pin head.

Paul
 
Top