• Welcome to ClassicBroncos! - You are currently viewing the forums as a GUEST. To take advantage of all the site features, please take a moment to register. It's fast, simple and absolutely free. So please join our community today!
    If you have problems registering or can't log into your account, please contact Admin.

Steering Column Reassembly for '66 with Floor Shift Conversion

bfoldy

Contributor
Sr. Member
Joined
Sep 13, 2004
Messages
718
Loc.
Torrance, CA
Hello everyone,

I'm in the process of rebuilding the steering column of my 1966 (new bearings, chopping the full-length shaft to adapt to WH lower collapsible shaft, new wiring, new smooth collar, painting, etc.) which was previously converted from column shift to floor shift. As I start reassembling the steering column, I have a couple of questions:

  1. Is it necessary to reinstall the old shift tube, or can it be safely omitted now that the manual shift on the column is no longer in use?
  2. Also, I'm looking for recommendations on how to effectively cover the section that will be open towards the lower end, where the shifter arm linkages used to be. (aside from black duct tape)
Any advice or experiences shared by those who have tackled this would be helpful.
 

WILDHORSES

Sponsor/Vendor
Bronco Guru
Joined
Nov 7, 2003
Messages
2,235
Loc.
USA
1. You don't need the tube
2. This hole closure will be custom. Everything from a HD hose clamp to welding a patch over the hole. It's going to depend on how smooth you want it to look when you are done. You also have the option of just leaving it open but if you plan on mudding it would be better to cover the hole.

Jim
 
OP
OP
bfoldy

bfoldy

Contributor
Sr. Member
Joined
Sep 13, 2004
Messages
718
Loc.
Torrance, CA
Appreciate the response, Jim. Also, just want to say thanks for all the helpful how-to videos you've done which will help me get through the rest of the project.
 

bronkenn

Contributor
Bronco Guy
Joined
Apr 27, 2017
Messages
2,688
Loc.
Southeast Ohio
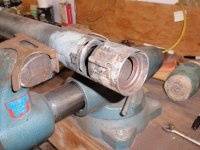
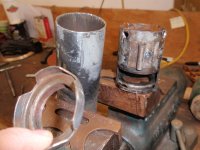
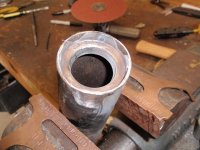
If you are going to shorten up the shaft, you can clean up the column by cutting it off above the shift levers. Take a spot weld cutter(rotobroach) and remove the spot welds that hold the bearing retainer in and reweld it to the shortened column. Really cleans up that area under the hood. I also used the WH lower steering shaft.
 

Attachments

  • column1.JPG
    column1.JPG
    188.4 KB · Views: 53
  • column2.JPG
    column2.JPG
    148.4 KB · Views: 44
  • column3.JPG
    column3.JPG
    158.9 KB · Views: 43
  • column4.JPG
    column4.JPG
    175.3 KB · Views: 49
  • eng comp 4.JPG
    eng comp 4.JPG
    127.1 KB · Views: 52

BGBronco

Contributor
N A S H V I L L E
Joined
Jun 23, 2017
Messages
1,561
Loc.
Tennessee
Appreciate the response, Jim. Also, just want to say thanks for all the helpful how-to videos you've done which will help me get through the rest of the project.
Jim’s 3 part Mini Series on the steering column is a classic for sure.
 

Jonathan_Cole

Newbie
Joined
May 11, 2020
Messages
152
Where can I find these videos? I have a repair manual on the way, but it may not be here before I tear it down. I have replaced the bearings and such in the past year, I just want to assure that everything is in the correct order when it goes back in.
 
OP
OP
bfoldy

bfoldy

Contributor
Sr. Member
Joined
Sep 13, 2004
Messages
718
Loc.
Torrance, CA
If you are going to shorten up the shaft, you can clean up the column by cutting it off above the shift levers. Take a spot weld cutter(rotobroach) and remove the spot welds that hold the bearing retainer in and reweld it to the shortened column. Really cleans up that area under the hood. I also used the WH lower steering shaft.
Wow, that's a fantastic job! Shortening the column hadn't crossed my mind as a solution. The column's already painted, and I'm eager to reinstall it in the truck, so revisiting that part of the process doesn't seem appealing at this stage. But this is a great idea!
 
OP
OP
bfoldy

bfoldy

Contributor
Sr. Member
Joined
Sep 13, 2004
Messages
718
Loc.
Torrance, CA
Where can I find these videos? I have a repair manual on the way, but it may not be here before I tear it down. I have replaced the bearings and such in the past year, I just want to assure that everything is in the correct order when it goes back in.
Check out the Wild Horses channel on YouTube and you'll see several useful videos related to the steering column and shifter. Not sure if there's anything that covers the full reassembly process, but between that, and the advice on this forum, you'll get it. Also "Jason and Jonie Builds" does a good job on their videos.
 

jamesroney

Sr. Member
Joined
Sep 11, 2007
Messages
1,952
Loc.
Fremont, CA
Hello everyone,

I'm in the process of rebuilding the steering column of my 1966 (new bearings, chopping the full-length shaft to adapt to WH lower collapsible shaft, new wiring, new smooth collar, painting, etc.) which was previously converted from column shift to floor shift. As I start reassembling the steering column, I have a couple of questions:

  1. Is it necessary to reinstall the old shift tube, or can it be safely omitted now that the manual shift on the column is no longer in use?
  2. Also, I'm looking for recommendations on how to effectively cover the section that will be open towards the lower end, where the shifter arm linkages used to be. (aside from black duct tape)
Any advice or experiences shared by those who have tackled this would be helpful.

1. Maybe. It depends on what you are going to use for a column bell at the top. If you can find a used floor shift (pickup truck or Mustang) steering bell...then you can delete the tube. But the existing column shift bell is supported by the tube. So if you plan on cutting off the shifter stub, and plugging the hole, and finishing with filler and painting...then you need something to hold it on. If you plan on buying the $70 aftermarket aluminum bell, it screws to the turn signal collar.

2. Also part of #1, and maybe. It depends on what you are going to use to seal the opening for the levers at the bottom. The hole in the base of the column is about 1/2 inch x 1.5 inches, and it is occupied by the shift levers, and some plastic bushings. When the levers are in the hole, the space is basically sealed. If you do not have something in that space, then the high pressure air from the fan runs across the exhaust, and blows that air into the steering column opening. That air escapes at the interface between the steering wheel and the column bell. It's surprising how much heat can come out of there. So you can weld up the hole, or you can make a plug, or you can install the old levers, or you can cut off the arms and install the old levers. But if you want to use the levers, you need something to hold them in. The shift tube does that for you. So if you delete the shift tube, you need another way to plug the hole.

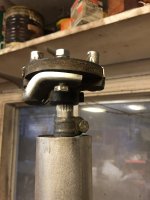
The first couple that I did I went ahead and welded a piece of 18 ga sheet metal that I formed to patch the hole. But when I was doing that work, I realized that if I was going to weld it, I would never need to "unweld" it. So then I thought, "Why not just shorten it?" Which took me EXACTLY to where @bronkenn ended up. This provides another fantastic benefit, in that you can shorten it enough to enable a rag joint at the top without having to modify the inner fender. In my opinion, it is the best way to do it. I have zero tolerance for sub-standard steering components. In that regard, I am a "belt and suspenders" kind of engineer. So I like splines, with captive pinch bolts, and safety wire. So it can't come loose, and if it does come loose, it can't fall off. And if it could fall off, it gives you plenty of warning before it does.

If I am forced to install a Borgeson, or Flaming River joint, I never use their hardware. That cheap ass over-hardened tiny little set screw gets replaced with a safety wired drilled grade 8 hex head cap screw. And I mill a slot for it. Every time, all the time. ( I do admit that I have cross drilled, pinned, and welded them.) And I won't use one on the steering box side ever. (Because I don't need to...) Pics to follow.
 

Attachments

  • IMG_8664.jpeg
    IMG_8664.jpeg
    181.7 KB · Views: 42
  • IMG_8626.jpeg
    IMG_8626.jpeg
    131.1 KB · Views: 44
  • IMG_8627.jpeg
    IMG_8627.jpeg
    238.4 KB · Views: 43
  • IMG_8625.jpeg
    IMG_8625.jpeg
    211.3 KB · Views: 43
OP
OP
bfoldy

bfoldy

Contributor
Sr. Member
Joined
Sep 13, 2004
Messages
718
Loc.
Torrance, CA
1. Maybe. It depends on what you are going to use for a column bell at the top. If you can find a used floor shift (pickup truck or Mustang) steering bell...then you can delete the tube. But the existing column shift bell is supported by the tube. So if you plan on cutting off the shifter stub, and plugging the hole, and finishing with filler and painting...then you need something to hold it on. If you plan on buying the $70 aftermarket aluminum bell, it screws to the turn signal collar.

2. Also part of #1, and maybe. It depends on what you are going to use to seal the opening for the levers at the bottom. The hole in the base of the column is about 1/2 inch x 1.5 inches, and it is occupied by the shift levers, and some plastic bushings. When the levers are in the hole, the space is basically sealed. If you do not have something in that space, then the high pressure air from the fan runs across the exhaust, and blows that air into the steering column opening. That air escapes at the interface between the steering wheel and the column bell. It's surprising how much heat can come out of there. So you can weld up the hole, or you can make a plug, or you can install the old levers, or you can cut off the arms and install the old levers. But if you want to use the levers, you need something to hold them in. The shift tube does that for you. So if you delete the shift tube, you need another way to plug the hole.

The first couple that I did I went ahead and welded a piece of 18 ga sheet metal that I formed to patch the hole. But when I was doing that work, I realized that if I was going to weld it, I would never need to "unweld" it. So then I thought, "Why not just shorten it?" Which took me EXACTLY to where @bronkenn ended up. This provides another fantastic benefit, in that you can shorten it enough to enable a rag joint at the top without having to modify the inner fender. In my opinion, it is the best way to do it. I have zero tolerance for sub-standard steering components. In that regard, I am a "belt and suspenders" kind of engineer. So I like splines, with captive pinch bolts, and safety wire. So it can't come loose, and if it does come loose, it can't fall off. And if it could fall off, it gives you plenty of warning before it does.

If I am forced to install a Borgeson, or Flaming River joint, I never use their hardware. That cheap ass over-hardened tiny little set screw gets replaced with a safety wired drilled grade 8 hex head cap screw. And I mill a slot for it. Every time, all the time. ( I do admit that I have cross drilled, pinned, and welded them.) And I won't use one on the steering box side ever. (Because I don't need to...) Pics to follow.
Thank you, sir. Very nice work. It looks like you even made your own splines!
1) Yes, I do have the smooth billet aluminum column "bell" that I will be swapping over as part of this process.
2) Hadn't even thought about heat escaping through there, but makes sense. More of a reason to eliminate the hole besides aesthetics.

And yes, there are Borgeson-style u-joints you speak of on both ends of the custom shaft. I'll keep an on eye the hardware and consider the safety wire option. If you have a picture of what you've done for this, that would be helpful. I have a general idea of it, but pictures are worth a thousand words, of course.
 

jamesroney

Sr. Member
Joined
Sep 11, 2007
Messages
1,952
Loc.
Fremont, CA
Thank you, sir. Very nice work. It looks like you even made your own splines!
1) Yes, I do have the smooth billet aluminum column "bell" that I will be swapping over as part of this process.
2) Hadn't even thought about heat escaping through there, but makes sense. More of a reason to eliminate the hole besides aesthetics.

And yes, there are Borgeson-style u-joints you speak of on both ends of the custom shaft. I'll keep an on eye the hardware and consider the safety wire option. If you have a picture of what you've done for this, that would be helpful. I have a general idea of it, but pictures are worth a thousand words, of course.
here's a sketch. Drilling the head of a hex bolt is easy. But the magic is to drill a receptacle hole in the shaft for the end of the bolt. It doesn't need to be too deep, but it needs to be there. That way, if the connection does come loose...it will stay captive and not fall off.

There is nothing wrong with the Borgeson style universal. They are lightweight, compact, and super strong. But the connections are the problem. They are lightweight, compact, and super weak. They do not have error proofing designed in. So unlike a Saginaw or Dephi connection, you have to be extremely diligent in the installation. Almost every component in a factory steering system has graceful failure modes. Things leak, wobble, bend, or rattle before they fail. So you get some warning.

I broached a keyway and made a pinch connection for a guy on this forum doing a brake pedal pivot swap for Hydroboost last year. I guess I should start taking more pictures. Brakes and Steering. The only two things I care about for safety. I have too many stories.
 

Attachments

  • IMG_0519.jpeg
    IMG_0519.jpeg
    125 KB · Views: 24
Top