DJs74
Bronco Guru
- Joined
- Apr 1, 2014
- Messages
- 1,135
I'm probably late to the game on this trick but I discovered an alternative work-around for tapping a threaded hole and thought I'd share.
During the holidays I had some shop time and needed to drill & tap a series of holes. Checked and double checked the correct drill size for the tap I was using, gathered the tools, bolts, new parts and all was well until I discovered my tap chuck was broke...
Determined to do the job since everything was in hand and I had the time and not loving the thought of driving 20 miles to buy another chuck, I figured there had to be a way to get this done with what I had.
Plan A was to use vice-grips but I've tried that before and although it will work if you have plenty of room to lock on to the tap perpendicular, I did not have the room for that, so that idea was scrapped.
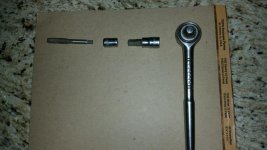
The winning combination: 3/8" ratchet, 3/8" 6 point socket with a 1/4" drive, 3/8" drive socket with a 6 point male hex bit (3/8" extension if necessary).
Because the particular tap I was using had a 1/4 square shank (my taps have 1/4" shanks up to 1/2-20), I was able to use the 1/4" drive socket (inverted from normal orientation). I chose the 3/8" socket size because I had the 3/8" drive bit laying there handy but you could use any hex size socket if you have a matching 6 point hex bit... and you could use a 1/2" drive or 1/4" drive ratchet if you have matching 6 point sockets / bits.
The setup:
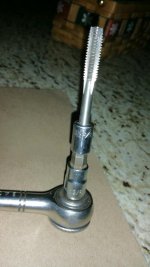
Attach the 3/8" drive x 3/8" hex bit onto the ratchet, install the 1/4" square end of tap into the 1/4" drive 3/8" hex socket - Then attach the ratchet and male hex bit into the inverted socket / tap.
Plenty of torque, ratcheting action overcomes space constraints, generous force can be applied to the ratchet to get the tap started, etc.
Sometimes being desperate promotes creativity!
See attached photos of the setup.
DJs74
During the holidays I had some shop time and needed to drill & tap a series of holes. Checked and double checked the correct drill size for the tap I was using, gathered the tools, bolts, new parts and all was well until I discovered my tap chuck was broke...
Determined to do the job since everything was in hand and I had the time and not loving the thought of driving 20 miles to buy another chuck, I figured there had to be a way to get this done with what I had.
Plan A was to use vice-grips but I've tried that before and although it will work if you have plenty of room to lock on to the tap perpendicular, I did not have the room for that, so that idea was scrapped.
The winning combination: 3/8" ratchet, 3/8" 6 point socket with a 1/4" drive, 3/8" drive socket with a 6 point male hex bit (3/8" extension if necessary).
Because the particular tap I was using had a 1/4 square shank (my taps have 1/4" shanks up to 1/2-20), I was able to use the 1/4" drive socket (inverted from normal orientation). I chose the 3/8" socket size because I had the 3/8" drive bit laying there handy but you could use any hex size socket if you have a matching 6 point hex bit... and you could use a 1/2" drive or 1/4" drive ratchet if you have matching 6 point sockets / bits.
The setup:
Attach the 3/8" drive x 3/8" hex bit onto the ratchet, install the 1/4" square end of tap into the 1/4" drive 3/8" hex socket - Then attach the ratchet and male hex bit into the inverted socket / tap.
Plenty of torque, ratcheting action overcomes space constraints, generous force can be applied to the ratchet to get the tap started, etc.
Sometimes being desperate promotes creativity!
See attached photos of the setup.
DJs74