• Welcome to ClassicBroncos! - You are currently viewing the forums as a GUEST. To take advantage of all the site features, please take a moment to register. It's fast, simple and absolutely free. So please join our community today!
    If you have problems registering or can't log into your account, please contact Admin.

To Ream or not to Ream?

Dude seriously

Jr. Member
Joined
Nov 12, 2009
Messages
214
Loc.
Everett
I reamed my knuckles for a TRO while they were attached, it was easier to do than I was expecting. I went really slowly, checked often and had a friend keeping the cutting surface oiled as I was using two hands to keep the drill motor plumb. If you go slowly and check often, you can see if you are getting off angle and correct.

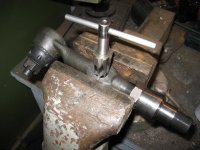
The pitman arm was more difficult to do. I would recommend reaming it in a drill press or mill.
 

Greg_B

Bronco Guru
Joined
Apr 15, 2010
Messages
2,087
Loc.
Cohutta, GA
I remed mine with them on the truck with nothing but a wrench on the end of the reamer. Went very slow but it was pretty easy. I was suprised how well it turned out.

Greg
 

saxman

Full Member
Joined
Mar 12, 2004
Messages
434
Loc.
Austin, TX
Hijacking an old thread here.

My question is, do you hold the reamer perfectly vertical, or, is the hole in the knuckle that is to be reamed angled a little bit?
 
OP
OP
B

bknbronco

Bronco Guru
Joined
Jan 17, 2011
Messages
4,378
Loc.
North Metro, MN
i cant quite remember if its angled but the reamer is gona follow the old hole. If you try and angle it i think it would oblong the hole. Best to just let it follow the old taper.

You can start by using a drill, but i found that my cordless drills spun too fast and without the power needed. They started chattering even with a shit ton of cutting oil. Switched to the 1/2" plug in drill that spins slow and steady and cut like butter. Just make sure you do the last little bit by hand as its super easy to go to far. Id even put the TRE in and tighten it dawn snug and check cotten pin hole, then go a bit further checking it often. If your not snugging the castle nut down when you check the ream the TRE wont seat like it should.

When using the drill its dont take but a second for that reamer to take out alot of metal expecially when nearing the finish. Best to go by hand!!!!!
 

saxman

Full Member
Joined
Mar 12, 2004
Messages
434
Loc.
Austin, TX
i cant quite remember if its angled but the reamer is gona follow the old hole. If you try and angle it i think it would oblong the hole. Best to just let it follow the old taper.

You can start by using a drill, but i found that my cordless drills spun too fast and without the power needed. They started chattering even with a shit ton of cutting oil. Switched to the 1/2" plug in drill that spins slow and steady and cut like butter. Just make sure you do the last little bit by hand as its super easy to go to far. Id even put the TRE in and tighten it dawn snug and check cotten pin hole, then go a bit further checking it often. If your not snugging the castle nut down when you check the ream the TRE wont seat like it should.

When using the drill its dont take but a second for that reamer to take out alot of metal expecially when nearing the finish. Best to go by hand!!!!!

thanks for the quick reply. What is the best way to do it by hand and not tire out? You just need for the cotter pin to peek out and then you stop, right?
 
OP
OP
B

bknbronco

Bronco Guru
Joined
Jan 17, 2011
Messages
4,378
Loc.
North Metro, MN
I was doing the GM 1 TON TRE's so there i alot of material to remove so its best to start with a drill and lots of cutting oil. Youll know when you start to get close if you check it once in a while. Then the last bit i did with the bar in the reamer. With a new reamer it cuts FAST! Real fast! My buddy at the machine shop said to maybe take a file and knock the edge down on the reamer, but i didnt want to ruin a $80 RAEMER!

Ya you want it just far enough for the castle nut to go on and be able to slip the cotter pin in. I said to snug it down firmly because i didnt. I just went finger tight and found out that when i cranked it down with a wrench for final installation the TRE went in further than previously. I went a tad too far. You can always put a washer on but when you go too far the boot ends up being squished. Hasnt been a problem on mine but could be.

Also there are different thickness castle nuts so make sure you assemble with the same nut you used to ream with.

I did this TRE slowly and took my time and did the last 1/8" or so by hand and it turned out perfect! Depending on if your going TRE over or under determains which way you ream it. The factory ream is for TRE under if i recall.
 

Attachments

  • IMG_1854.jpg
    IMG_1854.jpg
    101.7 KB · Views: 69
OP
OP
B

bknbronco

Bronco Guru
Joined
Jan 17, 2011
Messages
4,378
Loc.
North Metro, MN
Start it with a 1/2" drill, then finish by hand. If you do the entire knuckle by hand youll be there for a week. Dont be afraid....just dont be in a hurry. The knuckles are actually pretty soft material than youd expect.
 

saxman

Full Member
Joined
Mar 12, 2004
Messages
434
Loc.
Austin, TX
Did you guys ream with the tires on the ground or in the air? I would think on the ground so the tire spacing/camber is not affected?
 
OP
OP
B

bknbronco

Bronco Guru
Joined
Jan 17, 2011
Messages
4,378
Loc.
North Metro, MN
Did you guys ream with the tires on the ground or in the air? I would think on the ground so the tire spacing/camber is not affected?

I think your confused, makes no difference. Were not reaming for ball joints were doint the steeering linkage. I took the tires off to make room. When i ream my 44 knuckles ill do them in the vise before i even put the ball joints in. The pitman arm and pass side TRE i reamed in the vise.
 
Last edited:

Pa PITT

Contributor
Bronco Guru
Joined
Jul 15, 2005
Messages
11,287
Loc.
Stephenville TEXAS
I'd do the reaming. But use the Drill press if possible .
.. TO me welding on that kind of metal does not make it stronger So I'd lean away from welding on it.
 
Top