• Welcome to ClassicBroncos! - You are currently viewing the forums as a GUEST. To take advantage of all the site features, please take a moment to register. It's fast, simple and absolutely free. So please join our community today!
    If you have problems registering or can't log into your account, please contact Admin.

windshield frame and hinge replaement

roundhouse

Contributor
Bronco Guru
Joined
Sep 5, 2003
Messages
2,915
Im sure this has been covered before but I cant find a good how to.
mine is rusty at the bottom,

i have a good used frame to replace mine

im sure someones posted a how to thread on this but I cant find it.
 

DirtDonk

Contributor
Bronco Guru
Joined
Nov 3, 2003
Messages
48,852
Don’t have an answer for you, but just curious if the good used frame is from the same year range as yours.
The 66 to 68-ish frames were different than the 69-ish to 77 frames. I don’t think it’s enough to cause an actual problem, because I know it’s been done before.
The main differences are the spacing on the holes where the hardtop mounts, and the spacing of the windshield wiper holes.
 
OP
OP
R

roundhouse

Contributor
Bronco Guru
Joined
Sep 5, 2003
Messages
2,915
Don’t have an answer for you, but just curious if the good used frame is from the same year range as yours.
The 66 to 68-ish frames were different than the 69-ish to 77 frames. I don’t think it’s enough to cause an actual problem, because I know it’s been done before.
The main differences are the spacing on the holes where the hardtop mounts, and the spacing of the windshield wiper holes.
hmm, that I dont know, I will check that out.

I was fixing to drill out the spot welds to remove the hinge from the cowl, do I need to remove the dash ?
 

serial car restorer

Contributor
Jr. Member
Joined
Aug 27, 2024
Messages
144
Loc.
Western Oregon
Is your cowl solid? Mine turned out to be just as Swiss cheesy as the frame itself. I replaced the cowl first, then got a new frame (with the hinge already attached) and welded the hinge to the new cowl.
 
OP
OP
R

roundhouse

Contributor
Bronco Guru
Joined
Sep 5, 2003
Messages
2,915
Is your cowl solid? Mine turned out to be just as Swiss cheesy as the frame itself. I replaced the cowl first, then got a new frame (with the hinge already attached) and welded the hinge to the new cowl.
I think the cowl is mostly good, I will find out when I remove the hinge, I guess the best way is drill out all the spot welds holding the hinge to the cowl?
 

serial car restorer

Contributor
Jr. Member
Joined
Aug 27, 2024
Messages
144
Loc.
Western Oregon
I guess the best way is drill out all the spot welds holding the hinge to the cowl?
Probably. Since my cowl was also shot, I sliced the hinge to remove the frame, then drilled out the spot welds to remove the cowl. If you think there is any chance your cowl is salvageable, you'll want to drill off the hinge.
 

DirtDonk

Contributor
Bronco Guru
Joined
Nov 3, 2003
Messages
48,852
Does the hinge need removing? Is it because your new one does not have a hinge attached to it?
Or is the existing hedge shot too?
 

jeffncs

Contributor
Sr. Member
Joined
May 4, 2004
Messages
1,224
Loc.
Raleigh, NC
Here’s how I replaced my hinge and a/s frame.

Fold the w/s frame down to rear on the hood (I laid a moving blanket down to protect the hood)

Disconnect and remove all w/s wiper parts and wiring.

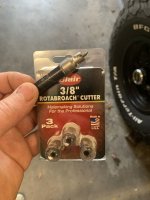
Drill out each spot weld holding the hinge to the cowl. Edit to add - use a spot weld cutter not a drill bit at this step.

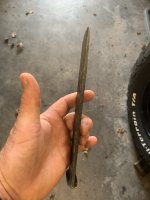
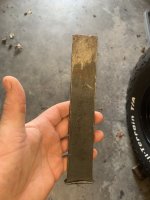
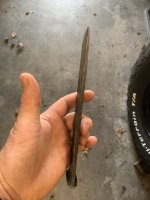
Using a piece of flat bar stock with one end sharpened into a sharp edge, i separated the hinge from the cowl by using it as a wedge and hitting end with a ball peen hammer. (Be careful not to damage the cowl)

Once separated, clean up the cowl with a flapper disc on your grinder (120grit works well - 80 grit too aggressive)

Inspect the cowl carefully for rust and repair it now.

Test fit the hinge to the cowl and w/s frame and as a full assembly to make sure they all work together. Happy with the fit? move forward. Not happy with the fit? Stop and figure out how to remedy,

Once happy with general fit and appearances of the pieces….
Using the new hinge as a guide, center the hinge. Mark and drill holes along the cowl and bottom of the w/s frame.

Install 1/4” nutserts into the holes drilled above. I think I installed ~12 across each piece the full width spread evenly. (Caution - make sure they’re offset or screw heads will hit and prevent w/s from moving into position!)

Test install everything using 1/4” SS button allenhead bolts. Make sure the w/s frame centers as you want and will hinge into the upright position.

Happy? Disassemble everything and paint it.
Not happy? Adjust/slot holes to get it where you need/want it.

Paint the cowl section and w/s frame.

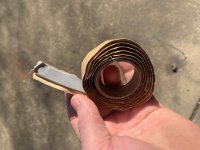
Once the paint is dry, I used some of that gummy sealant that come on a roll (used to seal pipe penetrations through walls; comes on a roll) and laid a bead between each surface that gets bolted down (hinge to w/s frame and hinge to cowl).

Attach the hinge to thw w/s frame using your allenheads.

Lay the w/s assembly into place and bolt the hinge to the cowl.

Move the w/s into position. Still happy? Install the rubber w/s seal.

I’ll add some pics of the tools I made and seal I used for the hinge.

Go slow!!! Go very slow!
 
Last edited:

jeffncs

Contributor
Sr. Member
Joined
May 4, 2004
Messages
1,224
Loc.
Raleigh, NC
My homemade panel separator Works great ar separating spot welds after drilling with a spot weld cutter.

IMG_3190.jpeg IMG_3189.jpeg

Spot weld cutter. Get one with removable / replaceable cutters!

IMG_3192.jpeg

Pipe sealant.
IMG_3191.jpeg

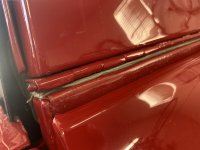
I used too much of the grey seal, but this is what my final product looks like.

IMG_3187.jpeg IMG_3188.jpeg
 

Attachments

  • IMG_3190.jpeg
    IMG_3190.jpeg
    109.9 KB · Views: 24
Top