• Welcome to ClassicBroncos! - You are currently viewing the forums as a GUEST. To take advantage of all the site features, please take a moment to register. It's fast, simple and absolutely free. So please join our community today!
    If you have problems registering or can't log into your account, please contact Admin.

Build thread - from a $305 eBay "parts truck" to... something completely different.

eBronc2

Contributor
Jr. Member
Joined
Jan 10, 2015
Messages
196
Once upon a time, there were affordable (ok, cheap) Broncos out there. No, really. Lemme 'splain:

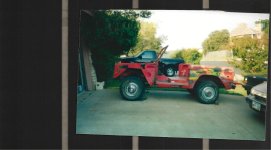
Back in mid-2001, eBay used to have a section where people posted "parts/salvage" vehicles. My day job at the time was a resident tech contractor at a US Goverment installation, where I basically babysat equipment for 8 hours a day, was onsite in case something broke, so downtime would be minimal. Either I was good at my job, (or just lucky), because it meant I had a lot of time to browse the internet (which was a bit different back then). Anyway, I came across a listing for a '70 Bronco parts truck, that was sitting out in a farmer's field being used as target practice by his kids, and rusting away. It had no top, no interior, no engine - but it was cheap. I put a bid for $305 just for grins and forgot about it - until a few days later, when I found out I had won the auction.

So, the second weekend of September, my brother and I headed out from Austin in my Jeep XJ, picked up a Uhaul trailer in Amarillo, loaded up the Bronco in Oklahoma, and drug it back home. Fun trip - cold front, rain, wind, truck ruts that had the trailer weaving all over the road, etc. Got back home, returned the Uhaul on Monday - and the next day was Tuesday, September 11th, 2001. Yes, 9/11.

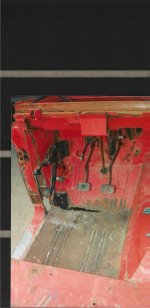
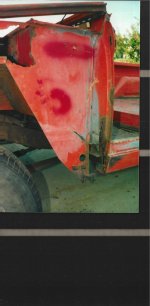
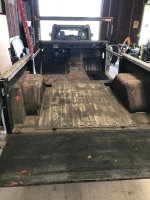
Anyway, this is what I started with:

Bronco 1.jpg
Photo_2023-04-05_193934 (2).jpg
Photo_2023-04-05_194048 (3).jpg
Photo_2023-04-05_194149 (4).jpg
Photo_2023-04-05_194242 (5).jpg
Photo_2023-04-05_194324 (6).jpg

Rusted floorboards, door posts, inner fenders, bent core support...but the frame was straight, and it did have a hood, grille, doors, and tailgate.

At the time, my project vehicle funds were pretty scarce, and I really just wanted a trail truck to go wheeling. I figured I'd slap together a junkyard engine, weld some patch panels over the worst rust, do a few repairs, and go have fun. Remember, old Broncos were just...old Broncos back then - not collectible classics. So, I got to work.

Rebuilt a 351W and dropped it in, straightened out some bent sheetmetal, sprayed some primer:

45656-865893-jpg.865893


Modified the dash, swapped in a ZF 5 speed, fabricated twin stick shifters for the original Dana 20 T-case, cut and bent some sheetmetal floorpans and welded in them in:

45656-865897-jpg.865897


Rolled on bedliner (which didn't last):

45656-865896-jpg.865896


Found a Dana 60 full floating rear axle, rebuilt it, and fabricated custom brackets to mount GM 12" disk brakes:
45656-865895-jpg.865895
45656-865894-jpg.865894


Over the years, I moved out to the country, had a little money to work with, so I built a shop, and made some changes to the Bronco as the project stretched out...and out. The original plan to just make it a trail truck turned into more of a full restomod buildup, so I decided to strip it down to the frame and start over.


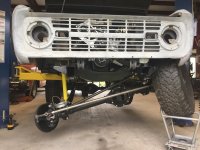
Made a few changes to the frame - removed factory shock mounts, added shock hoops front and rear, had it sandblasted and powdercoated, new suspension (4" lift), full-width high pinion Dana 44 from a '78 Bronco, longer radius arms, relocated arm mounts, etc.

IMG_0050.JPG
 

Attachments

  • IMG_2601.JPG
    IMG_2601.JPG
    162.3 KB · Views: 29
  • IMG_2597.JPG
    IMG_2597.JPG
    175.2 KB · Views: 30
  • IMG_2592.JPG
    IMG_2592.JPG
    175.6 KB · Views: 33
Last edited:
OP
OP
eBronc2

eBronc2

Contributor
Jr. Member
Joined
Jan 10, 2015
Messages
196
The original, rebuilt Dana 20 T case bolts to the back of the ZF % speed with an Advance Adapters kit. I fabricated the twin sticks and the extra brace for the pivot shaft out of angle iron, 3/8 rod, and part of the original muffler bracket. The shift knobs are billiard balls, drilled and tapped.

IMG_0054.JPG

Sitting on 35"tires mounted on 8 lug wheels (both axles have been converted to GM 3/4 ton 8 x 6.5 hubs, rotors, and calipers).

IMG_0303.JPG

Converted to power steering - F150 4x4x2 box, drilled knuckles to move tie rod to top, custom tie rod, drag link, and track bar.

IMG_0298.JPG


IMG_0304.JPG

Custom exhaust, hand bent stainless hard brake lines, stainless flex lines. This version of the custom brake caliper brackets mounted them a little too low, I made new ones to move the calipers up, and to allow larger Cadillac E-brake calipers. If the angle of the rear diff looks odd, it's that way since the rear driveshaft will be a double cardan type because it's pretty short. Tom Woods recommends that the rear diff yoke point directly at the rear yoke of the T-case for that type of driveshaft.

IMG_0375.JPG

Testing front axle articulation with the coils removed:

IMG_0366.JPG IMG_0359.JPG

As I improved the chassis, I started to realize the body, while it looked ok, had some serious issues. The more rust I cut out to repair, the more rust I found. The bedliner I had rolled on years ago had faded and flaked away, the patch panels I had welded on top of the original rusted floorpans were bent and mangled. I purchased replacement floorpans and other sheetmetal, but the amount of work to replace everything just overwhelmed me. I'm not getting any younger, and I'd like to actually enjoy driving this thing while I'm still able to.

IMG_2538.jpg

IMG_2535.jpg


Considering how much work I had done to the chassis, and how much classic Broncos had increased in value since I started the project, I decided the substantial investment in an all new steel body was worth it. I went with Rust Belt Broncos, in Ohio. It took a few months, but finally the new body (with flared rear fenders, '66 grille, and '77 inner fender to clear power steering and power brakes), showed up:

IMG_2558.jpg
 
Last edited:
OP
OP
eBronc2

eBronc2

Contributor
Jr. Member
Joined
Jan 10, 2015
Messages
196
IMG_2560.jpg IMG_2562.jpg

I've got to throw a couple of these photos in here - yes, that's 2 (nearly) identical 2022 Broncos. I had orignally ordered a BaseSasquatch, but after 2 years of waiting for Ford to build it, I lost patience and found a Badlands in exactly the same color, body style, and drivetrain as my Base order sitting on a dealer lot. So, I bought it. Naturally, about 2 weeks later, I got the email from Ford that my original order had been built. So, when that showed up at my dealer, I bought that, too (for MSRP). I couldn't keep both, but I had no trouble selling the BaseSquatch to a different dealer for a decent profit. That, and selling the old body and parts was enough to pay for the new body for the '70 project.


IMG_2482.jpg IMG_2479.jpg

Dropped the new body onto the chassis to check fit, and where to trim for the ZF shifter, twin sticks, power steering box, etc.

IMG_2694.jpg IMG_2693.jpg

Had to park the '22 next to the '70 to compare size:

IMG_2767.jpg

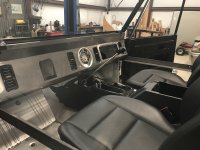
I figured since I had improved the chassis so much, and now with a new body, I might as well step the interior game as well. So, FBM provided a pair of Mercedes heated leather power seats, I had a custom dash made that incorporates 2022 Bronco dash vents, centered speedo, relocated glovebox, no radio, no ash tray, no speaker grille, no vent cable controls. A wrecked 2022 Bronco provided it's center console, which will need a little tweaking to fit the floor, ZF shifter, and twin stick shifters. Vintage Air will supply an HVAC unit, controls will be on the console. Only knobs on the dash will be Lights, Wipers, and Hazards. along with the ignition, 2 each on either side of the steering column.

IMG_3047.JPG


IMG_E3040.JPG

What's next? First, I need to get all the panel seams sealed up on the new body so I can send it to get painted - currently leaning towards a deep, dark blue (like new Bronco's Velocity Blue), with maybe a white top. Speaking of tops, probably going with a fiberglass top from Bronco Design - they offer both full and half cabs, along with a hard bikini top. While the body is off getting painted, I've got an upgraded rear output housing (with larger diameter shaft and output flange) for the T case to install, fuel and brake lines on the chassis to finish - currently the 351W has a Q-jet on it, but planning on upgrading to Holley EFI, which means new in tank fuel pump and lines - hydraulic lines for the power steering pump to install, and a few other things.

Once the body is painted and back on the chassis, I can get busy installing the Painless Wiring harness, then the HVAC system, door glass, weatherstripping, steering column, mounting the seats, center console....still a lot to do. It's come a LONG way from that rusty, bent, abused $305 eBay purchase, but the end is a lot closer than it was.
 
Last edited:

pocketlock

Jr. Member
Joined
Oct 29, 2022
Messages
88
I love this build! Stoked to see how your interior comes out. Mine is just a trail rig, but I have to have the amenities haha.
 

hsach

Contributor
Members Only
Joined
Apr 19, 2013
Messages
338
It just kept getting better the more I read, wow. Nice build, can't wait to see the finished interior.
 
OP
OP
eBronc2

eBronc2

Contributor
Jr. Member
Joined
Jan 10, 2015
Messages
196
A few photos of the modified WH raised track bracket I used to improve the geometry of the track bar in relation to the drag link. I didn't want to use a drop pitman arm, that would have caused interference with them at full compression. I decided to fab and weld the "box" on the front of the bracket to make it a double shear mount, and incorporated the bump stop mount behind it.


IMG_0451.jpg IMG_0453.jpg IMG_0578.jpg

Track bar has rod ends at both the axle mount and the frame mount, with F9 hardware. Drag link and tie rod are custom made, with GM 1 ton tie rod ends (because the outer knuckles on the Dana 44 are GM, not Ford). Testing the axle and full compression, droop, and articulation revealed no contact ay any point. The drag link has a little less than an inch of clearance below the oil pan sump at full compression, and the tie rod has about the same under the track bar frame mount.

IMG_0793.jpg


Now you can see the much better angle of the track bar and drag link - not quite exactly the same, but very close. The big black rotor shields are actually factory GM 3/4 ton caliper mounts, they're over 1/8" thick. The big 12" diameter rotors mean the calipers JUST BARELY clear the inside of the front 15" diameter wheels. I may change the wheel size and offest in the future, both to give more clearance for the calipers, and to tuck the wheels and tires into the wheel wells more - with the full width '78 Bronco front axle, GM outer knuckles, spindles, and hubs, the offset of the 15x8 wheels, and the 35x12.50's, the outer sidewalls are 84" (7 feet) apart. A little too wide to fit on most trailers, and even some trails.

IMG_0580.jpg
 
OP
OP
eBronc2

eBronc2

Contributor
Jr. Member
Joined
Jan 10, 2015
Messages
196
How do you like the ZF5?
Well, it's big. You either have to raise the body a few inches, or cut a BIG hole in the floor. It bolts right up to a SBF (if you get the right version - the versions for diesels have a very different bellhousing), which is nice. Hydraulic throwout bearing - good. PTO output ports on both sides - handy. Shifts like a truck.
 
Top