• Welcome to ClassicBroncos! - You are currently viewing the forums as a GUEST. To take advantage of all the site features, please take a moment to register. It's fast, simple and absolutely free. So please join our community today!
    If you have problems registering or can't log into your account, please contact Admin.

Dana 30 King Pin Rebuild

Bonefizz

Contributor
Full Member
Joined
Nov 4, 2016
Messages
293
Loc.
The poor house
Bronco Gurus,

I'm rebuilding my Dana 30 King Pins and dampeners and I'm struggling with them. These don't make sense. I must be doing something wrong.

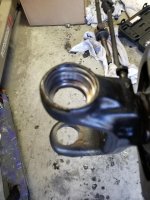
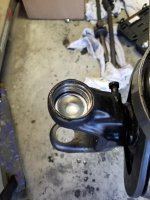
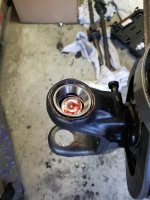
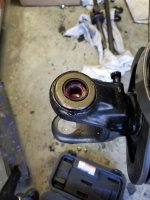
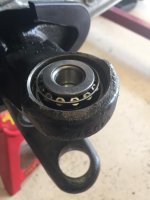
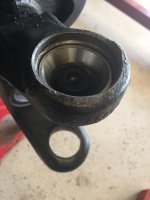
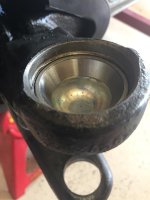
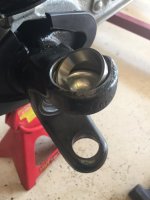
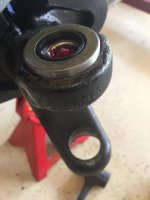
I've followed the diagram on the Wild Horses website, but things don't seem to be lining up. First question, is the bearing run supposed to be pressed on against the cup, or above it. Second, if I install the dampener and washer, then the bearing isn't making contact with the run. It sits above the run. Third, is the dust cap supposed to sit flush when it's installed? It seems to sit up too high. Also, should the bearing move around under the dust cap?

I've got them together, but don't have any confidence that they are correct. I'll upgrade to a 44 at some point, but this will have to work for now.

Thank you,
Clint
 

Attachments

  • Kingpin1.jpg
    Kingpin1.jpg
    102.6 KB · Views: 124
  • Kingpin2.jpg
    Kingpin2.jpg
    81.5 KB · Views: 121
  • Kingpin4.jpg
    Kingpin4.jpg
    75.9 KB · Views: 130
  • Kingpin5.jpg
    Kingpin5.jpg
    75.9 KB · Views: 127

chuckyb

Contributor
Sr. Member
Joined
Oct 25, 2016
Messages
941
I thought this was the hardest part of my build. The WH diagram was the most helpful thing I could find. Do you have a 66? I think the 66 is a bit different and doesn’t utilize the damper. I think I may have some pics in my build thread probably summer 2018 timeframe.
 

chuckyb

Contributor
Sr. Member
Joined
Oct 25, 2016
Messages
941
68 Dana 30

I found some pics hope these help
 

Attachments

  • D266CBA4-0992-499D-8A37-C595FA7C2E4C.jpg
    D266CBA4-0992-499D-8A37-C595FA7C2E4C.jpg
    57.4 KB · Views: 105
  • 23946DD7-9445-468B-8EC3-EC535D82D74B.jpg
    23946DD7-9445-468B-8EC3-EC535D82D74B.jpg
    62 KB · Views: 102
  • 46E6F084-57DC-470A-B4FC-FB9E579D6766.jpg
    46E6F084-57DC-470A-B4FC-FB9E579D6766.jpg
    55.1 KB · Views: 104
  • ACA38EB1-FC82-4EE9-8313-435673C76F4E.jpg
    ACA38EB1-FC82-4EE9-8313-435673C76F4E.jpg
    62.5 KB · Views: 103
  • 8FCAA809-194D-4E8D-B5BC-3F101B1B99A9.jpg
    8FCAA809-194D-4E8D-B5BC-3F101B1B99A9.jpg
    60 KB · Views: 105
  • B4903AD7-BB4D-4A40-B9AF-AED447DC0B49.jpg
    B4903AD7-BB4D-4A40-B9AF-AED447DC0B49.jpg
    55 KB · Views: 95

66BlueGoose

Contributor
Sr. Member
Joined
Feb 6, 2014
Messages
408
In your picture #3, does not look like the bearing race has been set down in place. You need to use a race set / seal set or drift to make sure it is set all the way down in the housing. Once done, when you place your bearing and seal in, they will sit lower. Look at chuckyb's 4th picture.
 
OP
OP
Bonefizz

Bonefizz

Contributor
Full Member
Joined
Nov 4, 2016
Messages
293
Loc.
The poor house
Perfect, thank you. I’ve got them all pushed down to the cup except one, it’s being stubborn. Of course, it’s the upside down one. I may need to pull out the torch and stand on my head to get it.
 

chuckyb

Contributor
Sr. Member
Joined
Oct 25, 2016
Messages
941
The upside down hammering is a PIA. Keep going at it as evenly as possible and it will go in.
 
OP
OP
Bonefizz

Bonefizz

Contributor
Full Member
Joined
Nov 4, 2016
Messages
293
Loc.
The poor house
I ended up putting the run in the freezer for a couple of hours and then it slid right in. Should have done that for the other three!

I finished installing my steering knuckles and shims late last night. What a pain!

Thank you everyone for your input, you were all a big help. I love this forum!
 
Top