• Welcome to ClassicBroncos! - You are currently viewing the forums as a GUEST. To take advantage of all the site features, please take a moment to register. It's fast, simple and absolutely free. So please join our community today!
    If you have problems registering or can't log into your account, please contact Admin.

Dana 30 King Pin Rebuild

904Bronco

Contributor
Bronco Guru
Joined
Sep 28, 2004
Messages
5,769
Loc.
San Martin, CA
Looking for a video or more info.

I have done a search and copied down various Key points from different threads. Utube Videos seem geared more so at Jeeps than Broncos.

Any suggestions? Thx. Doug
 

DirtDonk

Contributor
Bronco Guru
Joined
Nov 3, 2003
Messages
47,641
Utube Videos seem geared more so at Jeeps than Broncos.

I would still take those into account. Very likely the specs are virtually identical. Similar vintage Dana 30's may turn out to be the same with regard to the king-pins.
At the very least they'd be close enough to get you on the road.
What about Ford factory books? What about the Dana Service Manual that someone posted up here on the forum? I bet that pretty much covers every detail.

I know I saved it at one time, but where it is and on which hard drive would be hard to say at this time.
But I'll look...

Good luck!

Paul
 

66BlueGoose

Contributor
Sr. Member
Joined
Feb 6, 2014
Messages
408
904 Bronco - It's pretty straight forward.

Special Tools:
1) Hub Nut Socket
2) Spindle removal tool
3) Dial type torque wrench for checking king ping preload drag

Parts (you have to be in there, might as well replace what's need or worn):
1) Inner and outer wheel bearings
2) Hub Seal
3) Spindle Bearing
4) Spindle Seal
5) King pin bearings and seals (bumpers for certain years)
6) King ping shim kit
7) axle u-joint
8) Outer Axle Housing Seal
9) Brakes (Shoes, wheel cylinders, spring kit)

Make sure you know which Dana 30/hubs/axles your dealing with, hub seals, axle seals and king pin bumpers vary.

Key considerations
1) Torqueing hub nuts, I use Paul's procedure
2) Setting King pin preload drag

I am in the East Bay, and in San Jose a bunch, feel free to PM me.
 
OP
OP
904Bronco

904Bronco

Contributor
Bronco Guru
Joined
Sep 28, 2004
Messages
5,769
Loc.
San Martin, CA
Thank you 66 Blue Goose. I may take you up on your offer

It does seem to be relatively straight forward... Trepidation for something I haven't done before I guess.

So the center section has been rebuilt, 4:11 open carrier, I believe I have sourced all the parts/seals needed for the kin pins. Doing a GM based frt. disk brake conversion as well.

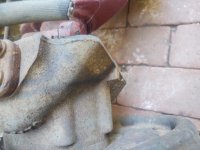
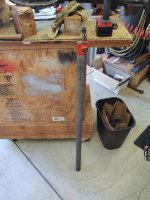
One side would not come apart. Diff housing was strapped to my bench and I used this Pipe wrench with a 40" extension on it to turn the Top king pin and work it out. Was very careful not to tear it up. The opposing side, loosened the 8 bolts and the king pins pushed out on their own??? Came right apart. Bower bearings were wasted, grease was powdered on both sides. Everything seems correct from what I read, of the parts I took out. Original Timken outer housing seal on the side that didn't want to come apart.

I have wire-wheeled everything and painted the housing with Eastwood's chassis paint. Hope to start assembly this afternoon, borrowing an inch torque wrench for the preload, each top kin pin had 6 - shims. I will start with that.

Paul sent / scanned a number of pages from service manuals he had. I decoded the axle BOM so it seems correct for my Bronco (68 1/2 -> 69)

Thanks again for your offer.

Parts: (4) King Pin kits from WH's, plus a shim kit.
Outer axle tube seals from WH's, they have no markings. Got a number from Napa but they couldn't find them in the state. (2" OD x 1 3/8" ID)
D30 - Diff cover gasket from Napa
Gear set, carrier, bearings, inner seals from West Coast Differential.

I guess this is a build thread now...
 

Attachments

  • IMG_20201012_183812426.jpg
    IMG_20201012_183812426.jpg
    127.7 KB · Views: 57
  • IMG_20201012_183801726.jpg
    IMG_20201012_183801726.jpg
    130.6 KB · Views: 57
  • IMG_20201012_152220494.jpg
    IMG_20201012_152220494.jpg
    121.2 KB · Views: 55

66BlueGoose

Contributor
Sr. Member
Joined
Feb 6, 2014
Messages
408
Yea, sometimes the king pins have been in there so long, they just don't pop loose when you pull the bolts, had to do something similar with one of mine. The old manual is what I used for reference as well, gives you the numbers for the preload on the king pins. I remember starting with the existing shim stack then having to add a few. Funny you mention the brake conversion, going to be doing that on my next Dana 30 build in a few months for now.
 
OP
OP
904Bronco

904Bronco

Contributor
Bronco Guru
Joined
Sep 28, 2004
Messages
5,769
Loc.
San Martin, CA
I got a late start yesterday.

WH's King pin kit has a Koyo race, part# matches the on the Bower race that came out. Bearing is made in China, bearings that came out don't seem to have numbers?

Races in the freezer worked well for install. Can't imagine pounding them in while being upside down with the housing still in the rig.

Hope to get a little farther along today?
 

Attachments

  • IMG_20201012_183826937.jpg
    IMG_20201012_183826937.jpg
    148.9 KB · Views: 42
  • IMG_20201014_180127092.jpg
    IMG_20201014_180127092.jpg
    113.8 KB · Views: 46
OP
OP
904Bronco

904Bronco

Contributor
Bronco Guru
Joined
Sep 28, 2004
Messages
5,769
Loc.
San Martin, CA
Well today went well, knuckles are back on, preloads set @ 10 ft lbs.

Kept the original 6 shims on both sides, added 2 on one side and 3 on the other.
Did touch up painting and will get the radius arms back on tomorrow. Then back in the frame it goes.
 

Attachments

  • IMG_20201015_162142475.jpg
    IMG_20201015_162142475.jpg
    117.4 KB · Views: 61
  • IMG_20201015_125745533_HDR.jpg
    IMG_20201015_125745533_HDR.jpg
    94.8 KB · Views: 60
  • IMG_20201015_123820198.jpg
    IMG_20201015_123820198.jpg
    85.4 KB · Views: 63
OP
OP
904Bronco

904Bronco

Contributor
Bronco Guru
Joined
Sep 28, 2004
Messages
5,769
Loc.
San Martin, CA
Disc Brake install...

I picked up the WH's kit from a guy locally who bought it and then decided not to use it. I think I saved about $100 from the listed price.

It is a pretty complete kit by itself: Raybestos Rotor, new loaded calipers, full cover backing plate, new longer spindle bolts and lock washers, then there are multiple upgrades you can add on, like new hoses, new bearings, other replacement parts.

The spindle comes set up for early style axles with the seal installed on the back of the spindle. The kits has the pieces if you need the late style seal. (Rubber) I have the early axles. The seal on the back of both the spindles was not seated all the way, so I had to pound them in with a seal driver.

The directions are pretty straight forward, until you get to the part about grinding off a portion of the knuckle for clearance for the floating GM caliper. All WH's directions show is the D44 grinding needed. I actually went to Tom's site to look at their kits directions and they have a photo of what needs ground off for the D30 Knuckle, which isn't much. (See pic's)

I was able to clean and reuse my Timken bearings from my drum brakes as the kit says you can. I cleaned and reused my Ford hubs. Picked up new stainless lines (for D30) and hoses.

A little more work to do on the front and I should be done.
 

Attachments

  • IMG_20201017_154611978.jpg
    IMG_20201017_154611978.jpg
    126.4 KB · Views: 33
  • IMG_20201018_145912053.jpg
    IMG_20201018_145912053.jpg
    94.3 KB · Views: 31
  • IMG_20201018_145931701.jpg
    IMG_20201018_145931701.jpg
    99.7 KB · Views: 34
  • IMG_20201018_164455524.jpg
    IMG_20201018_164455524.jpg
    85.7 KB · Views: 32
  • IMG_20201018_164501711.jpg
    IMG_20201018_164501711.jpg
    125.4 KB · Views: 34
Top