


Community
Message Forum
Photo Gallery
Event Calendar
Book Reviews
Bronco Wallpaper
Bronco FAQ
Link Back to CB!
Photo Gallery
Event Calendar
Book Reviews
Bronco Wallpaper
Bronco FAQ
Link Back to CB!
Buy / Sell


Bronco Tech
3 Arm Wiper Setup
Fix Motor Mount
Roll Cage Braces
Throttle Body 65mm
Wheel Alignment
Heat Riser Replacement
Vent Window Repair
Center Console Mount
Straighten Bumper
Ford 6R80 6 spd
More Tech...
Fix Motor Mount
Roll Cage Braces
Throttle Body 65mm
Wheel Alignment
Heat Riser Replacement
Vent Window Repair
Center Console Mount
Straighten Bumper
Ford 6R80 6 spd
More Tech...

Install the app
-
Welcome to ClassicBroncos! - You are currently viewing the forums as a GUEST. To take advantage of all the site features, please take a moment to register. It's fast, simple and absolutely free. So please join our community today!If you have problems registering or can't log into your account, please contact Admin.
You are using an out of date browser. It may not display this or other websites correctly.
You should upgrade or use an alternative browser.
You should upgrade or use an alternative browser.
Fixing Leaky Intake Manifold (Part 2)
- Thread starter bostonbronconut
- Start date
OP
OP
Re: Charcoal Canister - I'm confident that I found the mounting bracket but no canister. How important do you think it is for me to install one? If I don't really need one then I just need to cap that other hole in the air cleaner, right (see attached photo)?
Re: Leaky Intake Manifold - I patched up the intake manifold with some more oil-resistant RTV and it looks to have stopped the leak or at least slowed it down for the moment. I let the Bronco sit for a few days so the RTV could properly cure. I took it for a drive yesterday and didn't find any (significant) oil in the well at the back of the block. I hope it will buy me a few dry weeks before it gets too cold to drive it and then I'll pop off the manifold to reinstall it correctly.
Re: Leaky Intake Manifold - I patched up the intake manifold with some more oil-resistant RTV and it looks to have stopped the leak or at least slowed it down for the moment. I let the Bronco sit for a few days so the RTV could properly cure. I took it for a drive yesterday and didn't find any (significant) oil in the well at the back of the block. I hope it will buy me a few dry weeks before it gets too cold to drive it and then I'll pop off the manifold to reinstall it correctly.
Attachments


- Joined
- Nov 3, 2003
- Messages
- 47,641
Hey, dry is good!
For the charcoal canister, even though it’s not a critical component, and certainly isn’t required to make the engine run better, I will never again run a vehicle without one.
Even outside you can sometimes smell the fumes.
But if you’re parking it indoors, and you don’t smell fumes from the gas tank and carburetor, you’re one of the very few lucky ones.
Most of us would not be able to park our Broncos near the house, much less in the garage, without the evaporative emission system intact.
The good news is that that fitting is readily available at the local parts store. It’s part of a small filter housing.
Probably on the shelf near the PCV valves.
It simply slips inside the air filter, housing and through the hole, and clips in place.


OP
OP
I forget which one I bought but I did install one of those a few years ago and it helped fix a coolant leaking issue I had. Unfortunately, I did not seal the back of the engine/manifold correctly with enough gasket maker, which is causing the current issue.Hey boston, they make 2 different intake gaskets for a 302 Ford, both come in a full gasket pack??? Trust me, I learned the hard way!!!
OP
OP
Unfortunately, adding the RTV was a temporary solution and I am starting to get some oil pooling again. It looks like I am going to have to fix this the correct way. I'm going to create a new thread regarding that in a few minutes. I appreciate all of the help you guys have given me regarding this issue.Hey, dry is good!
For the charcoal canister, even though it’s not a critical component, and certainly isn’t required to make the engine run better, I will never again run a vehicle without one.
Even outside you can sometimes smell the fumes.
But if you’re parking it indoors, and you don’t smell fumes from the gas tank and carburetor, you’re one of the very few lucky ones.
Most of us would not be able to park our Broncos near the house, much less in the garage, without the evaporative emission system intact.
The good news is that that fitting is readily available at the local parts store. It’s part of a small filter housing.
Probably on the shelf near the PCV valves.
It simply slips inside the air filter, housing and through the hole, and clips in place.
OP
OP
I've finally gotten around to fixing this issue. I've popped the intake manifold off and plan on removing the old RTV and will add new RTV (The Right Stuff) to the front and back of the block.
I've done more research on this and found an article about the PCV valve needing replacing, so I'll do that when putting everything back together. Stay tuned!
I've done more research on this and found an article about the PCV valve needing replacing, so I'll do that when putting everything back together. Stay tuned!
Attachments

- Joined
- Nov 3, 2003
- Messages
- 47,641
Not sure what is meant by this. What did the article say? And what about yours makes you think it needs replacing?I've done more research on this and found an article about the PCV valve needing replacing, so I'll do that when putting everything back together. Stay tuned!
The PCV valve is in fact, a service replacement item. But it does not need replacing very often. Certainly not during every casual tune-up, or spark plug change. Or when fixing a leaking intake...
When in doubt as to it's functioning, or it's overall age, or if it's not looking all that pristine anymore, then certainly get a new one. They're not that expensive. But I'm not sure what kind of reading you did was telling you that they all need replacing.
Or were you referring to something that was changing the whole design of the original system? Or just for getting a new stock type valve to replace yours?
On the flip side of that, there have been decades of writings that state that, as long as the valve's pill rattles when you shake it, it's still working properly. I've found that to not be true always. Certainly not a universal truth.
It should rattle and be fine when they're low mileage and the oil is not all caked up, but I've had truly old and decrepit valves still rattle when shaken, and yet not really function as new.
So I never use the rattle test anymore. Just the general condition test, and age test. If it's got 100k miles on it, it's just cheap insurance to get a new one. If it's looking truly fugly, it's cheap insurance to get a new one.
But not just because someone wrote that they should all be replaced.
Paul
- Joined
- Nov 3, 2003
- Messages
- 47,641
And going back a little bit in this discussion, but still regarding the PCV system and evaporative emissions system.
The fitting that Oldtimer posted, and the hole that you showed in the side of the air cleaner housing, were not related. I got sidetracked with other parts of this discussion, and neglected to come back around to this.
The hole in the side of your housing is for the CHARCOAL CANISTER vent into the engine, not the PCV air return.
There is a different fitting, with it's own built-in fiber element, that fits in the hole in the side of your housing.
The elbow fitting that was posted earlier, is supposed to go underneath the center section of the housing, between the filter house and the carb hat. So it's not visible in your picture.
Next time you have your filter off (probably still is at this time?) shoot a pic of the underside of the housing. See if there is another fitting, or empty hole there.
And going back to the beginning... Your vacuum tree at the back of the intake has a few vacuum caps on it. I would check those, and replace them regularly if they are of the cheaper variety. They leak!
If yours are still good, then don't throw them away. They probably came from the factory and are still working. But if they are aftermarket replacements, you're lucky to get a year out of them before they start to leak and give you funky running.
And a last thing, please take some pictures of the insides of your valve covers.
We're looking for baffles. You want to know which one has the baffle, and that's the one that should get the PCV valve. The one without the baffle should be the air return.
That said, if yours was working, and not sucking oil, and not weeping oil out of the fittings, then leave it alone! Cain't fix what ain't broke after all.
Or at least you don't want to...
Paul
The fitting that Oldtimer posted, and the hole that you showed in the side of the air cleaner housing, were not related. I got sidetracked with other parts of this discussion, and neglected to come back around to this.
The hole in the side of your housing is for the CHARCOAL CANISTER vent into the engine, not the PCV air return.
There is a different fitting, with it's own built-in fiber element, that fits in the hole in the side of your housing.
The elbow fitting that was posted earlier, is supposed to go underneath the center section of the housing, between the filter house and the carb hat. So it's not visible in your picture.
Next time you have your filter off (probably still is at this time?) shoot a pic of the underside of the housing. See if there is another fitting, or empty hole there.
And going back to the beginning... Your vacuum tree at the back of the intake has a few vacuum caps on it. I would check those, and replace them regularly if they are of the cheaper variety. They leak!
If yours are still good, then don't throw them away. They probably came from the factory and are still working. But if they are aftermarket replacements, you're lucky to get a year out of them before they start to leak and give you funky running.
And a last thing, please take some pictures of the insides of your valve covers.
We're looking for baffles. You want to know which one has the baffle, and that's the one that should get the PCV valve. The one without the baffle should be the air return.
That said, if yours was working, and not sucking oil, and not weeping oil out of the fittings, then leave it alone!
Cain't fix what ain't broke after all.Or at least you don't want to...
Paul
OP
OP
Re: PCV—I read that a blocked/bad valve could result in increased pressure and oil being pulled into the engine. Some oil was in a little hole at the end of the block and dropped inside the engine, but not a large amount. That being said, the PCV does rattle as you mentioned in your earlier message so maybe that isn't the issue. But, since it is a $5 part, I don't mind swapping it out and just having ease of mind.
Re: Housing - I plan to get all of that assembled correctly so I am no longer pulling in dirty air. I am also going to get a charcoal canister as well. I've found a used one online (https://www.northeastclassicfordparts.com/product/fuel-vapor-charcoal-canister-1976-1977-bronco/) at a decent price. That being said, CJ's and some chains sell new canisters; are there any OEM/AMs you'd recommend?
Re: Vaccum Tree—I put new vacuum caps on a few years ago; it doesn't seem like they are leaking yet, but similarly to the PCV, they are not too expensive and easy to replace.
Re: Valve Covers - I was considering switching the valve covers from one side to the other because I have a lot of hoses on the passenger side, and it would help with organization and clutter. I hope to remove the valve covers within the next 48 hours and will provide many photos when done.
Re: Broken Bolt - One thing I haven't mentioned is that one of the manifold bolts broke off (green circle). It looks like a clean break, so I was going to use a bolt extractor to get it out, but I figured I would mention it if you recommend another method.
Attachments

- Joined
- Nov 3, 2003
- Messages
- 47,641
No, it can't "pull oil in" to an engine. The oil is already there!Re: PCV—I read that a blocked/bad valve could result in increased pressure and oil being pulled into the engine.
Pressure? Yes, if the engine is very worn and the combustion pressures/gasses/gunk is getting past the piston rings, it can be enough pressure to push oil OUT of the engine through any available orifice or crack. But on an engine in good condition, especially a fairly new engine, the amount of "blow-by" is (or should be) minimal enough that there really is not so much pressure that it's going to overcome the breather vent you already have on your one valve cover.
Any engine will always benefit from a properly working PCV valve, and it does "suck" so that any minimal excess blowby is sucked out and back into the engine to re-burn. But not having one won't really let all that much oil get out. If you had the other cover plugged however, without any breather cap, then all bets are off!
And once an engine gets old, sits for an over-long time, or just has something wrong with the piston rings, even a good PCV valve will only do so much before your oil starts to get out again and all over the place.
Did we already talk about this? Got pics of what you're talking about? How does oil drip out, then drip back into the engine?Some oil was in a little hole at the end of the block and dropped inside the engine, but not a large amount.
Are you talking about the hole circled in green in your pic? That's all inside the engine anyway. Right?
Worth a shot. But it's not going to keep oil from dripping into the engine. After all, no matter how much vacuum you're producing at the manifold and therefore the PCV valve, it's not going to suck it back in from other areas.That being said, the PCV does rattle as you mentioned in your earlier message so maybe that isn't the issue. But, since it is a $5 part, I don't mind swapping it out and just having ease of mind.
Good. Take some pics too, so we can see what you're dealing with.Re: Housing - I plan to get all of that assembled correctly so I am no longer pulling in dirty air.
Seems like a good price if it's still functioning. New might have some advantages, but used isn't bad as long as the charcoal media is still intact.I am also going to get a charcoal canister as well. I've found a used one online (https://www.northeastclassicfordparts.com/product/fuel-vapor-charcoal-canister-1976-1977-bronco/) at a decent price. That being said, CJ's and some chains sell new canisters; are there any OEM/AMs you'd recommend?
And you can "renew" it yourself anyway, if it's had liquid gas getting into it. Put it in the hot sun, or oven (really not sure how that works, but they said it in the book!) or even replace the charcoal with new, available from various sources.
I have no idea how the oven thing would work, but it was literally in the book in days gone by. I'm sure they did not mean to use your household oven though, since the smell of gas would really tick off the natives and you'd likely be barred from future kitchen use for life!
By the way... Do you still have the anti-rollover valve mounted to the side of the passenger frame rail with the tube from the gas tank?
If so, got a pic? We've had some images posted before, but not very many, considering how important it is, and how hard they are to find sometimes.
Great. Look forward to seeing what's what and on what side. Remember that no matter where it's more convenient, if one side has a good baffle and the other does not, then put the valve in the baffled cover. Whichever side you choose to use the cover on is up to you. But make sure the valve is on the baffled one.Re: Valve Covers - I was considering switching the valve covers from one side to the other because I have a lot of hoses on the passenger side, and it would help with organization and clutter. I hope to remove the valve covers within the next 48 hours and will provide many photos when done.
Don't have a go-to method or tool for that. But I'm sure someone will have experience with it. But I will say this. Don't drop it into the crankcase!Re: Broken Bolt - One thing I haven't mentioned is that one of the manifold bolts broke off (green circle). It looks like a clean break, so I was going to use a bolt extractor to get it out, but I figured I would mention it if you recommend another method.
While you're working on anything, and frankly, while you're not working on anything, cover that whole valley with rags or whatever you have to keep general stuff from getting into the engine while it's open.
Paul
- Joined
- Nov 3, 2003
- Messages
- 47,641
I guess I should clarify something I said. If your PCV system is removed or otherwise not functioning, you will certainly get oil weeping out of places you don't want to. It's just that it's not going to happen overnight on most healthy engines. It takes time to build up and weep out of a healthy running engine. But it will eventually find it's way out.
Oil always found a way out in the old days. Now we have better sealing seals and gaskets too, in addition to still utilizing PCV systems on even the newest engines.
But if you have lots of oil coming out, it's probably due to other things in addition to the PCV not working.
Paul
Oil always found a way out in the old days. Now we have better sealing seals and gaskets too, in addition to still utilizing PCV systems on even the newest engines.
But if you have lots of oil coming out, it's probably due to other things in addition to the PCV not working.
Paul
OP
OP
I finally got the header covers off.
1. Gaskets - I've seen better; there looks to be some oil on the back-driverside engine/gasket (see photo). That might be a source of a leak.
2. Oil Pressure Sending Unit - I thought this was going to look worse but besides what looks like worn out rtv/wrap, it doesn't look all that bad. Could also be a tiny source of a leak but I'd assume the unit would be caked in oil if it was really bad.
3. Oil Pressure SU Extension- I included a photo but I'm not seeing much oil either.
4. Oil Filter Screw/Plug - That looks pretty clean as well.
Thank you for all of the feedback. I'll keep plugging away and will follow up shortly.
Attachments
-
 driver-side-back.jpg80.4 KB · Views: 26
 -
 driver-side.jpg93.3 KB · Views: 26
 -
 extender-oil-filter.jpg69.7 KB · Views: 25
 -
 header-covers-2.jpg71.3 KB · Views: 24
 -
 header-covers.jpg87.1 KB · Views: 21
 -
 header-covers-three.jpg93 KB · Views: 24
 -
 oil-sender-bolt-extender.jpg67.1 KB · Views: 20
 -
 opsu-1.jpg58 KB · Views: 16
 -
 opsu-2.jpg52.3 KB · Views: 17
 -
 passenger-side.jpg103.4 KB · Views: 24
OP
OP
The chimney was on the driver's side, which is the valve cover on the right in the "header-covers" image. (I just realized that I've been calling them the wrong name the whole time).Great pictures, thanks!
So which side of the engine were the valve covers on? Was the one with the small baffle, on the passenger side, and the one with the big “chimney” on the driver side?
OP
OP
Alright, I've been back at it and have started reassembling everything. In the past, I've adopted a "fuck it" methodology that involved fixing stuff, but in a messy, cluttered way, so I've been taking my time to put all hoses and wires in an organized manner.
I am going to "Get in the Zone" and buy a PCV elbow for the air cleaner and a new fuel vapor canister. This Duralast canister looks sufficient, and I should be able to mount it high on the firewall: https://www.autozone.com/engine-man...r/p/duralast-vapor-canister-vc4356/294210_0_0. Let me know if you think otherwise.
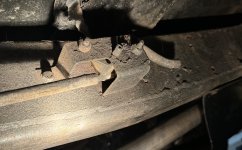
@DirtDonk—You asked about my anti-roll valve, which I finally found and took a photo of. As you'll notice, the tubing on the right has been cut. I assume I should be running a new line from the valve to the canister. Is that correct?
I am going to "Get in the Zone" and buy a PCV elbow for the air cleaner and a new fuel vapor canister. This Duralast canister looks sufficient, and I should be able to mount it high on the firewall: https://www.autozone.com/engine-man...r/p/duralast-vapor-canister-vc4356/294210_0_0. Let me know if you think otherwise.
@DirtDonk—You asked about my anti-roll valve, which I finally found and took a photo of. As you'll notice, the tubing on the right has been cut. I assume I should be running a new line from the valve to the canister. Is that correct?
Attachments


- Joined
- Nov 3, 2003
- Messages
- 47,641
The line on the left comes from the tanks, correct? Is that intact still, as far as you can tell?
If so, then yes, the line to the canister is just a simple tube. Metal most of the way, up to the engine compartment and then converts to rubber up, or near the canister.
The part you want for the air cleaner is not an elbow. The elbow that you see still in the air filter housing underneath, between the two halves, is where the PCV air return line goes to the valve cover. That is a simple elbow.
The empty hole in the side of the air filter housing is for a component that consists of a straight hose fitting with groove in it, and a an open chamber with a fiber filter media in it.
The groove is for a metal clip that holds the component in place.
Hopefully the new parts come with the clip, but that would be too easy.

The housing with the filter media in it, sits inside the air filter, housing, in between the metal and the actual air filter element. Pictures of it have been posted up before, but I’ll see if I can find one.
Maybe there’s an easy to clip one from rockauto somewhere.
If so, then yes, the line to the canister is just a simple tube. Metal most of the way, up to the engine compartment and then converts to rubber up, or near the canister.
The part you want for the air cleaner is not an elbow. The elbow that you see still in the air filter housing underneath, between the two halves, is where the PCV air return line goes to the valve cover. That is a simple elbow.
The empty hole in the side of the air filter housing is for a component that consists of a straight hose fitting with groove in it, and a an open chamber with a fiber filter media in it.
The groove is for a metal clip that holds the component in place.
Hopefully the new parts come with the clip, but that would be too easy.
The housing with the filter media in it, sits inside the air filter, housing, in between the metal and the actual air filter element. Pictures of it have been posted up before, but I’ll see if I can find one.
Maybe there’s an easy to clip one from rockauto somewhere.
OP
OP
This hurts my brain.
Thank you very much for your patience.
From what I can tell, it is still intact. The rollover valve is positioned under the passenger seat.The line on the left comes from the tanks, correct? Is that intact still, as far as you can tell?
The PCV valve on the valve cover is connected to the front of my Edelbrock 1406 Carb. This is how it was configured when I installed the carb years ago. In theory, that configuration should be fine since the PCV return line goes back into the manifold, right? If so, do I cap the elbow on the air cleaner housing?The part you want for the air cleaner is not an elbow. The elbow that you see still in the air filter housing underneath, between the two halves, is where the PCV air return line goes to the valve cover. That is a simple elbow.
My research shows that the piece you are referring to is a DOAZ-9D692-A (see image), which does not have said fiber filter. That connects to a hose, which then connects to the vapor canister. Again, this is what my research is showing me...it doesn't mean that it is 100% correct. The only thing I could find that was similar to what you described was a crankcase breather element like the image I found on broncograveyard.com. Please confirm.The empty hole in the side of the air filter housing is for a component that consists of a straight hose fitting with groove in it, and a an open chamber with a fiber filter media in it.
Thank you very much for your patience.
Attachments


- Joined
- Nov 3, 2003
- Messages
- 47,641
Those are the parts.
I’m probably just remembering it a little incorrectly, as the first part you show would have been inside my tube from the charcoal canister. I would slide the clip back, and remove that hose from the fitting that you show in the second picture of the filter.
The clip stayed in place as long as you didn’t try to pull too far, continuing to hold the filter in place. But my plastic fitting did not have the little ears on it that I see on the one in your picture.
Maybe just a slight variation on that. Mine was more of a simple cone shape, but perhaps it had been replaced.
Given the fact that your part number is for a 1970, I don’t see how my 71 would’ve been any different from the 76.
Similar threads
- Replies
- 8
- Views
- 461