• Welcome to ClassicBroncos! - You are currently viewing the forums as a GUEST. To take advantage of all the site features, please take a moment to register. It's fast, simple and absolutely free. So please join our community today!
    If you have problems registering or can't log into your account, please contact Admin.

Fixing sticky door locks and installing door glass

mraine

Contributor
Newbie
Joined
Dec 12, 2019
Messages
54
My bronco is like Frankenstein's monster, its made up of a bit of this and that. 74 frame, 77 rear and front ends, 66 liftgate, all new body, lots of parts left over from the original that I have tried to rescue.
I am currently working on getting the doors installed. So far I have installed the weather strip, latch and latch rods, handle, lock and glass.

My doors fit and have nice, even gaps which looks nice but I can only close the doors when I slam them super hard, then I have to reach into the cavity of the door with a screwdriver and push a lever on the latch to get the door open. It is so tight that I think if I open and close the doors a couple more times I will bend something. Here are ten things I did to fix it, plus a few questions at the end.
I am not saying these are the right things to do, yours might be different. This is what I did.

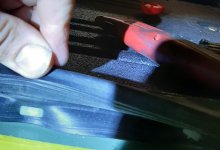
1. Trim door panels – The edge of the door panel was hitting the hinge when the door closed. You can see the paint dried funny where the panel was touching the wet paint. I think it was going to crack and buckle the panel given a bit of time. I used a die grinder to trim it and now I have good clearance but the paint is messed up. The pic looks like I cut ¼ inch out but I only cut about 1/16th or so. So its good and bad. I guess I am going to get a small paintbrush and put some primer and leftover paint on. After staring at it and swinging the door back and forth fifty times, that took thirty minutes to fix.

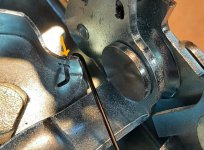
2. Flip straps – My door straps were installed wrong and the strap tab on the door was buckling the adjacent body panel edge so that was an easy one. Two minutes to fix.
 

Attachments

  • trim hinge.jpg
    trim hinge.jpg
    86.1 KB · Views: 31
OP
OP
M

mraine

Contributor
Newbie
Joined
Dec 12, 2019
Messages
54
3. Trim lock hole. I bought a new lock set but it wouldn't fit in the hole. I had to file the hole ever so slightly to get the lock to fit in the door. The door panel has a big slot and a small slot to accept the tabs on the tumbler and my big slot was ever so slightly too small. More paint needed to keep it from rusting. Another easy fix at five minutes.

4. Trim the door weatherstrip – The weatherstrip is way stiff and kept the door from sitting comfortably so I needed to do something. I saw another thread where somebody suggested a heat gun and somebody else trimmed their weatherstrip. I trimmed. The weatherstrip is shaped differently depending on which part you are talking about so its hard to describe but I cut out about ¼ inch of the supporting middle of the strip, starting at the edge of my thumb down, leaving the exposed edge as is. I know I messed it up and will need to replace it soon since I hacked it up but for now, it works. Two hours.

5. Silly putty – I used silly putty to check gaps and found I didn't have any metal to metal binding, which is more lucky than skill. Sorry the pic is out of focus, I am checking the bolt to bolt clearance when I close the door. You can kind of see that the bolt head impressed a shape on the silly putty but didn't bind. One hour.
 

Attachments

  • silly2.jpg
    silly2.jpg
    51.6 KB · Views: 23
  • cut weather.jpg
    cut weather.jpg
    72.4 KB · Views: 21
OP
OP
M

mraine

Contributor
Newbie
Joined
Dec 12, 2019
Messages
54
6. Cut rods - I have double bent door rod ends from the original bronco. Not only do they cause the rod clips to bind, but when you want to unattach a rod to check the fit, you have to take the latch out of the door to get at the rods. So I cut the tips off where the orange line is in the pic. Easy peasy. After twelve hours of fighting it, I cut the rod tips. Works perfect. Thirty minutes.

7. The door handle – The original door handle, or at least the door handle that was there when I bought it had a different angle on the attach screw than the replacement I bought. See the pic. That angle difference pushed the door handle ever so slightly towards the end of the door that holds the latch when you install it. That small difference pushed the handle hinge pin out so it touches the sheet metal of the door which caused the hinge pin on the handle to bind, which means that the latch doesn't want to retract after you mash the thumb button on the handle. So I bent the tabs that hold the pin. I bent them too far of course and really bound up the handle but after some fiddling I was able to compensate for the bad screw angle without binding the pin. I have pics of the before and after bends but really its hard to see the small difference between the two. I think after I bent the tabs, I moved the hinge pin about 1/16th, or at most 1/8th away from the door panel. If that wasnt enough, I was going to bend the tabs more and run a drill through the hinge pin holes so that the pin didn't bind, but I didn't need to. That took five minutes to fix. And four hours of staring at it to figure out why it was binding. So four hours and five minutes.
 

Attachments

  • Inkedrod_LI.jpg
    Inkedrod_LI.jpg
    65.6 KB · Views: 31
  • handles.jpg
    handles.jpg
    119.8 KB · Views: 27
OP
OP
M

mraine

Contributor
Newbie
Joined
Dec 12, 2019
Messages
54
8. Small screw – The latch has three attach screws. One is shorter than the other two. Make sure you put the small screw in the hole at the bottom, closest to the center of the vehicle. Or, do like I did and put the long screw there and bind up the latch for a day while you stare at it, wondering why it worked fine before. Three minutes plus a whole wasted day staring at it.

9. Move the cam return spring – I probably didn't need to do this and its a really small change but it seems like it works better after I moved the spring so there you go. The little fingers in the latch that grab the striker post didn't want to snap open when I triggered the release. The new spring position puts the spring end just a tiny bit further from the center of the finger wheel thing, making the latch more willing to release the post. I moved the spring from the orange arrow to where it sits now. It still sits in the same hole but it has a bit more leverage where it sits now. See pic for where I moved it. Two minutes.
 

Attachments

  • Inkedsmallspring_LI.jpg
    Inkedsmallspring_LI.jpg
    133.1 KB · Views: 28
OP
OP
M

mraine

Contributor
Newbie
Joined
Dec 12, 2019
Messages
54
8. Bend the main spring in the latch - My latch binds up when I locked the latch then tried to open it, then unlocked it. The unlock function didn't work because the slide would bind. If you look at the latch and play with it for a bit you can see that the most likely binding point is the slide plate that has the big L shaped spring poking through it. The sliding plate needs to lay mostly flat or it binds. The main spring in the latch runs at an angle that pushes the slide away from the latch and it acts like a childrens slide, moving whatever is on top away from the starting point.
I tried to polish the slide with sandpaper then with a die grinder with a soft pad and maybe it helped, maybe it didn't. Probably made it worse. So then I bent the tip of the spring so that it doesn't encourage the slide plate to move away from the latch and that really helped. But, be careful, the spring needs to sit in a grove on the other side of the slide plate and you don't want the spring to fall out of that groove so you have to bend the spring about ¼ inch from the end. If you bend it any further from the end, it has a chance to fall out of the groove.
The down side to bending the spring is that you lose some small portion of the spring assist when you mash on the thumb button on the door handle, but I think it is a small amount and I didn't have a choice. This was binding on me all the time until I bent the spring end. The orange line in the pic was where the spring was before I bent it. It took a couple hours to figure out why it was binding and one minute to fix.

9. Cut door latch rod – My passenger side door latch rod was hitting the door panel, making it bind. I cut the end about ¼ inch and that fixed it. It now rides about 1/16th from the door panel. I should have cut it another 1/8th just for some extra room but its probably ok as is. Two minutes.

10. Lube – I put some liquid ptfe on the latch. I am sure grease is better but grease attracts dirt so I went with this. I know, it will wear off. Two minutes.

Last, the passenger door opens and closes like a champ. It needs a firm pull to close it but its not bad at all. The drivers door is a bit tougher, the problem is the weatherstrip that touches the window frame. I don't want to cut that as it will look like crap so I am just going to let a year go by for it to break in.
Again, this is what I did. Maybe its all wrong and isn't for you.

Question: what did you guys use to lube the latch?
 

Attachments

  • Inkedbigspring_LI.jpg
    Inkedbigspring_LI.jpg
    88.4 KB · Views: 40

NewDog

Contributor
Full Member
Joined
Oct 30, 2018
Messages
187
Loc.
Surrey BC
LOL funny stuff - and thanks for sharing your experience and pics. My doors also need more slamming than I'd like to close fully.
 

BGBronco

Contributor
N A S H V I L L E
Joined
Jun 23, 2017
Messages
1,556
Loc.
Tennessee
The last go round I had with my Bronco, I really wanted to replace the body mounts but decided not to specifically because my door alignment was perfect. There are some basic things that need to happen and opening and closing doors are one of them!
 
OP
OP
M

mraine

Contributor
Newbie
Joined
Dec 12, 2019
Messages
54
I just looked, the hinge pin is on the front side of the hinge, pin head up. I think thats right.
 
Top