• Welcome to ClassicBroncos! - You are currently viewing the forums as a GUEST. To take advantage of all the site features, please take a moment to register. It's fast, simple and absolutely free. So please join our community today!
    If you have problems registering or can't log into your account, please contact Admin.

Installing Bailie Bilt bumpers

OP
OP
Boss Hugg

Boss Hugg

Contributor
Bronco Guru
Joined
Jun 8, 2010
Messages
2,145
It hinges up! But there’s an adjustment to be made on the front pivot point. Needs to be dropped about 1/2 to 3/4 inch. Sure wish I had the actuators today. But it’s about to rain so I had to pack all the tools inside the shop. Also wish I had space to get the bronco in there. But with this hinge system I won’t have enough ceiling clearance to raise the hood inside. 😒
 

Attachments

  • IMG_6006.jpeg
    IMG_6006.jpeg
    295.8 KB · Views: 20
  • IMG_6007.jpeg
    IMG_6007.jpeg
    302.6 KB · Views: 16
  • IMG_6008.jpeg
    IMG_6008.jpeg
    314.8 KB · Views: 16
  • IMG_6009.jpeg
    IMG_6009.jpeg
    347.3 KB · Views: 16
  • IMG_6010.jpeg
    IMG_6010.jpeg
    233.7 KB · Views: 19
Last edited:

Speedrdr

Contributor
Learning Member
Joined
Nov 27, 2017
Messages
1,244
Loc.
Paris, MS
I can understand why you are including actuators in this build. Lots of weight to be wrestling around…more so when you get past the wrestling around with heavy stuff age. Lol. Looking forward to seeing the finished product.

Randy
 
OP
OP
Boss Hugg

Boss Hugg

Contributor
Bronco Guru
Joined
Jun 8, 2010
Messages
2,145
I can understand why you are including actuators in this build. Lots of weight to be wrestling around…more so when you get past the wrestling around with heavy stuff age. Lol. Looking forward to seeing the finished product.

Randy
I mean, i DO intend to put some fiberglass parts on it, but in order to get structure in those glass parts, they may be bulked up so much they weigh the same as steel parts?? But there shouldn't be bolts sticking thru fenders and such like I have now. We'll see.
 
OP
OP
Boss Hugg

Boss Hugg

Contributor
Bronco Guru
Joined
Jun 8, 2010
Messages
2,145
More progress. But I got sidetracked with a possible blown head gasket in the explorer which I’ve been doing a v8 swap to.

 
OP
OP
Boss Hugg

Boss Hugg

Contributor
Bronco Guru
Joined
Jun 8, 2010
Messages
2,145
Dad came down and helped me fix the dent in the drivers end of the grill. At least it’s not apparent t from a mile away there’s a dent there. And I made it a two tone blue paint job!

So trying to figure what to do next I started cutting rod thinking I’d build the new grill as one piece and then cut it apart and mount the center section solid like I had planned. But then this happened. I need some 3/4 or 1” steel strap material to make the vertical parts of the old grill and I’ll be nearly done with it. I need to figure out whether or not to build the lower center section or just leave it alone.
 

Attachments

  • IMG_6046.jpeg
    IMG_6046.jpeg
    244.8 KB · Views: 15
  • IMG_6045.jpeg
    IMG_6045.jpeg
    280.2 KB · Views: 14
  • IMG_6044.jpeg
    IMG_6044.jpeg
    301.7 KB · Views: 12
  • IMG_6043.jpeg
    IMG_6043.jpeg
    228.7 KB · Views: 12
  • 71599665744__1FA7A307-F971-40B0-BD69-0949A0AC5F80.jpeg
    71599665744__1FA7A307-F971-40B0-BD69-0949A0AC5F80.jpeg
    290.5 KB · Views: 13
  • IMG_6041.jpeg
    IMG_6041.jpeg
    401.1 KB · Views: 13

Speedrdr

Contributor
Learning Member
Joined
Nov 27, 2017
Messages
1,244
Loc.
Paris, MS
If you indeed build the lower center section, will it clear the winch as it raises and lowers? I really couldn’t tell from your pics. What is there now looks good to me.

Randy
 
OP
OP
Boss Hugg

Boss Hugg

Contributor
Bronco Guru
Joined
Jun 8, 2010
Messages
2,145
The lower center section is the whole reason I cut the grill out to start with. I should've cut out the minimum to start with and it would've save some time and materials. But alas, here I am. If I build a lower center section, it will mount solid to the frame and stay in place when the hood moves.
 
OP
OP
Boss Hugg

Boss Hugg

Contributor
Bronco Guru
Joined
Jun 8, 2010
Messages
2,145
I suppose it’s time for another foto dump. Getting close to needing paint on the bumper. Probably gonna have it sand blasted before I rattle can it.

I had the drivers side bottom corner of the grill contact the bumper on its way up. I think when I get around to putting my glass fenders on it, I’ll be able to straighten up the bent part of the grill that I think is forcing that contact. It only touches for a second before it rotates up and away from the bumper.
 

Attachments

  • IMG_6053.jpeg
    IMG_6053.jpeg
    167.2 KB · Views: 13
  • IMG_6051.jpeg
    IMG_6051.jpeg
    205.6 KB · Views: 11
  • IMG_6052.jpeg
    IMG_6052.jpeg
    183.1 KB · Views: 10
  • IMG_6050.jpeg
    IMG_6050.jpeg
    179.5 KB · Views: 13
  • IMG_6049.jpeg
    IMG_6049.jpeg
    309.1 KB · Views: 13
OP
OP
Boss Hugg

Boss Hugg

Contributor
Bronco Guru
Joined
Jun 8, 2010
Messages
2,145
Fotodump!

Had to remove the elbow from the intake. The plastic air tube was in the way of the new cross pipe for the hood structure. So all that is now turnt just a bit to fit.

Also had to cut/splice all my front light wiring. No pics of that because, well, let’s just say I’m a fit/form/function kinda guy as opposed to a cosmetologist!

And there’s some action shots of blasting and painting. Getting close!!
 

Attachments

  • IMG_6081.jpeg
    IMG_6081.jpeg
    404.8 KB · Views: 7
  • IMG_6080.jpeg
    IMG_6080.jpeg
    442 KB · Views: 6
  • IMG_6079.jpeg
    IMG_6079.jpeg
    387.9 KB · Views: 7
  • IMG_6078.jpeg
    IMG_6078.jpeg
    582.3 KB · Views: 6
  • IMG_6077.jpeg
    IMG_6077.jpeg
    256.2 KB · Views: 5
  • IMG_6073.jpeg
    IMG_6073.jpeg
    308.3 KB · Views: 7
  • IMG_6082.jpeg
    IMG_6082.jpeg
    460.1 KB · Views: 5
  • IMG_6084.jpeg
    IMG_6084.jpeg
    198.1 KB · Views: 5
  • IMG_6083.jpeg
    IMG_6083.jpeg
    442 KB · Views: 7
OP
OP
Boss Hugg

Boss Hugg

Contributor
Bronco Guru
Joined
Jun 8, 2010
Messages
2,145
I feel like there’s an event I’m supposed to be at this weekend, but I’m not leaving till this thing is finished…. Just gotta remember what that event is… 🤔
 

Attachments

  • IMG_6092.jpeg
    IMG_6092.jpeg
    293 KB · Views: 7
  • IMG_6091.jpeg
    IMG_6091.jpeg
    231.9 KB · Views: 5
  • IMG_6090.jpeg
    IMG_6090.jpeg
    122.8 KB · Views: 4
  • IMG_6089.jpeg
    IMG_6089.jpeg
    101.5 KB · Views: 4
  • IMG_6093.jpeg
    IMG_6093.jpeg
    375.7 KB · Views: 4
  • IMG_6094.jpeg
    IMG_6094.jpeg
    185.8 KB · Views: 5
  • IMG_6095.jpeg
    IMG_6095.jpeg
    312 KB · Views: 7
OP
OP
Boss Hugg

Boss Hugg

Contributor
Bronco Guru
Joined
Jun 8, 2010
Messages
2,145
I’ve read that the first thing you want to do with a HF winch is to replace the cheap cables with real cables. If you look close, you can see the cables are copper clad instead of solid copper. Also, ramsey winches used to come with 6ga cables on their solenoid packs. I’m running 2ga between the solenoid and the motor with 1-0 cable from the battery in the back of the bronco. I hope to never have a motor problem with this winch!
 

Attachments

  • IMG_6105.jpeg
    IMG_6105.jpeg
    287.5 KB · Views: 8
  • IMG_6104.jpeg
    IMG_6104.jpeg
    114 KB · Views: 6
  • IMG_6103.jpeg
    IMG_6103.jpeg
    207.9 KB · Views: 7
  • IMG_6102.jpeg
    IMG_6102.jpeg
    358.9 KB · Views: 6
  • IMG_6101.jpeg
    IMG_6101.jpeg
    185.4 KB · Views: 7
  • IMG_6106.jpeg
    IMG_6106.jpeg
    197.3 KB · Views: 8
OP
OP
Boss Hugg

Boss Hugg

Contributor
Bronco Guru
Joined
Jun 8, 2010
Messages
2,145
Regarding that event somewhere..... Are we racing to see who gets there first or last?


PS: looking really good!
ummmm....YES. LOL. BUT, I know it'll take me ten minutes less to get there this time because the bypass is open. So I don't have the two hours on Mill Creek Road. (I've never cared to run very fast on that narrow road.)
 
OP
OP
Boss Hugg

Boss Hugg

Contributor
Bronco Guru
Joined
Jun 8, 2010
Messages
2,145
Well, today.... Ok, let me back up...

Many moons ago, I was trying to flush the coolant system. It seems that my engine had stop leak put in it at some point before I got it, and I wanted the system clean. So I had the engine warm, and thought I had the pressure off the system, and pulled the upper clamp off the radiator, which lead to brownish red coloring all over EVERYTHING in the shop, including the sheet rock in the ceiling, AND across part of my belly ending in time at the ER...which sucked because they didn't do anything that I hadn't already done at home...except give me a shot for pain meds.

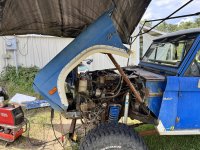
Fast forward to more modern days...like today. This engine and under the hood are STILL coated in that coloring. But today I spent some time doing a proper flush. As in two cycles with two bottles of flush. Reving the engine up and down, letting it idle, raising the idle... I got it pretty clean inside from what I could see.

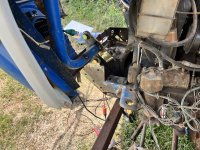
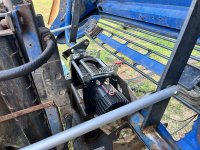
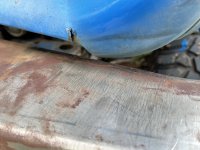
So now I've got that color all over just about everything because of the way I had stuff splashing. So I decided to get some Zep industrial strength cleaner and spray all over under the hood, and then power wash it off. Simple, right? Now I've got three plug wires throwing spark between the valve cover on one side and the alternator cover on the other. So tomorrow morning, I get to put new plugs on it before loading it up for OCBR. And I MIGHT have time to get the rear bumper mounted. But I have the top rear 1" of the frame rail to replace so I have something to bolt to, so it's not really simple. Just not a full weekend of work. I had to cut that part off due to the previous owner having a piece of 4x6x3/8 angle iron welded on for a bumper.

Fun times. If you're read this entire, worthless post, give it a like to say that you had nothing better to do!
 
Top