- Joined
- Aug 22, 2005
- Messages
- 14,492
I have been working a little more on my bronco. I have it driving better than it ever has. But to do this I had to sacrifice pinion angle by leaning the axle back in the top to get my castor angle back. The truck is lifted and it has a 205 transfer case. So with the lift and the higher sitting 205 I have a severe angle on the front drive shaft. Bad enough that it will bind with any front droop at all. It needs to fixed. So a high pinion is the first thing that will help out. But to get the pinion angle correct and not sacrifice drivability due to the poor castor geometry of the ball joints, the C's ( ball joint arms / mounts ) need to be cut off and rotated back. So when you do this the wedge mounts on the axle that the radius arms mount to also need to be moved. So, all that sounds like a great time.
First off I needed to find a donor axle. I was after a 75-77 f100 / 150 dana 44. The f 150 axle was the best choice because everything on it could be cut off and re used. You need to cut off the track bar mount, thats the one part you wont re use. ( You want to build a new raised track bar mount on the axle and get rid of any drop bracket you may have on the drivers side frame. It's a leverage game and the axle is stronger than the frame.)
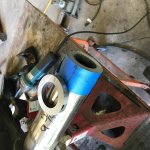
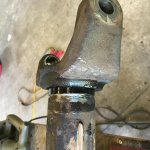
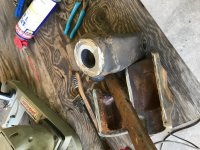
I got an axle from a member on this site ( super cool ). It was what I was wanting, a 1975 H.P. 44 out of an f100. This axle also has 1/2'' thick axle tubes, very beefy. So I dragged it out of the truck. Set jack stands up on a wheel dolly and put it on the stands. This made for a good working position. ( You are going to be working on it for a while, might as well get comfortable.) I took some measurements from a bronco width axle I have. Compared them to the new axle and figured out a plan of action. First I cut off the axle wedges. These are burned in pretty deep but if you go at them at the correct angle they come off pretty fast. I uses a 3'' zip wheel on a die grinder. With the wedges off it is easier to get to the weld on the C. I used my porta band to cut the C off. Yes I cut it clean off because I was going to shorten the tube anyway. I did cut right at the inside shoulder of the C. Cutting thru the weld. When it comes off try and catch it because it hurts when it bounces off your boot. Well with all that cut off you would think I would just do the other side. I was out of zip wheels. So I chose to clean up the stuff I had cut. The C needed the tube out of it. The wedges needed cleaned up and the track bar mount needed cut off the wedge. Plus the axle tube needed shortened and cleaned up and prepped to fit the C back on. I could do all this without the zip wheels. I ground the back face of the C. I got to where I could see the outline of the tube in the C. I then Put it in my press and tried to press it out. No love there. So I cut the inside of the tube to the C. I did this 2 times. I was then able to get the tube out of the C.
So at this point I had got good fits on the parts and just for fun I taped the wedges on and lightly tapped the C onto the axle about 1 /3 of the way. I needed to get cleaned up to go get supplies, the football games were starting and I was over it for the day. Shower , shopping, sitting. More tomorrow.
My plan is to get both sides all prepped. I will pull my 44 out of the bronco. I will mount the radius arms on the new axle with the wedges loose on the axle. I will set the springs back and get the truck weight back on the axle tubes. Then set my pinion angle, center my wedges where they need to go and tack them in place. Next I will set my C angle. I still need to find out what the best C angle is. Anyone?
After that I will pull it out and weld everything. I am pretty sure I could do all this using measurements, never having to test fit. But I want to get it right the first time. Extra work but that how I want to do it.
First off I needed to find a donor axle. I was after a 75-77 f100 / 150 dana 44. The f 150 axle was the best choice because everything on it could be cut off and re used. You need to cut off the track bar mount, thats the one part you wont re use. ( You want to build a new raised track bar mount on the axle and get rid of any drop bracket you may have on the drivers side frame. It's a leverage game and the axle is stronger than the frame.)
I got an axle from a member on this site ( super cool ). It was what I was wanting, a 1975 H.P. 44 out of an f100. This axle also has 1/2'' thick axle tubes, very beefy. So I dragged it out of the truck. Set jack stands up on a wheel dolly and put it on the stands. This made for a good working position. ( You are going to be working on it for a while, might as well get comfortable.) I took some measurements from a bronco width axle I have. Compared them to the new axle and figured out a plan of action. First I cut off the axle wedges. These are burned in pretty deep but if you go at them at the correct angle they come off pretty fast. I uses a 3'' zip wheel on a die grinder. With the wedges off it is easier to get to the weld on the C. I used my porta band to cut the C off. Yes I cut it clean off because I was going to shorten the tube anyway. I did cut right at the inside shoulder of the C. Cutting thru the weld. When it comes off try and catch it because it hurts when it bounces off your boot. Well with all that cut off you would think I would just do the other side. I was out of zip wheels. So I chose to clean up the stuff I had cut. The C needed the tube out of it. The wedges needed cleaned up and the track bar mount needed cut off the wedge. Plus the axle tube needed shortened and cleaned up and prepped to fit the C back on. I could do all this without the zip wheels. I ground the back face of the C. I got to where I could see the outline of the tube in the C. I then Put it in my press and tried to press it out. No love there. So I cut the inside of the tube to the C. I did this 2 times. I was then able to get the tube out of the C.
So at this point I had got good fits on the parts and just for fun I taped the wedges on and lightly tapped the C onto the axle about 1 /3 of the way. I needed to get cleaned up to go get supplies, the football games were starting and I was over it for the day. Shower , shopping, sitting. More tomorrow.
My plan is to get both sides all prepped. I will pull my 44 out of the bronco. I will mount the radius arms on the new axle with the wedges loose on the axle. I will set the springs back and get the truck weight back on the axle tubes. Then set my pinion angle, center my wedges where they need to go and tack them in place. Next I will set my C angle. I still need to find out what the best C angle is. Anyone?
After that I will pull it out and weld everything. I am pretty sure I could do all this using measurements, never having to test fit. But I want to get it right the first time. Extra work but that how I want to do it.
Attachments
-
 IMG_0537.jpg169 KB · Views: 288
 -
 IMG_0546.jpg154.1 KB · Views: 251
 -
 IMG_0547.jpg146.6 KB · Views: 257
 -
 IMG_0548.jpg135.5 KB · Views: 251
 -
 IMG_0549.jpg100.4 KB · Views: 244
 -
 IMG_0540.jpg127.5 KB · Views: 248
 -
 IMG_0543.jpg169.6 KB · Views: 261
 -
 IMG_0542.jpg166.3 KB · Views: 266
 -
 IMG_0550.jpg128.8 KB · Views: 230
 -
 IMG_0551.jpg112.5 KB · Views: 254
 -
 IMG_0552.jpg128.2 KB · Views: 258