• Welcome to ClassicBroncos! - You are currently viewing the forums as a GUEST. To take advantage of all the site features, please take a moment to register. It's fast, simple and absolutely free. So please join our community today!
    If you have problems registering or can't log into your account, please contact Admin.

Rear anti-wrap solutions

DJs74

Bronco Guru
Joined
Apr 1, 2014
Messages
1,135
From experience and research, there seems to be many different solutions to axle-wrap but I'd like to know from Bronco owners what is preferred or the best solution for Broncos specifically - personal experience or theory is fine.
Traditionally on 2WD cars and some 4WD full size trucks, I've used and seen many others use a pair of ladder bars around 3 to 4 feet long and as close to the wheels as possible (as far outward as possible).
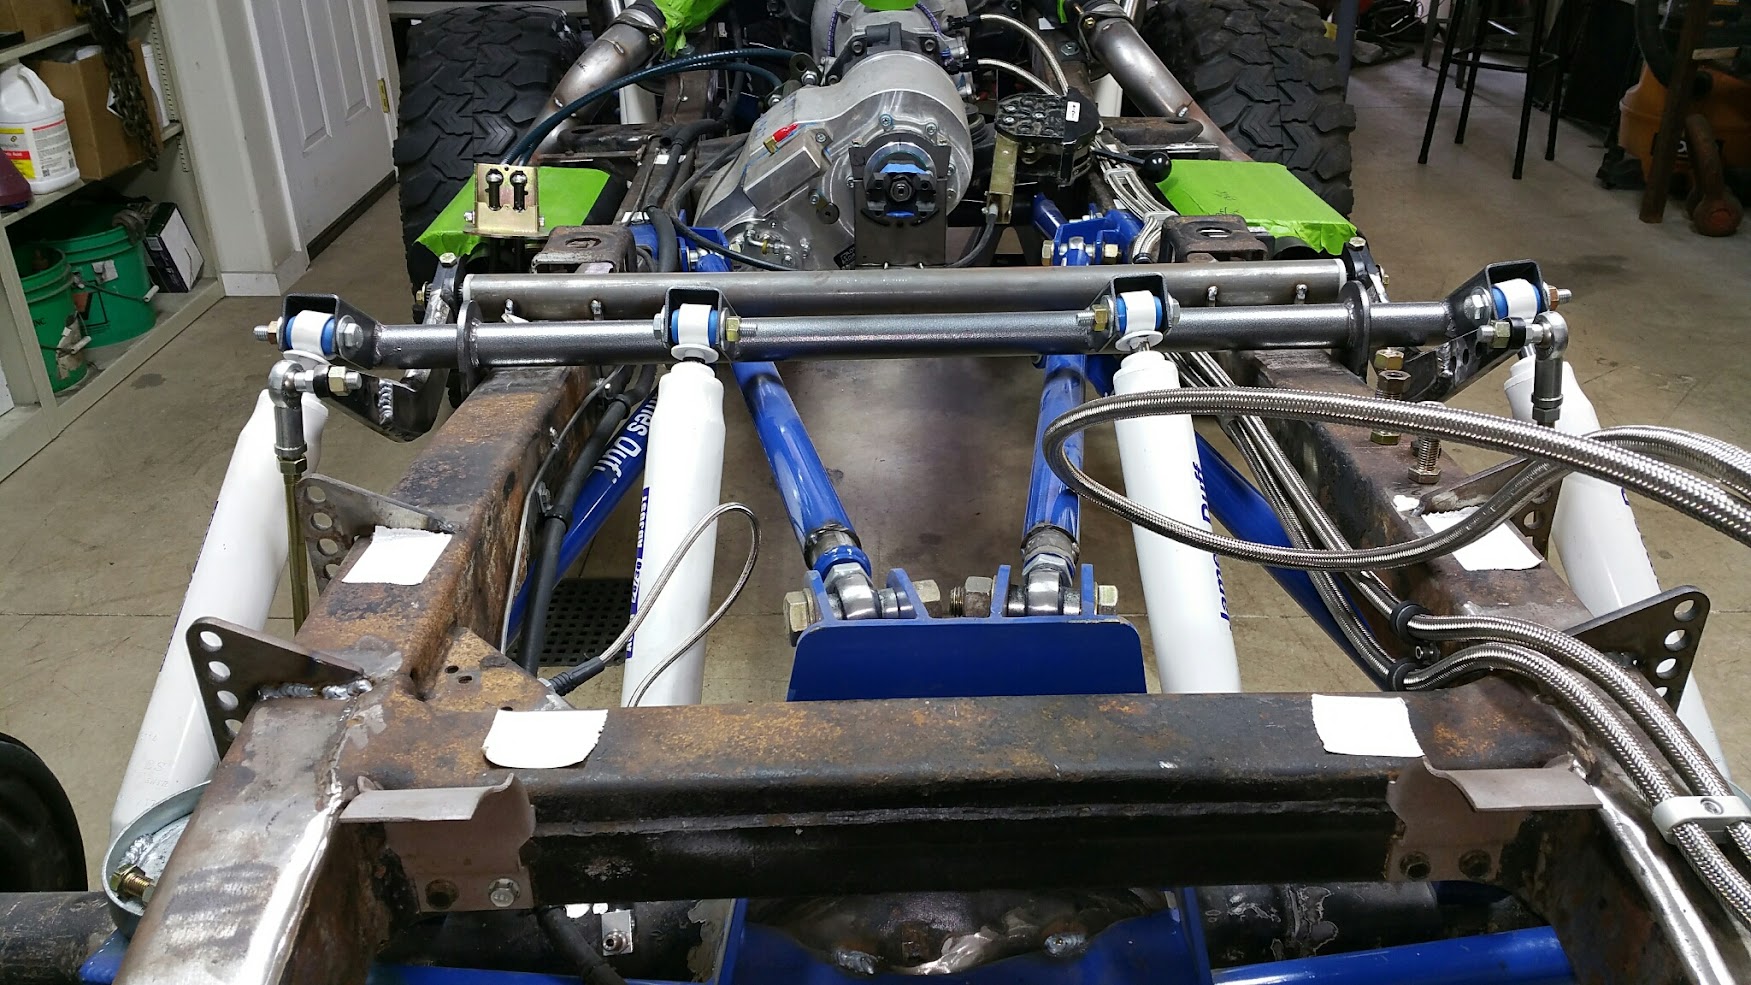
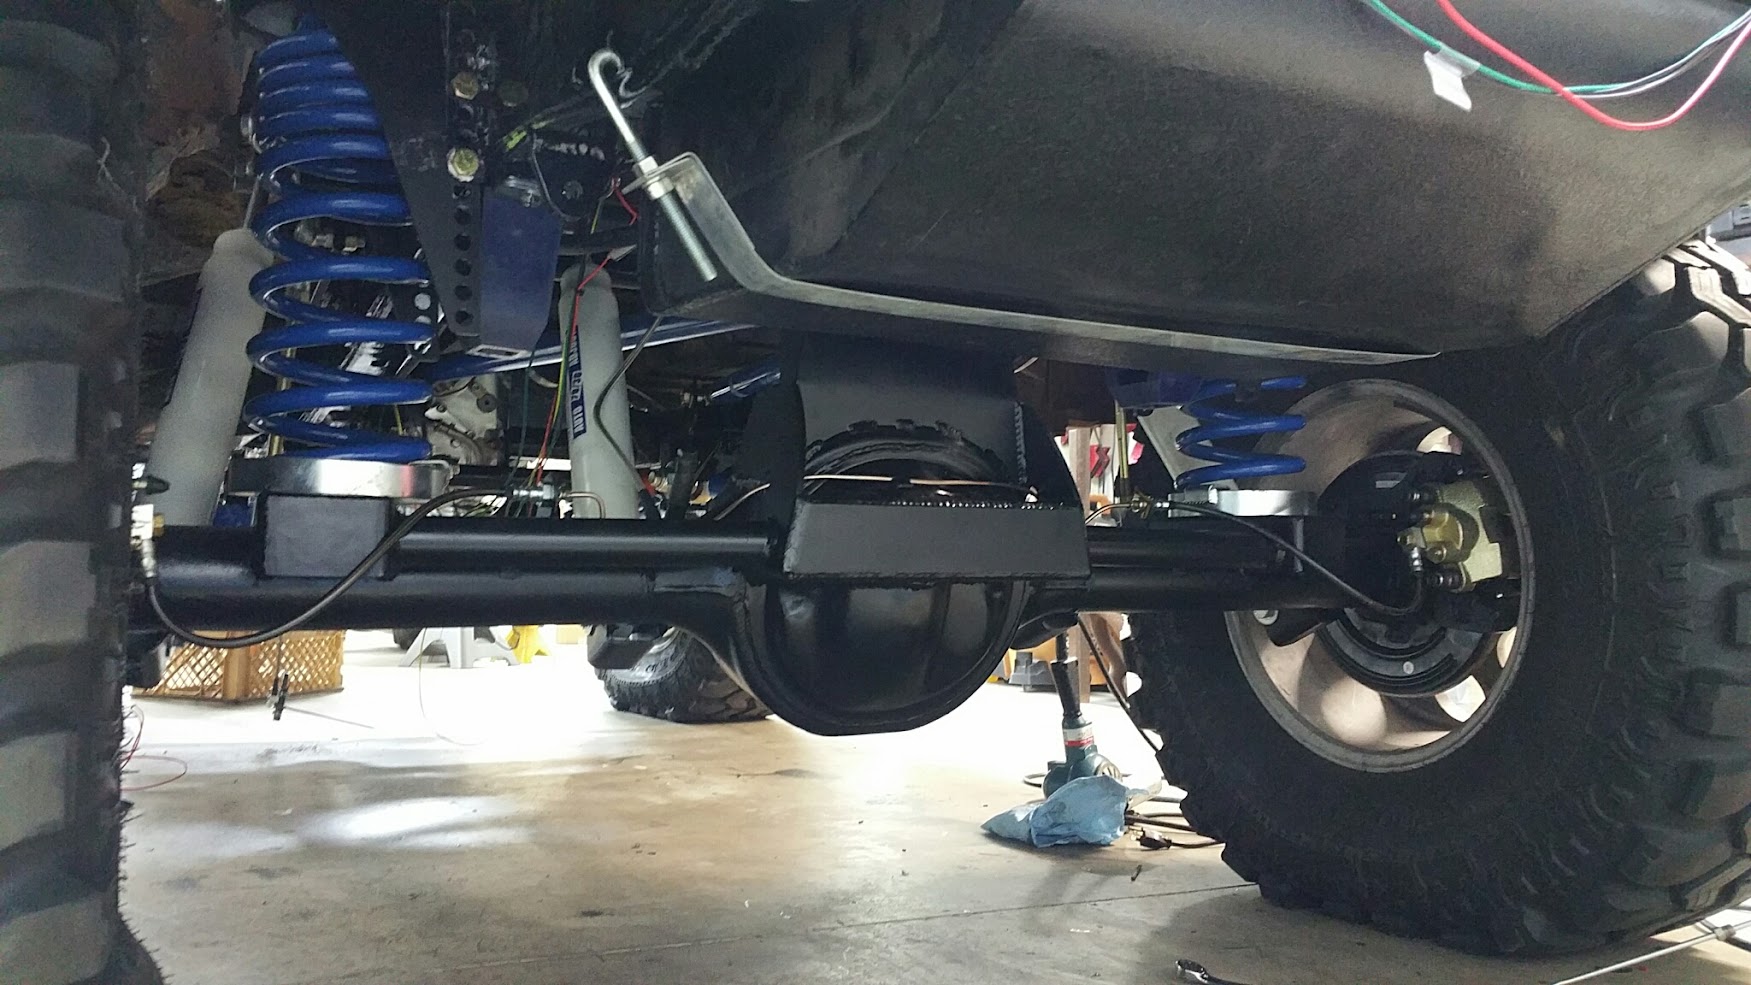
During my research, I see single bars mounted close to the differential and some even on top of the differential case - Duff's has a bar called Torque Tamer or something of that nature.
On my last two outings... I'm 2 for 2 on rear u-joints and have also managed to put some permanent buckles in my rear leafs.
Right now I'm leaning toward a traditional pair of 4 foot long ladder bars which will put the front heim joint at the rear of the transfer case.

any input is appreciated... single / double / weld on / bolt on / etc.


Below is a YouTube link of the October event, I'm at 1:35, 2:08, 4:07 and broke at 6:28

P.S. there were two other Bronco's at the event. The yellow '74 at the beginning has a 600+ cubic inch BBF, the blue '74 is a stock 302... both great looking and great running Broncos and nice guys. It was a fun event right up to the broken rear joint

https://www.youtube.com/watch?v=1UNtnF3UJWc


DJs74
 

DirtDonk

Contributor
Bronco Guru
Joined
Nov 3, 2003
Messages
47,639
Dang DJ! You doin' all that without some sort of traction device now? It's a bit of a wonder the joint lasted so long!
Definitely need to get something on there pronto.

I really like our WrapTrap, but frankly I'm not completely sure it's for you. Of course, part of the equation is just how much available room you have in the key areas for mounting any kind of bar, but the primary goal is wrap reduction, and it does that very well. Probably in the neighborhood of 85% for most. Maybe a little less for you under all that torque, but still pretty effective.

It's a good compromise for limiting climb without losing much wheel travel, and pivots closer to the spring pivot points than it does the u-joint I think. Luckily however, those are not so far off on a stock Bronco. But how is yours set up? Do you have a thread here showing your build? I know there's a lot about your Bronco, but don't remember you building a sand dragger!

A longer bar with different mounting scheme at the pumpkin might actually be called for if you have the time and the inclination to design your own based on your particular needs. This isn't a crawler, so while it might benefit from a crawler device, it's possible that you could come up with more appropriate geometry for your needs.

With that, you could design not only to reduce wrap/pinion climb, but also to dial in certain performance parameters that would help you on the track. Such as anti-squat (looks like yours is pretty good in that department already, but still something to consider) and extra leverage/bracing to keep the springs in line.

You could certainly start with the wrap trap or a torque tamer, but you may end up doing your own anyway, just to clear exhaust, frame mods, etc.
Maybe some of the geometry experts will chime in with suggestions as to optimal length and spread.

Got pics of the underside in full fighting trim?
Good luck.

Paul
 
OP
OP
DJs74

DJs74

Bronco Guru
Joined
Apr 1, 2014
Messages
1,135
Thanks for the information guys.

Paul - the Bronco owner previous to me had the suspension set up for 100 foot mud bogs so there were some concessions built in for axle wrap. Now that I've made some wholesale changes (all over) and converted it to sand / dirt drags... I've purposely made it bite & hook harder than the PO so I'm putting more torque and stress on the rear suspension causing some problems so I'm looking for specific Bronco devices from specific Bronco owners. Not in a huge rush just yet because the season is over but will need to implement a solution by March 2017

Thanks for the ideas and suggestions.


DJs74
 

welndmn

Bronco Guru
Joined
Nov 12, 2001
Messages
2,112
If you do some searching on this site, there have been a few topics on this and they always seem to end in the Wrap Trap being the winner.
 

DirtDonk

Contributor
Bronco Guru
Joined
Nov 3, 2003
Messages
47,639
I think it's been done, but we recommend at least a 2.5" lift to make it easier to find room for everything.
It's a pretty straightforward install, but being every Bronco is different, you can always run into one snag or another. The most common by far is non-stock exhaust tubing. So many ways for the exhaust guy or owner to run them, and so little space under a typical Bronco to spare.

Just had a customer install one, but he indeed had to tweak his dual exhaust slightly to make it work again. Even have a buddy that wanted his more easily removable so he cut the crossmember and made bolting flanges for quick removal. Everybody's tastes are different.
But it does fit in "most" slightly lifted EB's with little to no modifications to your existing stuff. True dual exhaust setups being the usual exception.

Paul
 

toddz69

Sponsor/Vendor
Bronco Guru
Joined
Nov 28, 2001
Messages
10,126
I think it's been done, but we recommend at least a 2.5" lift to make it easier to find room for everything.
It's a pretty straightforward install, but being every Bronco is different, you can always run into one snag or another. The most common by far is non-stock exhaust tubing. So many ways for the exhaust guy or owner to run them, and so little space under a typical Bronco to spare.

Just had a customer install one, but he indeed had to tweak his dual exhaust slightly to make it work again. Even have a buddy that wanted his more easily removable so he cut the crossmember and made bolting flanges for quick removal. Everybody's tastes are different.
But it does fit in "most" slightly lifted EB's with little to no modifications to your existing stuff. True dual exhaust setups being the usual exception.

Paul

Maybe someone can tell me quickly - how far forward of the rear crossmember do the Wrap Trap brackets mount on the framerails?

Thanks,
Todd Z.
 

Swerve

Sr. Member
Joined
Jul 31, 2014
Messages
526
I am curious...does the wrap trap crossmember need to be on top of the frame rails, or can i mount it between the frame rails so it is flush with the top of the frame rails?

Thanks, Swerve
 
OP
OP
DJs74

DJs74

Bronco Guru
Joined
Apr 1, 2014
Messages
1,135
I think it's been done, but we recommend at least a 2.5" lift to make it easier to find room for everything.
It's a pretty straightforward install, but being every Bronco is different, you can always run into one snag or another. The most common by far is non-stock exhaust tubing. So many ways for the exhaust guy or owner to run them, and so little space under a typical Bronco to spare.

Just had a customer install one, but he indeed had to tweak his dual exhaust slightly to make it work again. Even have a buddy that wanted his more easily removable so he cut the crossmember and made bolting flanges for quick removal. Everybody's tastes are different.
But it does fit in "most" slightly lifted EB's with little to no modifications to your existing stuff. True dual exhaust setups being the usual exception.

Paul

Hey Paul,

Am I correct when viewing the installation that the bar has a heim joint at the differential and then what looks like a threaded stud (like a radius arm) at the cross member?

Whatever I end up going with, I was planning to be able to adjust the bar(s) to specifically set the pinion angle to X°, then install the X° shims at the leafs to match to keep everything happy.

My original plan prior to learning of the "only one bar" scenario was to get a pair of traditional style 3 point bars with heim joints at all 3 attaching points but if a single bar on top of the differential will do the job, I like it


DJs74
 

DirtDonk

Contributor
Bronco Guru
Joined
Nov 3, 2003
Messages
47,639
A single does do the job, but one of the primary reasons it's done this way is to reduce wrap while still allowing for full, or near full wheel travel much easier than you could achieve with a separated pair of long, or traditional short pair of traction bars.
Short of fabbing up a full four-link suspension, it seems the most straightforward way.
And yes, a spherical rod end at the rear, and large bushings at the front.
I don't think the depth of the rod through the mount is intended to be regularly changed to set your geometry for a particular event, but don't see why it couldn't be done. There's extra thread to a point, to compensate for different heights and whatever might crop up, so you might be able to utilize that by getting a couple of extra nuts to stop the rod at a particular spot not originally set up when you mounted the crossmember. Pretty sure there's plenty of thread for a normal adjustment. You'd just need to provide the extra stops in the form or more nuts, or?
If you're just interested in setting it up specifically one way in conjunction with the shims though, you should easily be able to do that during the initial installation.
Above my pay grade though, so if you're interested in finding out more about it you can call in to the shop any time and they can tell you, or at least find out for you. Maybe Jim will chime in here first though. It's his design, so he would know it's capabilities beyond the norm.

Todd, not sure of the distance, but someone will probably have that info. It can vary slightly on different Broncos though, so take what is quoted as an approximation to use as a starting point of reference.

Swerve, yes you can. Not as it comes in the kit of course, as you'd have to modify the ends to fit and attach in the method of your choice (welding or bolting).
Like in any other situation, how easy it will be might depend on what other items you have under there. My friend that made the piece a bolt-on also moved it down slightly if I remember. I'll have to get some pictures for you if that's the case.
Just don't forget to compensate for any angular changes where the bar meets the mount.

Obviously lowering the unit will lower the mounting point, which, though it changes the geometry, should not reduce it's effectiveness over that short distance. Don't move it down too much though, or you start running into interference issues all over again.
Here again, maybe Jim can comment on the geometry and effectiveness issues. I don't think you'd notice the difference in performance, but I've not put a GoPro camera underneath different setups either.

Would be fun though.
Let's do it!

Paul
 
OP
OP
DJs74

DJs74

Bronco Guru
Joined
Apr 1, 2014
Messages
1,135
A single does do the job, but one of the primary reasons it's done this way is to reduce wrap while still allowing for full, or near full wheel travel much easier than you could achieve with a separated pair of long, or traditional short pair of traction bars.
Short of fabbing up a full four-link suspension, it seems the most straightforward way.
And yes, a spherical rod end at the rear, and large bushings at the front.
I don't think the depth of the rod through the mount is intended to be regularly changed to set your geometry for a particular event, but don't see why it couldn't be done. There's extra thread to a point, to compensate for different heights and whatever might crop up, so you might be able to utilize that by getting a couple of extra nuts to stop the rod at a particular spot not originally set up when you mounted the crossmember. Pretty sure there's plenty of thread for a normal adjustment. You'd just need to provide the extra stops in the form or more nuts, or?
If you're just interested in setting it up specifically one way in conjunction with the shims though, you should easily be able to do that during the initial installation.
Above my pay grade though, so if you're interested in finding out more about it you can call in to the shop any time and they can tell you, or at least find out for you. Maybe Jim will chime in here first though. It's his design, so he would know it's capabilities beyond the norm.


Thanks for the insight Paul.

For my purposes, it should be a one time setup for 300 feet, flat racing. The only variables I have is the particular track I'm at... mud/dirt or sand/dirt and possibly a tire change here or there but otherwise, I'm aiming for the pinion to be set once and done. As for suspension travel, it will be pretty limited to the track condition which might be a little loose but not hilly and whatever the terrain is like in the pit and staging area. I'm pleased with the current leaf spring rate - just about right for a small amount of weight transfer (squat) at launch.
I am planning some other rear suspension fabrications this winter so it'll be a good time to weld up some form anti-wrap or ladder bars. The WrapTrap is looking better by the minute.

thanks to all for the information and suggestions


DJs74
 

5001craig

Contributor
Bronco Guru
Joined
Nov 3, 2013
Messages
1,180
Great video DJ. Your Bronco looks like it really hooks.

Really not trying to go in a different direction than what you are looking at but your problem is exactly why I went with the Duff 4-link. I wanted something that would ride reasonably well with the pinion angle not changing when on the skinny pedal. I wanted to build one but the more I read, the more I was confused. And the Duff price wasn't that bad if you ask me. This thing is really beefy. Here's a pic during mock-up:

Un0U578G6HK71BvernYj2CU_6QOgtJr5dWhvh88t2v-64UNsYxstsn9P7P5esGwOBxYdlXJPTv20-PYi6gggzDlrcVcKdLPTsXzKpnrC7nYJmCi4XyFAVe32C3v5QBZUf3iB3Hz37P8j5mEfk4Ey54I6lalDrC-V8Bs9HAeaF2-hsiN9U7ImkVX4dL4XF8XE2duvxM4qNjpitVFli8qjXm46hiSFpOzeLJBYhyn4eeDxYismo4mhW8rSz9r82L6Sxe2zvaybFy-Y-lYrvMCYQES7V0Xb-rWiweZzNGzgitLYaqY096dfDAU5x2KgfSd1tUuPQunhDw4CNPYy_wZtJ8yawcDnNdvqlIuZOdf5kUVz0ecCWFIUPz7MS55BLq4-z9ToIWz_0XgUvsIVOwJJZUvUdB_e1WGXOFnx3z3TLU-YjdyIyr_m1OKidHxazkpaxVcKhMsoGArZgStzaAhGWsYDUWvt6CewBE7bMlbdTZEVH1cvZ4WtE2btTMPu0GTKLXYJuXoSUJsmX1JXvexu3VZU1QaJ0n5HzqM-i6vS_ulawWClEqkcJwR3PvEnKyv7xY8put7Doumc_27ILjQ4jjxMThNGjtWDWIn17a9Mr5oeeBAAkQ=w1753-h985-no


Then I took it all back apart, KBS'd the frame (wire wheel, clean/degrease, acid etch, rust converter and top coat).

xMwtRBpblZMdqzb5ZuHCg7iSnIXUkqjyYGKDF4BJQ-w9HEU8MCfnlKU64MV8PmMaDotBaFKzGHvzvYnd1d_U3CLyUkgHaA60VQI9wfXDmrp0mNNUwzDkbw0DnTBzGHRMR4Zs63D22Fcp_d2tyd922Z9co4dOfLyYE_WIFTryvGGshXFUMdsett8IDtpFp4jRidyenziIWQZ2di9AYxUy7Dx3PtSBDGHcMUDIILtH85RFnQtjbREJQcEWcj7CB9Pr2Idoz_a4SisBJTqPsY-4wUcBl1KtUsiKYD3X39UzDKkA-V4T8oq3gxX4gPmeiOPnUiTmdd5Rq3fRDbCNUVJJ-ZTA_OMhSteYtqZPf4T2IHoqch0-WId5yPvlExCx2gg3c7UO8Ew8WpgRLmFoh4BKr1yW54PB4v_91wNnkzN6LmyyQo5naFXxCrS62h8oZl_WiQ8q-NXoCtOnn8Eyxy9JbW66N7qVh7cv6pYQGEeAJTqRUXlfVY3IgckD3J0rYw-wJ5QmkrzjTeMJwOuNB244tXK502stNEae8opQtULsBYaezvZBprf3bRbeuBkmJ8iTDC1uWBRRn7QWbx5SjtyPJB23ViNeQnGETV1x13oF2KVcCmFdtw=w1753-h985-no
 

BroncoRebel

Newbie
Joined
Sep 10, 2013
Messages
9
James Duff Torque Tamer does the trick for me. 399 stroker with 400HP at the flywheel. Snapped u-joints all the time due to wrap until it was installed. U-joint has not broken since install.
 
OP
OP
DJs74

DJs74

Bronco Guru
Joined
Apr 1, 2014
Messages
1,135
Great video DJ. Your Bronco looks like it really hooks.

Really not trying to go in a different direction than what you are looking at but your problem is exactly why I went with the Duff 4-link. I wanted something that would ride reasonably well with the pinion angle not changing when on the skinny pedal. I wanted to build one but the more I read, the more I was confused. And the Duff price wasn't that bad if you ask me. This thing is really beefy. Here's a pic during mock-up:

Un0U578G6HK71BvernYj2CU_6QOgtJr5dWhvh88t2v-64UNsYxstsn9P7P5esGwOBxYdlXJPTv20-PYi6gggzDlrcVcKdLPTsXzKpnrC7nYJmCi4XyFAVe32C3v5QBZUf3iB3Hz37P8j5mEfk4Ey54I6lalDrC-V8Bs9HAeaF2-hsiN9U7ImkVX4dL4XF8XE2duvxM4qNjpitVFli8qjXm46hiSFpOzeLJBYhyn4eeDxYismo4mhW8rSz9r82L6Sxe2zvaybFy-Y-lYrvMCYQES7V0Xb-rWiweZzNGzgitLYaqY096dfDAU5x2KgfSd1tUuPQunhDw4CNPYy_wZtJ8yawcDnNdvqlIuZOdf5kUVz0ecCWFIUPz7MS55BLq4-z9ToIWz_0XgUvsIVOwJJZUvUdB_e1WGXOFnx3z3TLU-YjdyIyr_m1OKidHxazkpaxVcKhMsoGArZgStzaAhGWsYDUWvt6CewBE7bMlbdTZEVH1cvZ4WtE2btTMPu0GTKLXYJuXoSUJsmX1JXvexu3VZU1QaJ0n5HzqM-i6vS_ulawWClEqkcJwR3PvEnKyv7xY8put7Doumc_27ILjQ4jjxMThNGjtWDWIn17a9Mr5oeeBAAkQ=w1753-h985-no


Then I took it all back apart, KBS'd the frame (wire wheel, clean/degrease, acid etch, rust converter and top coat).

xMwtRBpblZMdqzb5ZuHCg7iSnIXUkqjyYGKDF4BJQ-w9HEU8MCfnlKU64MV8PmMaDotBaFKzGHvzvYnd1d_U3CLyUkgHaA60VQI9wfXDmrp0mNNUwzDkbw0DnTBzGHRMR4Zs63D22Fcp_d2tyd922Z9co4dOfLyYE_WIFTryvGGshXFUMdsett8IDtpFp4jRidyenziIWQZ2di9AYxUy7Dx3PtSBDGHcMUDIILtH85RFnQtjbREJQcEWcj7CB9Pr2Idoz_a4SisBJTqPsY-4wUcBl1KtUsiKYD3X39UzDKkA-V4T8oq3gxX4gPmeiOPnUiTmdd5Rq3fRDbCNUVJJ-ZTA_OMhSteYtqZPf4T2IHoqch0-WId5yPvlExCx2gg3c7UO8Ew8WpgRLmFoh4BKr1yW54PB4v_91wNnkzN6LmyyQo5naFXxCrS62h8oZl_WiQ8q-NXoCtOnn8Eyxy9JbW66N7qVh7cv6pYQGEeAJTqRUXlfVY3IgckD3J0rYw-wJ5QmkrzjTeMJwOuNB244tXK502stNEae8opQtULsBYaezvZBprf3bRbeuBkmJ8iTDC1uWBRRn7QWbx5SjtyPJB23ViNeQnGETV1x13oF2KVcCmFdtw=w1753-h985-no

Thanks for the suggestion Craig, great lookin setup you got there and believe me, I've considered a 4 link but it'll have to be later on in the budget I'm sorry to say, but... one day.

DJs74
 
OP
OP
DJs74

DJs74

Bronco Guru
Joined
Apr 1, 2014
Messages
1,135
James Duff Torque Tamer does the trick for me. 399 stroker with 400HP at the flywheel. Snapped u-joints all the time due to wrap until it was installed. U-joint has not broken since install.

I'm leaning toward a one bar design like the one at Duff's or the WrapTrap at Wild Horses. Thanks for the information

DJs74
 

DirtDonk

Contributor
Bronco Guru
Joined
Nov 3, 2003
Messages
47,639
...The WrapTrap is looking better by the minute.

Sounds good, thanks. If you do go this route I would still set up the pinion angle with approx. 2° down-angle in relation to the centerline of the driveshaft.
There will always be some minimal pinion climb even with the WT, especially under the conditions your rig will see, so this helps keeps the joints happy through their entire range.
It'll never see the extreme range you're putting it through currently, but it's still going to move with the bushings and other angular changes.

Really not trying to go in a different direction than what you are looking at but your problem is exactly why I went with the Duff 4-link.

Definitely worth showing that Craig. He's looking at different options first of all, and second we still love seeing shots of your build any time we have a good excuse!;D

Paul
 

welndmn

Bronco Guru
Joined
Nov 12, 2001
Messages
2,112
Thanks for the insight Paul.

For my purposes, it should be a one time setup for 300 feet, flat racing. The only variables I have is the particular track I'm at... mud/dirt or sand/dirt and possibly a tire change here or there but otherwise, I'm aiming for the pinion to be set once and done. As for suspension travel, it will be pretty limited to the track condition which might be a little loose but not hilly and whatever the terrain is like in the pit and staging area. I'm pleased with the current leaf spring rate - just about right for a small amount of weight transfer (squat) at launch.
I am planning some other rear suspension fabrications this winter so it'll be a good time to weld up some form anti-wrap or ladder bars. The WrapTrap is looking better by the minute.

thanks to all for the information and suggestions


DJs74


The Wrap trap is really made for street driving and off roading, you are going for a drag racing, or sand racing, I'd do ladder bars.
 
Top