• Welcome to ClassicBroncos! - You are currently viewing the forums as a GUEST. To take advantage of all the site features, please take a moment to register. It's fast, simple and absolutely free. So please join our community today!
    If you have problems registering or can't log into your account, please contact Admin.

LOWERING my Bronco

OP
OP
greatguy57078

greatguy57078

Contributor
Bronco Guru
Joined
Jul 15, 2006
Messages
3,430
Sorry I forgot to post the pics of the work that I did with the brace. I started with the cutoff wheel, and finished the edges with the grinder. It would be MUCH easier with the body off completely!

Hat's off to my lovely wife who helped me get the bolts in front of the bulkhead tightened. I was underneath in the dark with a flashlight and a strip of gorilla tape, and by that time (after working 6 days I was not the best of co-workers). Thanks honey!

One other note. That brace was completely filled with road dust, as you can see in the final pic. Needless to say, I was extremely dirty when I got done, and for the first time in my life I went straight to the shower ... even before I had a cold beer!
 

Attachments

  • mark and cut.jpg
    mark and cut.jpg
    94.2 KB · Views: 134
  • first cuts.jpg
    first cuts.jpg
    96.4 KB · Views: 106
  • Final trim.jpg
    Final trim.jpg
    64 KB · Views: 101

farzadmip

Sr. Member
Joined
Sep 11, 2009
Messages
613
Looking good Marty! We'll have to cruise up to Kool Deadwood Nites together this summer!! Planning on taking the 68 up for it.
 
OP
OP
greatguy57078

greatguy57078

Contributor
Bronco Guru
Joined
Jul 15, 2006
Messages
3,430
If we don't get the hotrod going, we will probably take the half cab off the '68 and run out west river with the bikini top. Either way we will be there! ��
 

chrlsful

Bronco Guru
Joined
Oct 21, 2009
Messages
1,448
low hood / battery location

I will tell you what. It's going to VERY tight under the hood. I already modified the hydroboost bracket because we couldn't get the body over the 4.6 DOHC engine without hitting it. I will either have to move the battery to the driver's side, or place it in the bed behind the bulkhead.

(I may C U over on the ford 6 site)
What one of the guys did was get a AIG (mat not liquid acid battery) and stuff it side ways in the fire wall where the scoop for the passenger's foot-air-intake is. Actually it wuz 2 batteries (on their side 1 stacked over the other).

over on the other site you'll see my 5 or 6 ways to "raise the hood" for these projects we run into (mine's the 4.1 swap in").
 

behemoth

Bronco Guru
Joined
Jul 2, 2003
Messages
1,736
Well I'm committed now, the bed floor is out, that hurt to do but now I'll get the stance I want. Lowering it again, after som cleaning.
2a0f8940f11e3d2d2cef9e51fb413190.jpg
 
OP
OP
greatguy57078

greatguy57078

Contributor
Bronco Guru
Joined
Jul 15, 2006
Messages
3,430
Looking good. The only reason that I kept the bed is because I need someplace to put our beer cooler....well and some luggage...and our beer...cooler. :p
 

behemoth

Bronco Guru
Joined
Jul 2, 2003
Messages
1,736
I wanted the bed too, but I chose lower and this gets me where I want it to be. The bed floor will go back in just a little higher than before. Smaller cooler, smaller luggage.
842bbd8d8c70843240264f57933133ac.jpg
633f16f84ee2d5913f2ec939fc322ceb.jpg
 
OP
OP
greatguy57078

greatguy57078

Contributor
Bronco Guru
Joined
Jul 15, 2006
Messages
3,430
Yeah. I hear that. There are a few things that I wish I could have done right the first time.

I have to take the shocks off and send them back for the correct length. I think I had that figured out right the first time, but the shocks that I have are longer then the ones that I actually ordered.

The shock mounts I bought seem to be locked up. I've had those shocks on/off I don't know how many times, and now that I have the body and the tank mounted, the mounting bolt won't budge on the passenger side. Sooo...out comes the tank.

Also, I changed my wheels and went a little crazy. I will have to post new pics when I get everything mounted to ride height with the new wheels/tires. :cool:
 
OP
OP
greatguy57078

greatguy57078

Contributor
Bronco Guru
Joined
Jul 15, 2006
Messages
3,430
That high?

Just wondering. Do you need to go that high with the notches or is that just a mock up? I am not going as low as you and I think I have all the clearance that I need. Are you bottoming out?


I wanted the bed too, but I chose lower and this gets me where I want it to be. The bed floor will go back in just a little higher than before. Smaller cooler, smaller luggage.
842bbd8d8c70843240264f57933133ac.jpg
633f16f84ee2d5913f2ec939fc322ceb.jpg
 
OP
OP
greatguy57078

greatguy57078

Contributor
Bronco Guru
Joined
Jul 15, 2006
Messages
3,430
Also...I was wondering if you notched the front for the Mustang II rack? I know that someone had asked me that awhile back, if I had intended on doing that because it looked like there was going to be a clearance issue.

What about tire rub up front? I would appreciate any feedback on that as well. I am thinking of going with wider tires, and don't seem to think that I should have issues, so I thought I would ask the guy that would know!

You can see the 4.6 DOHC peeking out. I can't wait to hear this thing start up for the first time! I get excited every time I see that Boxwood Green pickup on Fast and Loud spinning around in the parking lot. Same engine!
 

Attachments

  • FRONT PEEK.jpg
    FRONT PEEK.jpg
    88.4 KB · Views: 117

behemoth

Bronco Guru
Joined
Jul 2, 2003
Messages
1,736
I did not notch the front. I went with a height that kept me from that and if i wanted lower i could use drop spindles.

tire rub with the original rolled fenders was extremely minimal to non existent once i found the rub and rolled the lip more. the second front end has rub but i have not rolled them well enough.

at what height off the ground is the cross member and are the arms parallel to the ground?

I have wheel spacers and narrow front upper a arms as the heights arms would rub the wheels when turning killing the turning radius. 18" wheels would miss altogether.

Clearance in the rear for wider tires there is room, but you must tuck it all under the axle lots of back spacing. With the explorer 8.8 and the mustang wheels there is little room in the rear between the tire and the fenders.

I was bottoming out, I wanted to drive it basically with the body level to the ground and that put me at or near the bump stops. This new notch is extreme but it gives me 4" of up travel from the ride height I want. Beds out now and I have room to do what I need to sucks but I took it out carefully so that I may install it higher and keep the stock look sort of. I also ran it with the cover all the time so you could not see the bed anyway.

Yeah KC started out with the same engine now I think he has a 5.0 and a supercharger in it now. I toyed with the idea of a 351 efi and possibly a super charger. At this time I will just keep the engine I have now and sell off the lightning upper and lower, and the painless harness.

I cant wait for the post that yours is running, the first burnout still brings a grin.
 
OP
OP
greatguy57078

greatguy57078

Contributor
Bronco Guru
Joined
Jul 15, 2006
Messages
3,430
I would be interested in that Lightning intake. After putting the 351w in my red half cab, I don't know if I could ever go back to a 302 again. ��
 
OP
OP
greatguy57078

greatguy57078

Contributor
Bronco Guru
Joined
Jul 15, 2006
Messages
3,430
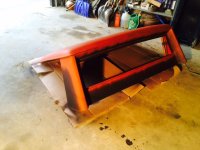
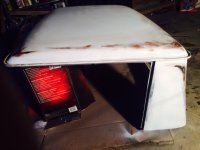
The aging process. Since I have decided to NOT paint this thing for awhile, it will maintain it's old patina for now. In order to make the top match the body, I have begun the aging process. This is my first attempt at creating this effect, so please bare with me!

Phase 1:
First we begin with the top that was chopped/raked and painted with gray primer.

Phase 2:
I then painted it entirely with flat black etch primer. (no pics)

Phase 3:
I painted around the edges where I planned on "aging" the paint with ruddy brown primer.

Phase 4:
I then painted over the ruddy brown areas with indoor/outdoor "dull aluminum" indoor/outdoor. I wanted this to break up these areas and make it look "cloudy".

Phase 5:
I went over the entire top with indoor/outdoor flat white.
 

Attachments

  • FLAT WHITE 5.jpg
    FLAT WHITE 5.jpg
    87 KB · Views: 80
  • FLAT WHITE A.jpg
    FLAT WHITE A.jpg
    96.8 KB · Views: 92
  • DULL ALUM B.jpg
    DULL ALUM B.jpg
    111 KB · Views: 71
  • DULL ALUM A.jpg
    DULL ALUM A.jpg
    108.2 KB · Views: 75
  • RUDDY BROWN C.jpg
    RUDDY BROWN C.jpg
    102.6 KB · Views: 79
  • RUDDY BROWN B.jpg
    RUDDY BROWN B.jpg
    107.3 KB · Views: 75
  • RUDDY BROWN A.jpg
    RUDDY BROWN A.jpg
    106.7 KB · Views: 81
  • chop.jpg
    chop.jpg
    108.8 KB · Views: 94
OP
OP
greatguy57078

greatguy57078

Contributor
Bronco Guru
Joined
Jul 15, 2006
Messages
3,430
On to the "aging process". I used a 3M scotch brite pad for removing the unwanted layers of paint. It's a slow process and easy to go to far... in my opinion.

I was careful to not go so far as the last layer of black etch primer. I tried to not make straight lines so that it would look more natural and uneven. I found less was better than more, but it is easy to go back and fade anything in with the flat white again.

I am by no means done, but I think I learned enough to make it look exactly the way I want, and at least for now....I don't have to worry about scratches or blemishes. After all....it's patina baby! :cool:
 

Attachments

  • scuff 4.jpg
    scuff 4.jpg
    80.4 KB · Views: 81
  • scuff 3.jpg
    scuff 3.jpg
    97.4 KB · Views: 72
  • scuff two.jpg
    scuff two.jpg
    78.4 KB · Views: 72
  • scuff one.jpg
    scuff one.jpg
    88.4 KB · Views: 77
  • side view.jpg
    side view.jpg
    117.6 KB · Views: 104

broncoitis

Bronco Guru
Joined
Jul 23, 2010
Messages
4,449
Nice job on the Paint looks great! As for the lowered Bronco with the chopped top. I love it. Never thought that I would say that but it is BAD ASS! ;D
 
OP
OP
greatguy57078

greatguy57078

Contributor
Bronco Guru
Joined
Jul 15, 2006
Messages
3,430
Well one more feat accomplished. I found that I was binding on the panhard bar, causing the rear to be about 1" too fat to the passenger's side.

So when I disconnected the panhard bar, the rear end slid over 1" and centered right up. Now that it's no longer bottoming out on that bar, it allowed me to get down lower. Problem is, now I am hitting the rear cross member with the back of the pumpkin. I would snap a pic but my trusty halogen light burnt out, so that was my cue to stop and go in the house for the night.

Tomorrow I will take the link bars off and trim them to bring the axle forward 1/2"-3/4" and better center it in the wheel well (again). This will give me some clearance for the current issue, but it sure looks like I will be trimming/notching that cross member at some point. It's still progress....right?%)
 

behemoth

Bronco Guru
Joined
Jul 2, 2003
Messages
1,736
160b3a82863490fb5d699850970d4fda.jpg

I had to notch the rear cross member twice now.
eea6594b4fae2e54cb2034436c54122f.jpg

In the second pic you can see my next dilemma, the center link and drive shaft get in the way of achieving stupid undesired low.

6662d88435d14a85fac450c650f410f6.jpg


This pick shows how tucked the rear is when sitting on the driveshaft. There is 2" till bump stop.
 
OP
OP
greatguy57078

greatguy57078

Contributor
Bronco Guru
Joined
Jul 15, 2006
Messages
3,430
I guess I am destined to do the same. That 9" is going to hit not matter what I do unless I move it way forward which is NOT the look I am going for. I should have the link bars back in as soon as I can find a tap that will give me a little more thread inside the tubes.
 

Attachments

  • REAR CROSSMEMBER.jpg
    REAR CROSSMEMBER.jpg
    289.4 KB · Views: 70
Top