• Welcome to ClassicBroncos! - You are currently viewing the forums as a GUEST. To take advantage of all the site features, please take a moment to register. It's fast, simple and absolutely free. So please join our community today!
    If you have problems registering or can't log into your account, please contact Admin.

UPDATE: Ball joint preload question...not the same old question

Lando375

Jr. Member
Joined
May 23, 2020
Messages
118
I just installed new ball joints and everything was torqued to specs. The preload was set to where it takes 25-26 lbs to pull the knuckle. When I did the final torque of the upper ball joint the pull force went to around 4 lbs.

I loosened everything and retorqued everything and set the preload about 5 times. Everytime, I get the same results. Has anyone measured the pull force after final torque of the upper ball joint? Am I missing something? Thanks in advance.
 
Last edited:

DirtDonk

Contributor
Bronco Guru
Joined
Nov 3, 2003
Messages
51,619
The only way to measure the pull torque is after the final fastener is tightened.
Any measurement taken before you are done is just a random point of reference.
That random reference might, or might not help determine what the final reading will be.

The Dana specification is for a pull weight of “LESS THAN 26lbs” and doesn’t give a specific number.

I think we asked the question just a week or two ago whether there is such a thing as too little pull weight.
Don’t know that anyone had an answer or not.

Maybe someone will see this and comment.
In the meantime however, I’d say you should be ok.
Personally I’d like to see around 10lbs pull, but I can’t say your 4lbs is too loose.
 

DirtDonk

Contributor
Bronco Guru
Joined
Nov 3, 2003
Messages
51,619
In “the old days” I would regularly achieve 10-15 pounds when testing. In recent years it seems as if everyone gets right to the ragged edge of 25.
You’re the first exception to this I’ve seen in a long while.

But I don’t really understand the need for so many to do a “final” test before the final step.
This seems to be very common for wheel bearing adjustment and ball-joint installs.
Oh, and suspension installations when it’s still just a bare frame and engine/EFI tuneups before installing the exhaust! 😉😁

Good luck. Hope it turns out that easy turning is good turning.
 
Last edited:

DirtDonk

Contributor
Bronco Guru
Joined
Nov 3, 2003
Messages
51,619
Oops, sorry one more question.
When you are torquing the upper preload sleeve, what torque do you use?
And what is it’s position in the knuckle?

Thanks.
 
OP
OP
Lando375

Lando375

Jr. Member
Joined
May 23, 2020
Messages
118
Oops, sorry one more question.
When you are torquing the upper preload sleeve, what torque do you use?
And what is it’s position in the knuckle?

Thanks.


Thanks for all the replies. I torqued the sleeve to 25 ft-lbs with the knuckle facing forward. That only got me about 13 lbs of pull force. I tighten it until I was at about 25 lbs of pull force.

I only saw one other post mentioning an issue like mine but there wasn't a follow up.

Thanks again
 

DirtDonk

Contributor
Bronco Guru
Joined
Nov 3, 2003
Messages
51,619
Just off the top of my head, I thought the specification for the sleeve was 40 pounds?
However, that’s another problem. In recent years people have not been able to achieve the 40 pounds. More like limited to 20 to 25 like you’re doing.
Trying to get it to 40 often gets you simply threading the sleeve all the way through the yolk!

But no matter the torque achieved, as mentioned, you don’t check the pull force until you’ve torqued the top nut.
So trying to adjust the pull force with just a turn of the sleeve is a study in frustration as you have found out.

If you decide to do it over again, try it again with the factory setting of 40 lbs first. Just to see if you can get there from here.
And check the sleeve as it comes through the top yoke. Make sure it’s not coming too far down.
I like to limit it to two threads showing through the bottom.
 
OP
OP
Lando375

Lando375

Jr. Member
Joined
May 23, 2020
Messages
118
Just off the top of my head, I thought the specification for the sleeve was 40 pounds?
However, that’s another problem. In recent years people have not been able to achieve the 40 pounds. More like limited to 20 to 25 like you’re doing.
Trying to get it to 40 often gets you simply threading the sleeve all the way through the yolk!

But no matter the torque achieved, as mentioned, you don’t check the pull force until you’ve torqued the top nut.
So trying to adjust the pull force with just a turn of the sleeve is a study in frustration as you have found out.

If you decide to do it over again, try it again with the factory setting of 40 lbs first. Just to see if you can get there from here.
And check the sleeve as it comes through the top yoke. Make sure it’s not coming too far down.
I like to limit it to two threads showing through the bottom.

So my OCD took over and I was back in the garage at 4am. I started over using the the method you gave except I had to go to 50ft lbs on one and 45ft lbs on the other. One of the ball joints was looser that the other starting out. The ball joint that was torqued to 50 had an end pull of around 16 pounds. The ball joint that was torqued to 45 had around 24 lbs.

I'm leaving it there because I didn't want screw down the adjuster too much on the one that required 50 ft lbs. They definitely feel a lot better.
 

ba123

Contributor
Bronco Guru
Joined
Oct 29, 2022
Messages
2,757
Loc.
CA
The only way to measure the pull torque is after the final fastener is tightened.
Any measurement taken before you are done is just a random point of reference.
That random reference might, or might not help determine what the final reading will be.

The Dana specification is for a pull weight of “LESS THAN 26lbs” and doesn’t give a specific number.

I think we asked the question just a week or two ago whether there is such a thing as too little pull weight.
Don’t know that anyone had an answer or not.

Maybe someone will see this and comment.
In the meantime however, I’d say you should be ok.
Personally I’d like to see around 10lbs pull, but I can’t say your 4lbs is too loose.
Sorry to disagree Paul, but I do on this one.

I just did my Ball joints. You can't set the preload, torque the final bolt and then adjust, that's the problem.

You have to torque the lower, then the sleeve to the proper resistance, then torque the top "lock" nut.

If you do and you did it correctly, yes, you should measure after you're done and it should stay the same.

@Lando375 there has to be something else going on, like maybe your ball joints weren't fully pressed in. Unless I don't understand, and I might not, the resistance is from the resistance on the torque on the bolt on the bottom and the sleeve to the ball joint on the top. That's cannot change after your torque unless something is wrong with your ball joint or unless it's not fully pressed in and then when you're done, torquing that down, is pulling that ball joint more in so there is less resistance.

I would back up, try to press each in further until you're sure, torque the bottom to 70 ft lbs, then the top sleeve

And Paul, I do agree with you on the sleeve comment. My Moog instructions said to torque the sleeve to 70 ft lbs. yeah, no thanks.
 

jamesroney

Contributor
Bronco Guru
Joined
Sep 11, 2007
Messages
2,597
Loc.
Fremont, CA
Official thread-jack warning!

@ba123 I have been pondering the Dana 44 ball joint preload issue for a while now. But I never really gave it serious thought. For many years, I didn't own a spanner socket for that sleeve, and most of mine were rusted in place. A piece of pipe with four tangs ground into it was usually good enough to move it, if I was lucky enough to have a new adjuster to replace it. Seems like there are more kits that include the adjuster now. That has made things much more complicated.

The Dana 44 open knuckle ball joint pair was used in the 1961 K10 Chevy to the 2000 Dodge 1500. So let's call it 40 years. But it's a unique design. King pin knuckles are easy to evaluate. 100% of the vehicle weight is carried on the lower king pin. Control arm suspension is also easy to evaluate. If the spring is on the lower arm, then the lower ball joint carries 100% of the load. If the spring is on the upper arm, then the upper ball joint carries 100% of the load. The later model Dana 30's and 44's in the TJ, XJ, ZJ, JK, JL, and JT trucks all use a load bearing lower ball joint, and a sliding upper ball joint. So 100% of the vehicle load is carried by the lower ball joint. The upper joint is just there to keep everything straight.

But that Dana 44 open knuckle in your Bronco has TWO load carrying ball joints. The upper and lower ball joints SHARE the vehicle load. @DirtDonk This is why those "Ball Joint Eliminators" in the other thread are largely irrelevant for a Bronco.

Anyway, the vast majority of the D44 knuckles that I have serviced all had that adjusting sleeve sitting in the threaded knuckle about 1/8 inch deep. For 20 years, I always just took a caliper, measured the depth, and re-inserted the sleeve to that depth. Truth be told, I usually just left it EXACTLY where it was and just pressed in new ball joints. But as Bronco restoration has become more "fussy" the media blast / powder coat process lends itself to replacing the adjuster.

But just what exactly does that thing do? And what is the pre-load adjustment? And what is the design intent of pre-load on a ball joint? So one day, I made the mistake of reading the instructions, and it said to pre-load the adjuster by tightening to 70 lb-ft, (35-70 doesn't really matter) When I did that, it pushed the adjuster thru the inner C, and jacked the knuckle up about 1/8 inch. And it made ABSOLUTELY NO SENSE. Sure, by tightening the adjuster, I was setting pre-load on the upper joint, but I was UNLOADING the lower joint. So this technique only works if the lower ball joint is brand new, is 100% slop-free, and build to exacting tolerance between the ball joint stud, and the ball joint crimp plate. NOT the ball joint bearing plate, or ball support plate. At that point, I realized that the installation instructions were hopeless.

If you look at the inner C forging, you can see that the lower end is much thicker and heavier than the upper end. So I would guess that 80% of the load should be on the lower ball joint. And maybe 20% on the upper? But even if it were 50-50...the only way to get the joints to share the load is to pre-load the upper ball joint a tiny bit. And that can only happen when the lower ball joint is in full compression. But tightening the stupid adjuster puts the lower ball joint in tension. So you are actually unloading the lower joint, while pre-loading the upper joint. And that puts more vehicle weight on the upper joint, where it doesn't belong.

If you look at the attached cutaway pic, you can see the red circle. This is the area of the lower ball joint that should just be a seal, and crimp, and never see any load. But when you start pre-loading the upper, you unload the lower, and it displaces this otherwise non-structural area. Some lower ball joints are sensitive to this. Some are not. It shouldn't matter, but it does.

So....when I install ball joints now, I install the lower ball joint and tighten to spec. Then I install the upper sleeve. Then I jack up the knuckle until the entire weight of the Bronco is on the lower ball joint. Then I tighten the upper sleeve to about 50 lb-ft. Then I install the castle nut on the top, which pulls the pin into the taper and basically brings the pre-load to about zero.

I'm not saying that my way is right...but it's more right than the instructions.

Rant's over.
 

Attachments

  • balljoint2.jpg
    balljoint2.jpg
    26.8 KB · Views: 165

DirtDonk

Contributor
Bronco Guru
Joined
Nov 3, 2003
Messages
51,619
You don’t mention what your end results are.
Do you check pull torque? Or usually just leave it wherever it is?
Are they usually tight, or loose? Or wherever?

Speaking of later model jeeps and such. What is a typical pull weight of a modern Dana knuckle?
I don’t know that it even matters, but it would at least be some sort of a comparison for us to use since pull weight is our stated goal according to the manual.
 

toddz69

Sponsor/Vendor
Bronco Guru
Joined
Nov 28, 2001
Messages
11,209
The later model Dana 30's and 44's in the TJ, XJ, ZJ, JK, JL, and JT trucks all use a load bearing lower ball joint, and a sliding upper ball joint. So 100% of the vehicle load is carried by the lower ball joint. The upper joint is just there to keep everything straight.

But that Dana 44 open knuckle in your Bronco has TWO load carrying ball joints. The upper and lower ball joints SHARE the vehicle load. @DirtDonk This is why those "Ball Joint Eliminators" in the other thread are largely irrelevant for a Bronco.
Excellent treatise, as always, James. Good stuff! Is there an online source somewhere that details how exactly the Jeep ball joint setup differs from what we have in our Broncos? I'm not familiar with the Jeep configuration and would like to know how they work.

Thanks,
Todd Z.
 

DirtDonk

Contributor
Bronco Guru
Joined
Nov 3, 2003
Messages
51,619
I just did my Ball joints. You can't set the preload, torque the final bolt and then adjust, that's the problem.
But you aren’t supposed to be adjusting after the fact. At least not per the book.
You are setting it initially to where they think it will work best, then testing. (And basically hoping for the best!)
If it needs tweaking, you go back and do it again with a different torque setting on the sleeve. But that's just what we do. It's not what the book says.
Notice that in the book it says essentially, "if after adjusting to our specifications, the pull weight is too much, then you need new ball joints" instead of saying to try adjusting to a different value.
By "new ball joints" I always took that to mean either new ones to replace old ones, or new ones to replace defective or poorly made new ones. Which is what we run into a lot these days it feels like. Assuming that's the issue we have with the sleeve threading all the way out through the yoke year before the specified torque is reached.
Nothing really about resetting, readjusting, and trying again. But we do, and luckily often achieve the desired result. As in Lando's case here.

All resistance to the knuckle spinning is in the ball-joint's ball and socket area. Since the tapered stem is not spinning once torqued, and it's distance from the "ball" is fixed, then talking about preload is all about the ball and socket, with nothing to do with the tapered stem. That part is simply "tight" and that's it.
I'm sure most get this part, but just stating it to bring it out in the open.
You have to torque the lower, then the sleeve to the proper resistance, then torque the top "lock" nut.
Yep, that's what I've been saying all along.

If you do and you did it correctly, yes, you should measure after you're done and it should stay the same.
Well, not really. Why would it stay the same? Lots of potential movement between the various components.
With the sleeve you are literally changing the relationship between the upper and lower ball joint sockets. Moving them closer together or farther apart. No reason that the final pull torque should always remain the same.
I'm sure that it does some of the time. And it sounds like you're getting it there yourself every time? But pretty sure it does not do so all of the time in every case.
I like to cite the wheel bearing scenario. You NEVER and I mean NEVER check your clearance until you have pulled the outer lock nut up tight. The value there has been stated in various books as being anywhere from 30lbs (what!) to as much as 150lbs. I always choose between 70 and 120 lbs on my work, but any of the higher values seem valid and to work well.
The point is though, that before the nut is torqued, backing the inner adjuster nut off the 90° specified leaves the wheel bearing free play HUGE! It would never pass muster.
Once torqued however, all that extra play is gone. That's a ton of metal stretch from the torque applied to the outer end of the spindle.
Is it just the spindle stretching? Don't know, but a lot of things are going on after the final torque.

If you have not torqued the upper nut, how do you know that some of the pull weight is not reduced in value due to the top stud/stem spinning in the sleeve? Tightening the top nut locks everything in it's current position. At least to my way of thinking. Maybe I'm wrong and the pull weight on the steering arm is always the same before and after the final torque.
I can't say I've ever tried to compare, because I've never tested until it was all put together and final torque done. As per the book.
But maybe that's why the new torque spec is 70lbs? Putting more initial on the sleeve probably gets the final value closer to the desired result, resulting in fewer attempts to get it right. That would make sense to me on the surface.
And Paul, I do agree with you on the sleeve comment. My Moog instructions said to torque the sleeve to 70 ft lbs. yeah, no thanks.
Never heard that much until James mentioned it above. Maybe he's going by the same instructions. I wonder when they changed from the 40lbs that's been in the aftermarket books for the last 60 years almost?
Anyone have quick reference to the Dana book we had posted here a few times? I don't remember what it says, but it would be nice to compare.
If you can't achieve 40, or 50 lbs, how the heck are you going to get it to 70! In my last few cases, that would have put it all the way through the steering yoke for sure.

This is a great discussion. I want to see more details about other ball joint setups, and hear how others have achieved their final adjustments.
I do think though, that far too many people try far too hard to get to 26lbs exactly, when it's just supposed to be "less than" that value.
Hopefully this discussion will open up a big sea change in how quickly and easily this job goes.

Paul

 

ba123

Contributor
Bronco Guru
Joined
Oct 29, 2022
Messages
2,757
Loc.
CA
But you aren’t supposed to be adjusting after the fact. At least not per the book.
You are setting it initially to where they think it will work best, then testing. (And basically hoping for the best!)
If it needs tweaking, you go back and do it again with a different torque setting on the sleeve. But that's just what we do. It's not what the book says.
Notice that in the book it says essentially, "if after adjusting to our specifications, the pull weight is too much, then you need new ball joints" instead of saying to try adjusting to a different value.
By "new ball joints" I always took that to mean either new ones to replace old ones, or new ones to replace defective or poorly made new ones. Which is what we run into a lot these days it feels like. Assuming that's the issue we have with the sleeve threading all the way out through the yoke year before the specified torque is reached.
Nothing really about resetting, readjusting, and trying again. But we do, and luckily often achieve the desired result. As in Lando's case here.

All resistance to the knuckle spinning is in the ball-joint's ball and socket area. Since the tapered stem is not spinning once torqued, and it's distance from the "ball" is fixed, then talking about preload is all about the ball and socket, with nothing to do with the tapered stem. That part is simply "tight" and that's it.
I'm sure most get this part, but just stating it to bring it out in the open.

Yep, that's what I've been saying all along.


Well, not really. Why would it stay the same? Lots of potential movement between the various components.
With the sleeve you are literally changing the relationship between the upper and lower ball joint sockets. Moving them closer together or farther apart. No reason that the final pull torque should always remain the same.
I'm sure that it does some of the time. And it sounds like you're getting it there yourself every time? But pretty sure it does not do so all of the time in every case.
I like to cite the wheel bearing scenario. You NEVER and I mean NEVER check your clearance until you have pulled the outer lock nut up tight. The value there has been stated in various books as being anywhere from 30lbs (what!) to as much as 150lbs. I always choose between 70 and 120 lbs on my work, but any of the higher values seem valid and to work well.
The point is though, that before the nut is torqued, backing the inner adjuster nut off the 90° specified leaves the wheel bearing free play HUGE! It would never pass muster.
Once torqued however, all that extra play is gone. That's a ton of metal stretch from the torque applied to the outer end of the spindle.
Is it just the spindle stretching? Don't know, but a lot of things are going on after the final torque.

If you have not torqued the upper nut, how do you know that some of the pull weight is not reduced in value due to the top stud/stem spinning in the sleeve? Tightening the top nut locks everything in it's current position. At least to my way of thinking. Maybe I'm wrong and the pull weight on the steering arm is always the same before and after the final torque.
I can't say I've ever tried to compare, because I've never tested until it was all put together and final torque done. As per the book.
But maybe that's why the new torque spec is 70lbs? Putting more initial on the sleeve probably gets the final value closer to the desired result, resulting in fewer attempts to get it right. That would make sense to me on the surface.

Never heard that much until James mentioned it above. Maybe he's going by the same instructions. I wonder when they changed from the 40lbs that's been in the aftermarket books for the last 60 years almost?
Anyone have quick reference to the Dana book we had posted here a few times? I don't remember what it says, but it would be nice to compare.
If you can't achieve 40, or 50 lbs, how the heck are you going to get it to 70! In my last few cases, that would have put it all the way through the steering yoke for sure.

This is a great discussion. I want to see more details about other ball joint setups, and hear how others have achieved their final adjustments.
I do think though, that far too many people try far too hard to get to 26lbs exactly, when it's just supposed to be "less than" that value.
Hopefully this discussion will open up a big sea change in how quickly and easily this job goes.

Paul
Wow, I love when someone goes into that much detail… I’ll try to explain my own thoughts. After reading a few times, I don’t think we think that differently…

I think torquing and hoping for the best makes no sense unless all the parts are new and from the same manufacturer…all original. There will be differences in tolerance between wear, dirt, rust, and manufacturing. BUT, you are correct about the manual, it certainly does say that. I’ll try to post it.

I torqued the bottom to spec, then the sleeve until I got 24# something resistance. The torque value was somewhere in the 20’s I think and the resistance I set for was like 24.75 or thereabouts. I then torqued down my locking nut on top and yes it changed but it was ever so slight. I think that’s what it’s supposed to do…seems like you’ve done more of these than I have but it’s only a locking nut to secure it all together and block the sleeve from moving any more. (My understanding)

I saw a vid on YT of a Bronco guy doing it the same way I did as well…I’ll try to find it but there so much crap on there.

I don’t know what you mean about the sleeve going through the yoke. I don’t understand how it could if you’ve already torqued down the bottom, not to mention the ball joint is pressed in from the top so it’s not like you’re going to push the ball joint through, right? Or maybe the ball joints you’re working with are different than the ones I am and that’s what is making the difference? I don’t know. I actually did torque mine down way more than I wanted to just to see what the heck they were talking about. I got to like 50 and the knuckle wouldn’t move so I backed it back off.

I wasn’t planning on doing my other side as I did change them at some point but I figure with this discussion and the fact that I couldn’t get a ground down steering stop bolt off anyway, that since everything was off, I may as well remove the knuckle and tackle another set of ball joints.

I’ll try to get it done later today when home and I’ll post if it worked out the same way or different. I also saw one more thing in the manual since you made me look that I really liked! It said to use the puller to put pressure on the top so that you can torque the bottom. That might be easier than trying to jack up the bottom like I did before, not to mention I don’t have my spring in and can’t unless I put that back in first.
 

Attachments

  • IMG_2256.jpeg
    IMG_2256.jpeg
    342.3 KB · Views: 97

DirtDonk

Contributor
Bronco Guru
Joined
Nov 3, 2003
Messages
51,619
I always forget about the mention of the "step plate" and "puller" and "forcing screw" in the text. I've never seen those tools in person, but have seen pictures. In fact we had this discussion a couple of years ago and someone posted up the pictures again.
I use the jack method because that's what I thought would work, as it had worked on so many other tapered stud projects in the past. And I always have one handy.

I agree with you that it should not be possible for the sleeve to come all the way through. And though I have not tried to get one to come out the other side, I have (on a '77 Bronco) had some Moog ball joints not get to 25lbs on the spanner wrench before the sleeve was literally 3/4 of the way through. That's where I stopped and backed it off until only two threads were showing through the bottom of the yoke.
At that point, we torqued the top nut to spec and tested the pull force. Ended up being about 20lbs and so we called it good.

But at 3/4 through with little to no extra resistance (we did not check pull force) it seemed like it would easily go all the way though.
Maybe not, but it was still too far extended for my liking. Just a personal "feeling" rather than any previous experience with the problem.
But like brake pads and shoes that are too thick, this too-loose sleeve issue has been haunting us for over ten years now.
Prior to that, 40lbs and lock it down worked every time.

Paul
 

ba123

Contributor
Bronco Guru
Joined
Oct 29, 2022
Messages
2,757
Loc.
CA
Ok, home and out in the two new ball joints. I do have to say, that top one is tricky. One might think it’s in all the way but it prob is not. Because of the angles on the inside of the knuckle and you cannot get anything flat with clearance, you have to press it, then remove and readjust, press again, and maybe repeat one more time. Tough because you don’t have a slot for a retainer clip to tell you it’s through also. Keep pressing and adjusting until there’s no way it’ll go anymore. (Paul, I know you know this, more for the OP who had top joint issues).
 

ba123

Contributor
Bronco Guru
Joined
Oct 29, 2022
Messages
2,757
Loc.
CA
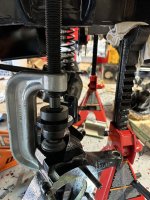
And for the press, this is what it sounded like to me.
IMG_5161.jpeg

BUT… the problem is that you can’t get a torque wrench in there with that so I used a wrench and tightened as much as I could and then removed it and no problem torquing after that. Beats getting grease on my jack from the lower fitting.
 

ba123

Contributor
Bronco Guru
Joined
Oct 29, 2022
Messages
2,757
Loc.
CA
Done…but first off that was way too easy this time and second I think your jinxed me (or I jinxed myself) cause the resistance did change this time and it’s too much.

So I’ll have to go in and loosen the sleeve I guess. I’m not putting in another ball joint only for the same thing to happen. I’d bet that means if you’re reassembling with existing ball joints and they didn’t make that clear.
 

DirtDonk

Contributor
Bronco Guru
Joined
Nov 3, 2003
Messages
51,619
Agree. Assumed it was for when re-using the old joints. But also left it open to (my) interpretation that if you got a bum joint it would show up here and you could then go out and spend more money on another one.

Paul
 

Oldtimer

Contributor
Jr. Member with Sr. moments
Joined
Feb 4, 2005
Messages
1,795
Loc.
Sunnyvale, CA
. . .But that Dana 44 open knuckle in your Bronco has TWO load carrying ball joints. The upper and lower ball joints SHARE the vehicle load.

I made the mistake of reading the instructions, and . . . it made ABSOLUTELY NO SENSE. Sure, by tightening the adjuster, I was setting pre-load on the upper joint, but I was UNLOADING the lower joint. . . At that point, I realized that the installation instructions were hopeless.

If you look at the inner C forging, you can see that the lower end is much thicker and heavier than the upper end. So I would guess that 80% of the load should be on the lower ball joint. And maybe 20% on the upper? But even if it were 50-50...the only way to get the joints to share the load is to pre-load the upper ball joint a tiny bit. And that can only happen when the lower ball joint is in full compression. But tightening the stupid adjuster puts the lower ball joint in tension. So you are actually unloading the lower joint, while pre-loading the upper joint. And that puts more vehicle weight on the upper joint, where it doesn't belong.

I'm not saying that my way is right...but it's more right than the instructions.

Rant's over.
Not a rant, a frustrated observation of manufacturers compromises, that we end up having to deal with.

After sleeping on this issue, and contemplating the death wobble I experienced after cut n' turn of inner Cs, with new ball joint installation, this is how I am going to re-adjust ball joints . . . maybe.

1) Install ball joints in knuckle, verify they are seated with .0015 shim.
Axle housing is supported on jack stands.

2) Install knuckle in axle, torque lower ball joint to 70 ft-lbs.
At this point weight of knuckle is hanging on non load supporting crimp of lower ball joint.
crimp.png


3) Using bottle jack, lift knuckle until lower ball is fully seated in socket.
4) Install tapered sleeve in upper joint and tighten till upper ball is fully seated in upper socket.
Instuctions mention 30 to 70 ft-lbs.
Is this to much, or to little?
We want enough pre load so that when tapered stud pulls into tapered sleeve, during final torque of top nut, we don't create a gap in upper joint.
5) Torque top nut.

This should split the load between upper & lower joints, and not have one doing all the work.

When complete we want no play in ball joints, and not so tight that we are binding upper ball against it's crimp.

If there is play, ball joint crimp may be suspect.

The manufacturer wants to verify no binding from excessivepre-load with a "fish scale".
Fishing is to inactive for me, so I don't own a fish scale.

assembly.jpg
 
Last edited:
Top