• Welcome to ClassicBroncos! - You are currently viewing the forums as a GUEST. To take advantage of all the site features, please take a moment to register. It's fast, simple and absolutely free. So please join our community today!
    If you have problems registering or can't log into your account, please contact Admin.

Best of both worlds build

Speedrdr

Contributor
Legend in my own mind
Joined
Nov 27, 2017
Messages
2,028
Loc.
Paris, MS
Got the frame chopped and putting it back together today with the modifications to make the suspension work.

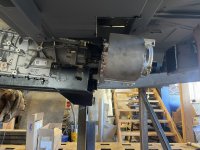
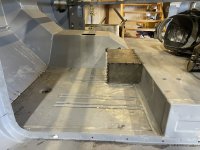
Got the atlas clocked flat so we had to put a notch in the floor to tuck it up but it made a huge improvement in driveshaft clearance between the 1350 CV joint on the front output of the Atlas and the 10R80 transmission. Widening the frame helps in so many ways.

With the wider frame rails we dropped the Coyote motor 2" from where it would have mounted with the BC Broncos motor mounts so I can clear the Coyote with stock hood and no body lift. Relocating the front crossmember will make things easier with the coyote as well.

We are able to fit 18" rear coilers and 16" front coilovers while maintaining the lower stance. The challenge up front is the combination of coiler and bypass shock take up some real estate so we are still negotiating that.
Okay. That’s not nice to tease us. Can’t you see that’s just cruel and inhumane treatment???🤪

Randy
 
OP
OP
Colo77Bronco

Colo77Bronco

Sr. Member
Joined
Oct 10, 2004
Messages
694
Loc.
Colorado Springs
Pictures of the Atlas tucked up into the firewall. I still need to drop the body down to the frame and lower the Coyote 2". Transmission will be tucked up nicely and Atlas flat. The Tom's Offroad Crossmember will be going away and I will make one. Cutting the floor to clock the Atlas up solved so many issues. In the traditional configuration you cannot use a 1350 joint on the front output of the Atlas because it is clocked to the bottom corner of the 10r80. With it flat it clears nicely. Also, the crossmember had to hang down to make a route for the front driveshaft but it can now be nice and flat.

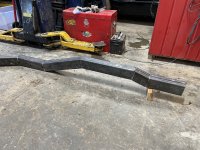
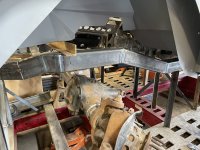
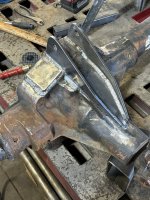
Also picture of where I cut the frame and the new fabricated rail to mate with it. We moved it out to run directly under the body mounts and will weld in support tubes where the body mount go. Still going to modify the front of the rail to angle in to meet the stock front bumper location.
 

Attachments

  • IMG_1661.jpeg
    IMG_1661.jpeg
    198.4 KB · Views: 195
  • IMG_1662.jpeg
    IMG_1662.jpeg
    178.1 KB · Views: 187
  • IMG_1663.jpeg
    IMG_1663.jpeg
    332.5 KB · Views: 181
  • IMG_1664.jpeg
    IMG_1664.jpeg
    292.9 KB · Views: 179
OP
OP
Colo77Bronco

Colo77Bronco

Sr. Member
Joined
Oct 10, 2004
Messages
694
Loc.
Colorado Springs
New frame rail mounted. We have the stock frame from just behind the Atlas back and this now kicks out at that point and runs directly under the body mounts going forward then jogs back to stock location after the engine. Putting tube through the frame for strength at the body mount points. It came out so well that we are doing the same on the other side. With the full width axles, and widening the frame, the engine bay has now become huge! I think I could run any Coyote oil pan and exhaust set up out there without issues. The 2008 Superduty front axle with the pumpkin way further to the driver side was a hassle with the stock frame width but now it makes clearance SO much easier. Everything functions and fits so much better now. Not sure why none of the aftermarket frame builders aren't being more aggressive and only adding 2" of width.
 

Attachments

  • IMG_1685.jpeg
    IMG_1685.jpeg
    231.3 KB · Views: 167

sprdv1

Contributor
REBEL
Joined
Mar 8, 2007
Messages
81,996
Nice.. Best of luck w/progress. one thing at a time right
 
OP
OP
Colo77Bronco

Colo77Bronco

Sr. Member
Joined
Oct 10, 2004
Messages
694
Loc.
Colorado Springs
Frame rails finally completely mocked up. I think I have plenty of room now for full length Coyote headers. Will be moving the inner fenders out soon. They are way too far in for full width axles.
 

Attachments

  • IMG_1737.jpeg
    IMG_1737.jpeg
    214.8 KB · Views: 174

ssray

Contributor
Sr. Member
Joined
Apr 19, 2010
Messages
915
Loc.
South Central NE
Wow, nice. I’m watching your build! Ever meet JD (74BroncoCO on here)? He lived in Falcon but moved quite a few years back. Knew him from a different forum thats gone now.
 
OP
OP
Colo77Bronco

Colo77Bronco

Sr. Member
Joined
Oct 10, 2004
Messages
694
Loc.
Colorado Springs
I haven't but I am going to go look at his posts. My previous build was from about 2005 through 2015 until I was forced to sell it so I have been out of the game for a few years.
 
OP
OP
Colo77Bronco

Colo77Bronco

Sr. Member
Joined
Oct 10, 2004
Messages
694
Loc.
Colorado Springs
Here is the link with the progress of my build to this point. It has been slow going up to this point because Jordan Townsend, the custom fabricator, has been tied up finishing other builds but mine is picking up steam. Go visit this link and like it if you like what you see!

Thanks everyone!

 
OP
OP
Colo77Bronco

Colo77Bronco

Sr. Member
Joined
Oct 10, 2004
Messages
694
Loc.
Colorado Springs
I offered him a bonus if rough fabrication of entire suspension and steering completed in time to go to Super Celebration in 3 weeks. Go to the YouTube page and leave a comment if you want him to get enough fabrication done to see it there as a work in progress.
 
OP
OP
Colo77Bronco

Colo77Bronco

Sr. Member
Joined
Oct 10, 2004
Messages
694
Loc.
Colorado Springs
Also, I have my old doors and a few other bits I’ll be bringing along to SuperCelebration for whoever needs them first come first serve.
 
OP
OP
Colo77Bronco

Colo77Bronco

Sr. Member
Joined
Oct 10, 2004
Messages
694
Loc.
Colorado Springs
Have time to wrap up this build in the next two months. Trying to decide if I should put in the wiring harness and drive it in proper in case I meed to modify anything or trust the work and send it off to paint so the wiring harness is a one time installation. Thoughts???
 

Speedrdr

Contributor
Legend in my own mind
Joined
Nov 27, 2017
Messages
2,028
Loc.
Paris, MS
There’s definitely a reason to drive it and “test the waters” so to speak. If you find a problem it can be fixed and not run a risk of scuffing a finished paint job.
On the other hand, wiring is generally not an issue with paint scuffing (in my limited experience) and you’d have a pretty rig to give you incentive to finish up.
 
OP
OP
Colo77Bronco

Colo77Bronco

Sr. Member
Joined
Oct 10, 2004
Messages
694
Loc.
Colorado Springs
Well, it has been a long time but finally making significant progress. I addition to the winch recessed behind the stock from bumper (different post), we made a huge amount of progress on the front suspension and steering. 3-link is done in front. Beefy aluminum arms. We had to modify the Coyote oil pan significantly toward the front in order to be able to get a full 7" of compression. Similar to NVRSTK we will ride on 38s or 40s and keep overall ride height very low. We will have 16" of travel in front with the coil-carriers and bypass shocks. The coil-carriers will mount in front of the axle similar to how the bypasses are mocked up in back of the axle now. We trimmed a few inches of the bottom of the coyote oil pan and made a custom pickup tube. The steering is in extreme mock up phase currently so the linkages will be nicer but we confirmed all of the geometry will work. Fitting Dana Super 60 front axle, coyote mounted low enough for stock hood, figuring out how to use my Toms Offroad PSC Steering box and getting the linkages to fit was a lot. Pics are with the axle at full stuff on both sides so the axle tub is almost touching the modified coyote oil pan. None of this would have ever worked with the stock frame. Wanted a cool high steer kit but that would put all of the linkages through the block of the Coyote so that was money wasted.
 
OP
OP
Colo77Bronco

Colo77Bronco

Sr. Member
Joined
Oct 10, 2004
Messages
694
Loc.
Colorado Springs
I need to give my guy Jordan Townsend some major props here. We are going with 40” tires on 1-ton axles and keeping the height of the rig very low for center of gravity. It is only a little taller than stock. He widened the front frame rails and raised them up for axle clearance. He also fabricated a custom oil pan for the Coyote to clear the axle and steering components at full compression. He was able to keep the engine low enough that I can clear a supercharger with stock hood and 2” body lift AND keep 7.5” of up travel which is insane given the space constraints. I am so lucky he was able to figure that out.
 

DirtDonk

Contributor
Bronco Guru
Joined
Nov 3, 2003
Messages
51,618
Now we just need more pics!
The last ones are already three weeks old. 😉😁
Nice mod to the tank too. Any pitfalls or gremlins run into during the process?
 
Top