• Welcome to ClassicBroncos! - You are currently viewing the forums as a GUEST. To take advantage of all the site features, please take a moment to register. It's fast, simple and absolutely free. So please join our community today!
    If you have problems registering or can't log into your account, please contact Admin.

Steering is darting is this the likely culprit?

OP
OP
joshua

joshua

Contributor
Bronco Guru
Joined
Jun 5, 2007
Messages
1,757
Yes. It's a common method.
But the key is to make it long enough to mimic the diameter of the tire that will be used.
The more common driveway method (I believe) is to use the sidewall of the tire. I've done it too, but I find that too many truck tires have too many sidewall discrepancies that can skew the numbers.

That said, for me it doesn't really matter, as no matter what I set it at, any time I'm doing a vehicle for the first time, I take what I set it at, drive it for awhile, then tweak it slightly over the next few weeks until I find where it likes it best.
It's usually where I set it initially, but not always.

Can't you use the bolt that's in there now?
Nothing wrong with coarse thread at least for initial driving around. If it's determined that the added strength of a fine-thread bolt is worth it, then by all means change it back out as soon as you can get the correct bolt.
Probably more important getting one with the correct length shank?
But I would not hesitate to use what you have in the short term.

Paul
It was welded in. (3/4 bolt) And would be a ton of work with a dermal to remove.

And I’m going to try the tape on the lugs method now that I understand it. I’ll report back later.

As I’ve currently switched projects to rebuilding my heater box cuz I’m in the frozen north of MN. Well kinda frozen as it was over 70 today.
 

SLOWnEASY

Contributor
Sr. Member
Joined
Sep 26, 2022
Messages
517
Loc.
San Diego, Ca.
One of the alignment shops in San Diego does something similar. But they jack the up each wheel one at a time. With the wheel in the air they place a can of white spray paint on the ground close to the tire. Then they hold down the spray button and spin the tire by hand painting a line all the way around the circumference. Then while still spinning the tire they put a pointer on the ground and scrape a clear spot in the center of the line all the way around the tire. From there you have a consistent point to measure off of front and back.
I've used them since 1985 and typically the majority of the paint line wears off in the first 10 or so miles. You could also jack each tie up and spray a line of black to cover the white it you really want to.
Thinking further you could wrap a line of painters or even duct tape around the tire first and then use a fine point sharpie to draw a line around the tire. Just don't try to freehand the line. Hold the marking instrument on the ground and spin the tire. Oh and it probably goes without saying but for the marking, spin the tire away from the instrument so the pointer bounces off and doesn't grab the edge of a tire lug.
Editing since I just re-read Joshuas last post. You could definitely use just two pieces of tape one on the front and one on the back of the tire. But still find a way to hold your pen or sharpie steady and spin the tire to draw the lines.
 
Last edited:

Broncobowsher

Total hack
Joined
Jun 4, 2002
Messages
37,060
I have heard of the scribe a line method as well. If you use spray crack check developer (talc powder suspended in alcohol) it will wash off.
 

DirtDonk

Contributor
Bronco Guru
Joined
Nov 3, 2003
Messages
51,613
One potential issue with using the sidewalls is random bulging here and there, potentially skewing the measurements.
I get how that using a method that makes it an easy one-step (after other multiple steps?) measurement, would be appealing. Instead of creating a full round mark, or using two separate marks then, using one single point on the sidewall would at least keep it consistent.
We used to make our own measuring devices out of wood that put brackets up against the sidewalls of tires and mimicked a very large tape measure. Essentially a sliding scale arrangement.

Ours was a straight 2x2 with a vertical piece on one end, and a sliding pieces for the other. Long enough to reach the outside of the tires, a printed scale on it's surface (or an actual measurement tape/strip glued, screwed or stapled to the surface) was a nice repeatable tool capable of measuring any vehicle with any tire size. As long as the main beam was long enough of course.
Stood in the corner of our garage for 40 years and was put to good use in that time.
It started to lose favor with me though, when over the years it seemed like more and more tires (both car and truck tires) were coming with uneven sidewall surfaces.

But I still like the single piece of tape on a lug with a nice flat side to hook the tape measure to, or a single mark on the sidewall and roll the tire forward to take the second measurement. Still easy for one person to do it that way.

Paul
 

.94 OR

Contributor
Bronco Guru
Joined
Jul 5, 2009
Messages
2,209
Loc.
Willamette Valley, OR
One potential issue with using the sidewalls is random bulging here and there, potentially skewing the measurements.
I get how that using a method that makes it an easy one-step (after other multiple steps?) measurement, would be appealing. Instead of creating a full round mark, or using two separate marks then, using one single point on the sidewall would at least keep it consistent.
We used to make our own measuring devices out of wood that put brackets up against the sidewalls of tires and mimicked a very large tape measure. Essentially a sliding scale arrangement.

Ours was a straight 2x2 with a vertical piece on one end, and a sliding pieces for the other. Long enough to reach the outside of the tires, a printed scale on it's surface (or an actual measurement tape/strip glued, screwed or stapled to the surface) was a nice repeatable tool capable of measuring any vehicle with any tire size. As long as the main beam was long enough of course.
Stood in the corner of our garage for 40 years and was put to good use in that time.
It started to lose favor with me though, when over the years it seemed like more and more tires (both car and truck tires) were coming with uneven sidewall surfaces.

But I still like the single piece of tape on a lug with a nice flat side to hook the tape measure to, or a single mark on the sidewall and roll the tire forward to take the second measurement. Still easy for one person to do it that way.

Paul
Any reason that method couldn't be modified to set against the rim instead of the sidewall with some offsets? Should eliminate the "bulge" issue that way.
 

Broncobowsher

Total hack
Joined
Jun 4, 2002
Messages
37,060
I don't trust rims to be true.

Any good alignment machine has wheel sensors installed and the wheel rotated. This zeros out any runout and gets down to the true rotational axis of that tire. You could have wheels that look like Clark Griswold after paying $500 for 4 bald tires and a toe and still get an accurate alignment.
 

DirtDonk

Contributor
Bronco Guru
Joined
Nov 3, 2003
Messages
51,613
Any reason that method couldn't be modified to set against the rim instead of the sidewall with some offsets? Should eliminate the "bulge" issue that way.
Nope, that would probably be more consistent than a tire sidewall.
 

DirtDonk

Contributor
Bronco Guru
Joined
Nov 3, 2003
Messages
51,613
I don't trust rims to be true.
Probably not an uncommon thing. Especially if used hard.
But I generally do trust most wheels to be at least fairly true.
Certainly many of them won’t be too far out, and hopefully better than the tires!
And I’d want to know about it anyway. Would hope to replace them if I found them to be out of true.
 
OP
OP
joshua

joshua

Contributor
Bronco Guru
Joined
Jun 5, 2007
Messages
1,757
A couple of things to do before taking it down to have it aligned. Well, maybe more than a couple.
Yes, you should raise the lower trackbar mount to the upper hole. I'd rather lower the upper mount slightly, but that's more work and your riser has that handy hole right there. So it's easy to experiment.
Second, check all four tire pressures. What are they set at?
Is your steering box centered? Meaning, no matter where the wheel is pointing, and the tires are pointing, is the BOX itself, in the center spot of it's travel. Or more accurately still, is it on the high spot of the gears. Only a manual check will confirm this. More work, but worth it if you don't already know.
Next, do the wiggle test. Familiar with it? If not, let us know and we can give you the full rundown.
What C-bushings are in it? You say "correct for the lift" but are they correct for your Bronco? Nobody knows ahead of time, so we all just use the generic "correction" factor for including bushings. Mostly because almost nobody ever checks their caster before the lift, so we don't know to recommend a higher or lower offset bushing.

Depending on what kind of shop you find, and how much you have to spend, almost nobody is going to do a "full alignment" on your Bronco. They're going to give you a printout, adjust the toe-in (incorrectly most likely) and send you on your way.
I'm not against a check however, and a printout of your readings is a fantastic tool to check how your rig is set up.
I'd adjust the toe-in myself frankly. That way you can also play with it later to find your Bronco's happy spot. Mine were always right about 3/16" toe-in.

But do the wiggle test maybe before anything else.
This test will highlight anything you need to take care of first. Such as, wheel bearings, ball-joints, steering linkage ends, trackbar ends and bolts, rear u-bolts, and just about anything else.
Pay particularly close attention to the upper and lower trackbar mounts. This means ALL of it. The bolts themselves, the holes that the bolts go through (are they wobbling in their mounts), the mounts for flex, the steering box for moving on the frame rail (cracked frame) and all that stuff.

Good luck.

Paul
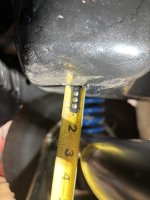
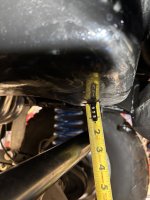
Is this to close? It’s definitely lined up more gooder. But now it seems very close to the oil pan
 

Attachments

  • IMG_0720.jpeg
    IMG_0720.jpeg
    140.5 KB · Views: 41
  • IMG_0721.jpeg
    IMG_0721.jpeg
    131.8 KB · Views: 41
  • IMG_0723.jpeg
    IMG_0723.jpeg
    220.5 KB · Views: 37
  • IMG_0724.jpeg
    IMG_0724.jpeg
    186.8 KB · Views: 41

DirtDonk

Contributor
Bronco Guru
Joined
Nov 3, 2003
Messages
51,613
More gooder is right!
Can't tell for sure, but is that a correct pan with the rear sump? The bar is that close to the shorter part of the pan?
I'm going to say that, for standard driving around while you're checking the steering action, you're ok. But for long-term use, it would be nice to be a little further away.
Looks like something has already hit the pan and scraped it. That the case?

Also looks like someone (you?) bent the steering stabilizer bracket up for clearance. Or did something hitting it do the job for you?

Paul
 
OP
OP
joshua

joshua

Contributor
Bronco Guru
Joined
Jun 5, 2007
Messages
1,757
More gooder is right!
Can't tell for sure, but is that a correct pan with the rear sump? The bar is that close to the shorter part of the pan?
I'm going to say that, for standard driving around while you're checking the steering action, you're ok. But for long-term use, it would be nice to be a little further away.
Looks like something has already hit the pan and scraped it. That the case?

Also looks like someone (you?) bent the steering stabilizer bracket up for clearance. Or did something hitting it do the job for you?

Paul
No the bracket was that way I replaced my frame. When I bought the frame it was hanging on a barn wall. So idk how it got bent or even that it was bent. It’s just dangling there so I don’t lose it. I really need to remove as I don’t plan to use a stabilizer (hopefully)

It is the correct pan. And nothing hit the pan. I had it sitting on an old tire a not long ago. I just got the bronco up and running really.

And thanks I’ll pull this bolt out and attempt to drill a hole in it for the castle nut. I really need to invest in a drill press. But anything for hobbyists seems to be really crappy lol.
 

.94 OR

Contributor
Bronco Guru
Joined
Jul 5, 2009
Messages
2,209
Loc.
Willamette Valley, OR
It's too bad you can't drop the frame end of the track bar 1.25-1.5" so that it is all but parallel with the drag link in the process. That would give you a little more pan clearance as well.
 

Apogee

Contributor
Bronco Guru
Joined
Nov 26, 2005
Messages
6,345
Loc.
Tangent, OR
It's too bad you can't drop the frame end of the track bar 1.25-1.5" so that it is all but parallel with the drag link in the process. That would give you a little more pan clearance as well.

Couldn't he? The '76/'77 track bar mount is lower/longer than the earlier versions IIRC, though I'm not sure by how much. I cut mine off and I can't seem to find it laying around to measure it, so it must be in the scrap bin, but it wouldn't be that hard to make a new one to position the upline end of the track bar where he wants/needs it, get the drag link and track bar perfectly parallel and increase the clearance between the track bar and oil pan. Personally, I would remove the front springs and put the rig on the bump stops (if it has them, otherwise at full compression) when doing this to ensure fitment and clearance of everything, as tie-rod/drag-link, track bar, pitman arm, differential and oil pan call all get super cozy with one another at full stuff and/or full articulation in my experience.
 
Top