• Just a reminder that you won't be able to start new posts or reply to existings posts in the Archive forum.

    This is where all the old posts go so they can still be used for reference and searched.
  • Welcome to ClassicBroncos! - You are currently viewing the forums as a GUEST. To take advantage of all the site features, please take a moment to register. It's fast, simple and absolutely free. So please join our community today!
    If you have problems registering or can't log into your account, please contact Admin.

68 Sport body off build thread, Updated...4/10 New pipes

OP
OP
Sac '68 sport

Sac '68 sport

Bronco Guru
Joined
Apr 9, 2004
Messages
1,176
Loc.
Orangevale
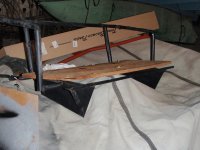
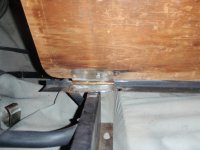
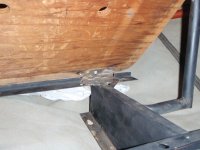
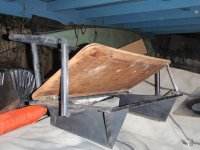
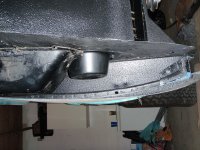
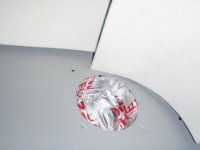
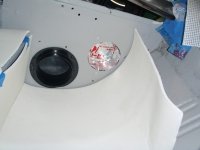
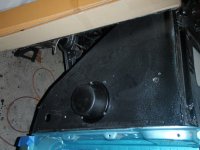
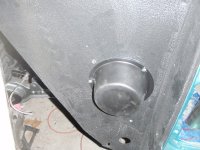
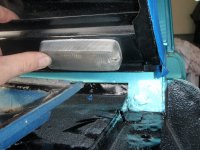
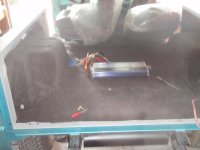
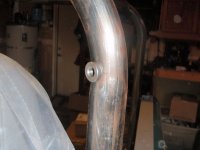
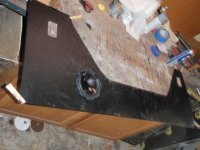
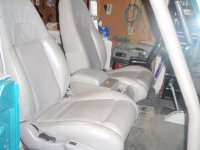
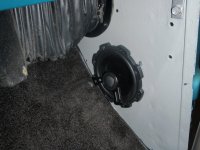
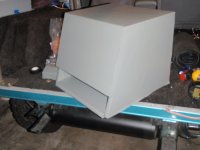
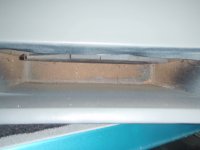
I’m going to make the rear seat bottom flip up to show off my amp. 5 channel Sound Stream Rubicon. Local company and they use to be great amps so I’ll see how the new stuff is. I cleaned it all up and took to it with the body hammer and dolly for a couple of hours. Then I welded in some normal door hinges to make it hinge. I still need to get some flat bolts or screws so the hinges can close all the way. I saw some at ACE today that were totally flat and I think will work good. For the seat side I’ll just use the same type of counter sunk nut that was on stock. They have those at ACE too. The front and rear will hopefully get the same polished alum. screen I used on the fender for the trans cooler, but I’m not sure if I can get a long enough piece.
 

Attachments

  • PC220191.jpg
    PC220191.jpg
    111.5 KB · Views: 40
  • PC220189.jpg
    PC220189.jpg
    101.1 KB · Views: 39
  • PC220190.jpg
    PC220190.jpg
    112 KB · Views: 34
  • PC220194.jpg
    PC220194.jpg
    129.3 KB · Views: 43

ryoungbronco

Bronco Guru
Joined
Jul 4, 2007
Messages
1,751
Loc.
Belmar, NJ
Nice work so far. I saw that the front of the frame is boxed around the power steering. Is that to strengthen it or did you use a different type of box?
 
OP
OP
Sac '68 sport

Sac '68 sport

Bronco Guru
Joined
Apr 9, 2004
Messages
1,176
Loc.
Orangevale
Speaker pods. Dog food dishes painted black and riveted to the kick panels. I then taped them up with tite seal aluminum backed window flashing stuff. It works great, like a light dynamat but only like $10 for a 20ft roll. They will be filled with 5.25 Rockford Fosgate speakers. I think I’m going to do a thin fiberglass kick panel cover for them so they look more flush mounted. Also started on cutting the insulation for under the carpet.
 

Attachments

  • PC220180.jpg
    PC220180.jpg
    128.5 KB · Views: 60
  • PC220172.jpg
    PC220172.jpg
    175 KB · Views: 73
  • PC220158.jpg
    PC220158.jpg
    66.2 KB · Views: 74
  • PC220160.jpg
    PC220160.jpg
    88 KB · Views: 77
  • PC220157.jpg
    PC220157.jpg
    123.6 KB · Views: 75
  • PC220156.jpg
    PC220156.jpg
    161.6 KB · Views: 81
OP
OP
Sac '68 sport

Sac '68 sport

Bronco Guru
Joined
Apr 9, 2004
Messages
1,176
Loc.
Orangevale
Nice work so far. I saw that the front of the frame is boxed around the power steering. Is that to strengthen it or did you use a different type of box?

The PO had put in power steering out of a mid 70's big merc. car. He hacked into the frame to make it fit. About 6-7 years ago the whole thing broke so I had a guy box it all in for me. I've added some plate and welded up some spots that he couldn't because the body was on at the time. It works pretty good but it puts the pitman arm at an odd angle so the same guy welded me up a pitman arm to make it work. Not the best and I check it often but it's what I've got to live with until I can find a pitman arm to work. I think I might be able to use an indexed drop arm so that's on the list too.
 
OP
OP
Sac '68 sport

Sac '68 sport

Bronco Guru
Joined
Apr 9, 2004
Messages
1,176
Loc.
Orangevale
Spedo is done. Took mine apart to clean it and the whole head totally fell apart. Parts everywhere. The odometer would barely spin and was catching on something in side of it. It hasn’t really worked for years. Now I know why. I found a 64 pickup spedo on E-bay that was pretty much the same but it didn’t have an ammeter, no problem as I’m putting in a Volt meter, and no oil pressure gauge. The truck gauge was really nice. I pulled the spedo head and fuel gauge because I bent the needle on mine trying to clean it. Cut the hole for the volt meter and put it in using JB weld. Repainted all the needles and I took some polish to the face of all the gauges after testing it on one of the other gauges first. Painted the trim and outer ring Artic Silver with clear and hit it with the buffer to get it to shine. I couldn’t figure out how to roll the odometer back to all 0’s though.
 

Attachments

  • PC220181.jpg
    PC220181.jpg
    155.6 KB · Views: 43
  • PC220182.jpg
    PC220182.jpg
    160.4 KB · Views: 38
OP
OP
Sac '68 sport

Sac '68 sport

Bronco Guru
Joined
Apr 9, 2004
Messages
1,176
Loc.
Orangevale
New springs and front RSX9000's are in and the front wheels got a good buffing. I had recently bought a set of stock height WH varrible rate coils to smooth out the ride, but after installing them the truck sat really low in the front. Rear is an older Duff stock height 5 pack. I plan on putting in an 11 pack at some point but not for a while. Funds are running low. Either the Duffs are tall, the WH are short or some of both because this thing was really raked. I found a set of newer 2.5 inch lift coils from a guy on the NorCal Bronco's site and gave them a quick sand and rattle can spray with the metalic gray that is going to be the trim color on the rest of the truck. This appears to have it sitting even front to back, and I don't have any lean... But now as you can see from the pic's it shifted the axel way over to the drivers side. It's almost 3 inches further over at the top of the tire. The pass coil actually hits the bottom of the frame/spring bucket when I bounce it. I didn't think 2.5 inch coils would shift it over that much. Guess I'll be getting a new track bar...
 

Attachments

  • PC260334.jpg
    PC260334.jpg
    90.4 KB · Views: 28
  • IMG_0112.jpg
    IMG_0112.jpg
    95.9 KB · Views: 34
  • IMG_0111.jpg
    IMG_0111.jpg
    89.1 KB · Views: 36
  • IMG_0109.jpg
    IMG_0109.jpg
    87 KB · Views: 36
OP
OP
Sac '68 sport

Sac '68 sport

Bronco Guru
Joined
Apr 9, 2004
Messages
1,176
Loc.
Orangevale
Merry Christmas to me...New Russle power flex SS lines and all the fittings for the hydroboost and PS from the parents, and my wife got me some a new plastic glove box and the Alum. Nicks Trix column cover from Tom's. The last two won't see the truck for a while...
 

Attachments

  • Image11.jpg
    Image11.jpg
    168 KB · Views: 26
  • Image71.jpg
    Image71.jpg
    90.1 KB · Views: 26
  • Image61.jpg
    Image61.jpg
    88.4 KB · Views: 23
OP
OP
Sac '68 sport

Sac '68 sport

Bronco Guru
Joined
Apr 9, 2004
Messages
1,176
Loc.
Orangevale
Since I got the lines I might as well start putting it all in. This is a 79 Lincoln Sag. pump with dual returns. I put it in using a Sag. bracket from a mid 80's van and my stock adjuster bracket. I had to grind off the old adjuster nut, redrill and reweld on a new nut so everything would line up with the stock adjuster bracket. I didn't really want to use the rest of the stuff off the van. I've got an old York AC bracket for my dealer installed AC that I want to be able to put back on at some later point in time. They hydro is from an 81 chevy wagon and it lined up really nice. I just had to rotate the bracket 90 deg. grind a little then drill three holes that lined up perfectly with the stock brake bracket. Really nice fit. It doesn't have the accumulator that some others have and I read after I got it that it's not the most desirable unit but I'm going to give it a shot anyway. When taking it all apart the brake line to the master stuck in the nuts and I couldn't get them free for the life of me so new brake lines will have to be bent up.
 

Attachments

  • Image51.jpg
    Image51.jpg
    123.2 KB · Views: 43
  • Image21.jpg
    Image21.jpg
    97.7 KB · Views: 43
  • Image41.jpg
    Image41.jpg
    130.7 KB · Views: 31
  • Image31.jpg
    Image31.jpg
    109.1 KB · Views: 34
OP
OP
Sac '68 sport

Sac '68 sport

Bronco Guru
Joined
Apr 9, 2004
Messages
1,176
Loc.
Orangevale
Decided to tackle the EZ wire harness today. Layed everything out and himmed and hawed for an hour about where to put the fuse box and hole in the fire wall. I was thinking the stock location next to the gas pedal. I filled the holes in the fire wall prior to paint so really I could go anywhere. I needed some time to think about things so I went to Harbor Freight and picked up some shrink wrap, zipties and some other supplies and when I got back I decided to instal the dash and see how it looked in the glove box and make sure everything will reach where it needs to go. It looks like it will work good there so that's where it's going to go.

I want to keep it all as clean and neet as possible so I'm trying to plan things out so I don't have any extra stuff in the engine compartment. I've got a mallory unilite with a ballast resistor and power filter so I'm going to put the ballast resistor in the cab under the dash somewhere and run the wires back into the cab then out to the coil on the fire wall behind the drivers fender along with the back half of the harness. I'm hoping I can move the power filter in there too but I'm not sure if it's ok to extend the wires on that yet. I also got a 1 wire Alt. from RRRAAAYYY so that should help clean things up.

I still need to figure out how to run the Back up lights before I run the back half. Anyone know how this will go with the EZ and the C-4? There is a "Back up light" section in the back section and also with the dash section and one that says "back up light power" with the dash section. Instructions with this kit aren't the greatest.

I think this is going to take a while...
 

Attachments

  • 2011-01-02_00003.jpg
    2011-01-02_00003.jpg
    131.9 KB · Views: 51
  • 2011-01-02_00004.jpg
    2011-01-02_00004.jpg
    166.7 KB · Views: 37
  • 2011-01-02_00008.jpg
    2011-01-02_00008.jpg
    91.2 KB · Views: 37
  • 2011-01-02_00006.jpg
    2011-01-02_00006.jpg
    147.5 KB · Views: 39

broncoitis

Bronco Guru
Joined
Jul 23, 2010
Messages
4,449
Looking Good! Keep it up. I have had my current Bronco since 2000 and it is finally getting close to being done. You'll get there before you know it!
 
OP
OP
Sac '68 sport

Sac '68 sport

Bronco Guru
Joined
Apr 9, 2004
Messages
1,176
Loc.
Orangevale
Thanks for the motivation. Just got to keep plugging along.

My son, six, had the day off from school today so I took the day off to. At about 10:30 one of his friends from school called about a play date so he went over there and I went to the pick and pull. Win win...

I wanted to get all the electrical gizmo's so I had them while doing the wiring and I really wanted to do something about the ugly raidator overflow bottle I had. I liked the idea of the Explorer and truck washer/overflow units so I went looking for one of those and anything else that caught my eye. I found a decent washer/overflow out of an Explorer and I also found one that was similar out of an 80's ranger but it didn't fit quite as nice.
While digging through the Explorer I saw the little cargo light in the back and thought they would be perfect in the rear quarter pannel covers in front of and behind the rear seat in the cargo area so I grabbed 4 of them. I also grabbed the dome light out of an Amigo that fits perfect in the little oval hood recesses so I'm going to put one right above the fresh air storage box that's on it's way and I might see if I can find two more to go in the two recesses at the end of the hood. Best score of all, I was able to nab the last S-10 lighted rear view mirror in the yard.

Anyone know which wire (black/white or black) is pos. on the washer pigtail?
 

Attachments

  • P1030340_tn.jpg
    P1030340_tn.jpg
    54.2 KB · Views: 74
  • 2011-01-03_00006.jpg
    2011-01-03_00006.jpg
    152.7 KB · Views: 83
  • 2011-01-03_00001.jpg
    2011-01-03_00001.jpg
    84.2 KB · Views: 84
  • 2011-01-03_00004.jpg
    2011-01-03_00004.jpg
    161.8 KB · Views: 74
  • 2011-01-03_00003.jpg
    2011-01-03_00003.jpg
    90.6 KB · Views: 73
OP
OP
Sac '68 sport

Sac '68 sport

Bronco Guru
Joined
Apr 9, 2004
Messages
1,176
Loc.
Orangevale
Finally time to update the build thread. Been plunking along slowly.
Got the wiring, dash, glass and rear view in.
 

Attachments

  • dash.jpg
    dash.jpg
    189.7 KB · Views: 66
  • Rear view.jpg
    Rear view.jpg
    164.2 KB · Views: 63
OP
OP
Sac '68 sport

Sac '68 sport

Bronco Guru
Joined
Apr 9, 2004
Messages
1,176
Loc.
Orangevale
We moved into a new house in May so I didn't have much time or money to work on the rig.
Saved up some money and decided to take two weeks off for the holidays. Pulled the cage and welded in the seatbelt bungs and sent it along with the console, back seat, soft top frame and spare rack off to Performance Powder Coat here in Orangevale get powder to match my column and other little bits.

Under the carpet I did the tite-seal strips. It stuck to the Raptor ok but not great in spots. I did notice that it knocked down some of the noise and tin sound though. Got the carpet in, the amp installed and wire for the lights and sound system.
 

Attachments

  • carpet installed.jpg
    carpet installed.jpg
    173.8 KB · Views: 48
  • carpet on drive.jpg
    carpet on drive.jpg
    165 KB · Views: 43
  • seatbelt.jpg
    seatbelt.jpg
    147.4 KB · Views: 47
  • off to the PC.jpg
    off to the PC.jpg
    186 KB · Views: 52
OP
OP
Sac '68 sport

Sac '68 sport

Bronco Guru
Joined
Apr 9, 2004
Messages
1,176
Loc.
Orangevale
And this is what we did at night over Christmas in the new neighborhood. Every house on the block is way over the top and we get 200,000-300,000 people a year. Any given night in the 2 weeks leading up to Christmas there was 15,000-20,000 people walking and driving through per night. It was a blast but I'm glad it's over. I haven't had this much tequila since I was in College at Chico State...
 

Attachments

  • old truck lighted up.jpg
    old truck lighted up.jpg
    198.2 KB · Views: 47
  • big santa.jpg
    big santa.jpg
    186.6 KB · Views: 43
  • street back to the house.jpg
    street back to the house.jpg
    193.9 KB · Views: 38
  • news van.jpg
    news van.jpg
    184.2 KB · Views: 40
OP
OP
Sac '68 sport

Sac '68 sport

Bronco Guru
Joined
Apr 9, 2004
Messages
1,176
Loc.
Orangevale
While the cage and other parts were gone I made some side panels. They will hold 4 of the little lights I got from the Explorer and some 5.25 in. Rockford Fosgate's. Vinyl was black and I painted with Dupli-color vinyl spray to match the seats. That stuff works great.
 

Attachments

  • gray panel.jpg
    gray panel.jpg
    174.7 KB · Views: 45
  • black panel.jpg
    black panel.jpg
    195.9 KB · Views: 53
Last edited:
OP
OP
Sac '68 sport

Sac '68 sport

Bronco Guru
Joined
Apr 9, 2004
Messages
1,176
Loc.
Orangevale
Got the cage and other stuff back from the PC. They did a fantastic job and were very reasonable. If your in the Sacramento area I can't recommend them enough. Everything turned out awesome and the color match to the stuff I painted is better than I could have hoped. Hard to tell from the pictures but it's a pretty heavy metallic silver/gray. It looks great in the sun. Only one little problem with the side latch for the spare, some paint came out from between the washer and bracket and caused some bubbles so they are going to recoat that one. I didn't even have to ask. They saw it when I went to pick the stuff up right as it came out of the oven and they said that they wanted to fix it. Great service.
 

Attachments

  • cage front.jpg
    cage front.jpg
    217.9 KB · Views: 61
  • cage rear.jpg
    cage rear.jpg
    208.3 KB · Views: 61
Last edited:
OP
OP
Sac '68 sport

Sac '68 sport

Bronco Guru
Joined
Apr 9, 2004
Messages
1,176
Loc.
Orangevale
Got some work done the last few days.
Got the cage and seats in. These are the seats I pulled from a clunkered Explorer. I had to modify the rear brackets for the drivers and drill new holes to get the seats to sit low enough. The front bracket height was good, but I had to drill holes. With the power they lay right on the floor boards and are about the same height as stock. Had to make some brackets to get the front passenger side to bolt in. Not sold yet on the bracket that is holding the drivers side of the front passenger seat, but it has no flex at all so I guess it's ok. Still I might add an angled leg. Also got the front belts in. I mocked all this up and filled holes before I did the liner.
 

Attachments

  • P1020762.jpg
    P1020762.jpg
    185.5 KB · Views: 43
  • P1020760.jpg
    P1020760.jpg
    181.4 KB · Views: 44
  • P1020754.jpg
    P1020754.jpg
    154.3 KB · Views: 49
  • P1020752.jpg
    P1020752.jpg
    140.4 KB · Views: 48
  • P1020751.jpg
    P1020751.jpg
    150.6 KB · Views: 49
  • P1020742.jpg
    P1020742.jpg
    184.8 KB · Views: 58
Last edited:
OP
OP
Sac '68 sport

Sac '68 sport

Bronco Guru
Joined
Apr 9, 2004
Messages
1,176
Loc.
Orangevale
Also got the Tuffy, stereo, and front speakers installed, also recovered the old speaker box. I'll see how it looks once I get it in, but I think I might order some matching carpet to cover it with.
 

Attachments

  • P1020744.jpg
    P1020744.jpg
    174.8 KB · Views: 70
  • P1020745.jpg
    P1020745.jpg
    195.5 KB · Views: 65
  • P1020757.jpg
    P1020757.jpg
    154.2 KB · Views: 59
  • P1020758.jpg
    P1020758.jpg
    156.9 KB · Views: 52
Top