• Just a reminder that you won't be able to start new posts or reply to existings posts in the Archive forum.

    This is where all the old posts go so they can still be used for reference and searched.
  • Welcome to ClassicBroncos! - You are currently viewing the forums as a GUEST. To take advantage of all the site features, please take a moment to register. It's fast, simple and absolutely free. So please join our community today!
    If you have problems registering or can't log into your account, please contact Admin.

68 Sport body off build thread, Updated...4/10 New pipes

OP
OP
Sac '68 sport

Sac '68 sport

Bronco Guru
Joined
Apr 9, 2004
Messages
1,176
Loc.
Orangevale
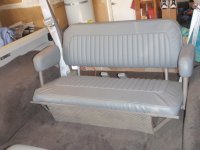
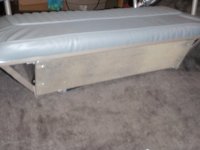
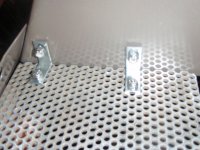
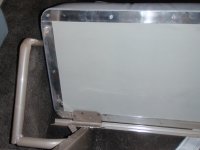
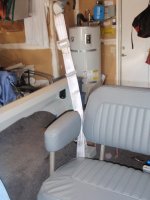
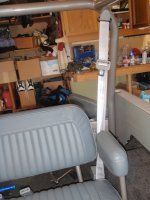
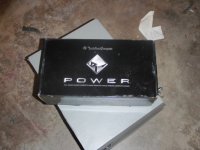
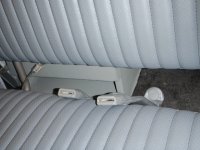
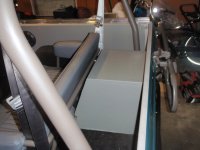
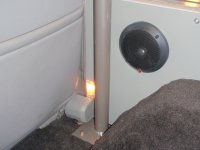
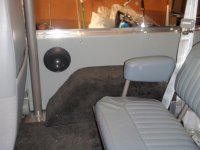
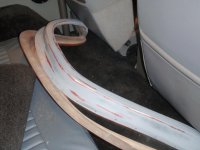
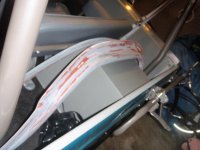
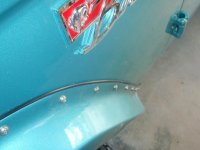
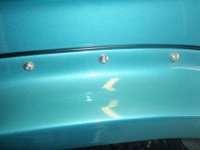
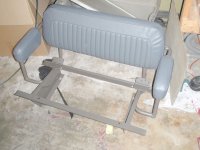
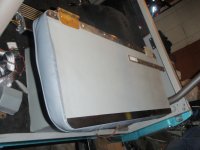
Putting in more time recovering the back seat. I got the covers from the guy in Oregon that sells on e-bay, but since the bottom of the butt part of the seat cover just wraps and staples I wanted to make the bottom side look nice and clean too since it will tilt up to reveal the amp. I covered the bottom with vinyl and I'm in the process of putting on some aluminum strips that I'm polishing and attaching with counter sunk stainless screws. The fugly hinges on the seat bottom are just extras I'm using for spacers, I welded some to the seat before I sent it to get powder.
 

Attachments

  • P1020747.jpg
    P1020747.jpg
    183.1 KB · Views: 41
  • P1020748.jpg
    P1020748.jpg
    171.5 KB · Views: 45
Last edited:
OP
OP
Sac '68 sport

Sac '68 sport

Bronco Guru
Joined
Apr 9, 2004
Messages
1,176
Loc.
Orangevale
Back seat is finished.

Finished the seat and got it all bolted in. It doesn't open all the way because the bottom hits the arm rests but it opens enough to get a view of the amp and be able to get in there and adjust.
Now I just need to get something a little nicer looking than an old nut driver to hold it up...
 

Attachments

  • P1140789.jpg
    P1140789.jpg
    169.7 KB · Views: 57
  • P1140787.jpg
    P1140787.jpg
    184.1 KB · Views: 47
  • P1120783.jpg
    P1120783.jpg
    149.1 KB · Views: 46
  • P1120779.jpg
    P1120779.jpg
    184.1 KB · Views: 45
OP
OP
Sac '68 sport

Sac '68 sport

Bronco Guru
Joined
Apr 9, 2004
Messages
1,176
Loc.
Orangevale
Here's the bottom of the seat showing the hinges and finished bottom. There are little nutserts similar to stock on the back side to hold the screws in place.
Also got the rear 3 pt belts bolted up.
 

Attachments

  • P1120782.jpg
    P1120782.jpg
    164.5 KB · Views: 32
  • P1140785.jpg
    P1140785.jpg
    159.2 KB · Views: 27
  • P1140786.jpg
    P1140786.jpg
    158.3 KB · Views: 24

.94 OR

Contributor
Bronco Guru
Joined
Jul 5, 2009
Messages
1,763
Do you have something like a magnetic latch to keep the rear seat snapped down? My luck, it would bounce a bit with no weight on it and I would hear nothing but the metal on metal sound and drive me nuts.
 
OP
OP
Sac '68 sport

Sac '68 sport

Bronco Guru
Joined
Apr 9, 2004
Messages
1,176
Loc.
Orangevale
Do you have something like a magnetic latch to keep the rear seat snapped down? My luck, it would bounce a bit with no weight on it and I would hear nothing but the metal on metal sound and drive me nuts.

Good point.
I haven't driven it yet with the seat installed so I don't know if that will be an issue or not. I plan on creating some way of locking the seat down but I haven't quite figured out how to do it yet. If it does rattle I'll just put in a couple of little rubber bumpers like the ones for the tailgate. Although with dual 40 series Flowmasters, the four Rockford Fosgate's and a 12 inch Pioneer sub I think all the little rattles will pretty much get drowned out.
 
OP
OP
Sac '68 sport

Sac '68 sport

Bronco Guru
Joined
Apr 9, 2004
Messages
1,176
Loc.
Orangevale
Getting closer..

Got lots done the last two days. Got the aux tank and skid plate installed and hooked up. What a pain in the a$$ that was. Got the floor jack under there and jacked it up into place, then couldn't get the breather line installed. Lower a little, raise a little, wash, rise, repeat, finally got it in.

Put a fresh polish on the soft top rails and got them put on.

I also got the back end mostly finished off today. Got the old Tom's hitch painted up with some satin black, and installed, got the tailgate reassembled and put on and got the bumper put on. Only thing that really went wrong today was when I was taking apart the license plate light to clean it up I dropped the lens. Didn't know that was glass. Damn... Anyone got a new lens???

And the Big Brown truck came today with the speakers for the rear panels. They are the same 5.25 Rockford fosgate's as I've got in the front.
 

Attachments

  • P1160805.jpg
    P1160805.jpg
    162.5 KB · Views: 68
  • P1160803.jpg
    P1160803.jpg
    197.2 KB · Views: 65
  • P1160801.jpg
    P1160801.jpg
    207.4 KB · Views: 68
OP
OP
Sac '68 sport

Sac '68 sport

Bronco Guru
Joined
Apr 9, 2004
Messages
1,176
Loc.
Orangevale
Got the emblems put on. Freshly polished and repainted. Taping off that little bronco is fun... Also started getting together some tailgate cables. The stupid loose stock catches smacked the corner of the body when I was putting the gate up and took a chip out of the paint, so they're out. I got the 19 inch cables for a Dodge from Napa. They could be an inch or so longer but they will be fine. Plus they were the longest ones they had. I used the stock holder on the tailgate and a 2 1/4 inch grade 8 with a couple steel spacers, washers, and an old shock bushing in the lower hole on the body. The bushing is just for looks to cover the longer spacer. The test one I did seems to work well.
 

Attachments

  • P1210816.jpg
    P1210816.jpg
    170.9 KB · Views: 77
  • P1210817.jpg
    P1210817.jpg
    187.1 KB · Views: 80
  • P1210819.jpg
    P1210819.jpg
    189.7 KB · Views: 134
  • P1210820.jpg
    P1210820.jpg
    159.9 KB · Views: 130
OP
OP
Sac '68 sport

Sac '68 sport

Bronco Guru
Joined
Apr 9, 2004
Messages
1,176
Loc.
Orangevale
Got the side panels finished and installed. The Rockford Fosgate's finish out the sound system and it ROCKS!!! Even got a snarky comment from one of the neighbors while I was tuning. Mission accomplished! The speaker box turned out ok. When it's in the truck you don't really see the unfinished edges, but I'll have to get in with some more glue and re glue some of the edges that are starting to come up. One of the eye bolts that I use to lock it to the back seat is hitting the seat frame now that I have the retractor for the 3 pt belts in there. I think there will just barely be enough room to put the lock on.

Got the interior lights all hooked up too. They are installed on the Dome light circuit so they turn on with the stock switch. The front one's got buried behind the seatbelts, didn't really think that one all the way through before cutting the holes, but whatever. They work. I just put the side panels on with some stainless screws and finish washers.
 

Attachments

  • P1210833.jpg
    P1210833.jpg
    176.5 KB · Views: 68
  • P1210832.jpg
    P1210832.jpg
    175.6 KB · Views: 70
  • P1210830.jpg
    P1210830.jpg
    195.6 KB · Views: 75
  • P1210829.jpg
    P1210829.jpg
    193.6 KB · Views: 78
  • P1210824.jpg
    P1210824.jpg
    142.1 KB · Views: 78
  • P1210823.jpg
    P1210823.jpg
    153.4 KB · Views: 81
  • P1210821.jpg
    P1210821.jpg
    172.7 KB · Views: 96
OP
OP
Sac '68 sport

Sac '68 sport

Bronco Guru
Joined
Apr 9, 2004
Messages
1,176
Loc.
Orangevale
Been a bit since an update. Haven't really had much time for the Bronco with the kids events and work but the NorCal Bronco group is having a get together on the 31st and I want to go so I got to work this weekend.

Got the flares sanded down and ready for primer and paint and I got the doors on. Still need to put all the guts in but just getting them on was a serious exercise in frustration.

Celebrated the re-registration with a new mascots on the plate. No more non-op. She's legal and ready to run.
 

Attachments

  • P3040843.jpg
    P3040843.jpg
    80.4 KB · Views: 37
  • P3040847.jpg
    P3040847.jpg
    84.3 KB · Views: 42
  • P3040841.jpg
    P3040841.jpg
    79.8 KB · Views: 42
  • P3040839.jpg
    P3040839.jpg
    69.5 KB · Views: 39
  • P3040842.jpg
    P3040842.jpg
    79.6 KB · Views: 36
  • P3040840.jpg
    P3040840.jpg
    67.6 KB · Views: 47
OP
OP
Sac '68 sport

Sac '68 sport

Bronco Guru
Joined
Apr 9, 2004
Messages
1,176
Loc.
Orangevale
Got some color on the flares today. First time using the newly mandated waterborne paint. I was worried, but I really liked working with it and the color match the local paint shop did was outstanding. It didn't smell hardly at all, went down really nice and I took the advise of the paint shop guy and hit it with the heat gun to speed the drying and it worked excellent. Very happy with how it worked out. But, I got a little carried away with the clear and got quite a few runs and sags, so I'll have to do some sanding and maybe re-shoot the clear on the two I had hanging. I decided to shoot the stock valve covers as well since my aluminum ones on the motor now need quite a bit of polishing. Not sure which way I'll go but I had the paint loaded up and they were just sitting around so what the heck.
 

Attachments

  • P3110858.jpg
    P3110858.jpg
    203.6 KB · Views: 17
  • P3110860.jpg
    P3110860.jpg
    158.1 KB · Views: 19
  • P3110862.jpg
    P3110862.jpg
    178 KB · Views: 19
OP
OP
Sac '68 sport

Sac '68 sport

Bronco Guru
Joined
Apr 9, 2004
Messages
1,176
Loc.
Orangevale
Got the door gaps lined up pretty good for now and got the latches and locks put in and put on the door panels and arm rests. I need to redo both the door panels, they are the old ones that I just hit with the duplicolor. The duplicolor holds up good but there are some little tears in the vinyl. I still need to drill holes for the rest of the ss screws to hold them down, but I welded the old holes up because they were striped out and now it's taking forever to get a bit through the welds...
 

Attachments

  • P1010870.jpg
    P1010870.jpg
    193.5 KB · Views: 24
  • P1010868.jpg
    P1010868.jpg
    179.1 KB · Views: 28
  • P1010867.jpg
    P1010867.jpg
    174.6 KB · Views: 22
  • P1010866.jpg
    P1010866.jpg
    184 KB · Views: 19
OP
OP
Sac '68 sport

Sac '68 sport

Bronco Guru
Joined
Apr 9, 2004
Messages
1,176
Loc.
Orangevale
Oh so close!!!

Got the flares on. Had to paint all of them twice and one of them 4 times! Getting clear to lay down with out horrible orange peel is really an art. Not like spray cans that's for sure. There are still a few little flaws in a couple of them and a scratch or two from putting them on but their small and I can live with it for now. I put them on with #10x1/2 SS button head screws with lock nuts, so if I ever want to take them off to redo it will be easy. Glad I went with body color. I'm really happy with how it turned out.
 

Attachments

  • image007.jpg
    image007.jpg
    96.8 KB · Views: 32
  • image008.jpg
    image008.jpg
    56 KB · Views: 31
  • image003.jpg
    image003.jpg
    72.9 KB · Views: 27
  • image002.jpg
    image002.jpg
    77.6 KB · Views: 42
  • 1333212648_tmp_P1010873.jpg
    1333212648_tmp_P1010873.jpg
    121.2 KB · Views: 32
OP
OP
Sac '68 sport

Sac '68 sport

Bronco Guru
Joined
Apr 9, 2004
Messages
1,176
Loc.
Orangevale
New exhaust put on yesterday by Marco's in Citrus Heights CA for any of you local guys. I think they did a real nice job. Dual 2 1/4 using my few year old 40 series Flowmasters. Sounds great. I'd been driving it around a little with just a short section of pipe from the headers to the Flow's dumping out under the truck. It sounded nice but was pretty loud at idle and a little fumey. This still sounds good but you can actually hold a conversation at a stop light.

Next up, new valve covers a pitman arm change and she's done!!! Shhh. Don't tell my wife...
 
OP
OP
Sac '68 sport

Sac '68 sport

Bronco Guru
Joined
Apr 9, 2004
Messages
1,176
Loc.
Orangevale
Pictures
 

Attachments

  • image1001.jpg
    image1001.jpg
    91.2 KB · Views: 38
  • image1003.jpg
    image1003.jpg
    90.1 KB · Views: 31
  • image1007.jpg
    image1007.jpg
    99.6 KB · Views: 36
  • image1010.jpg
    image1010.jpg
    117.6 KB · Views: 34
Top