


Community
Message Forum
Photo Gallery
Event Calendar
Book Reviews
Bronco Wallpaper
Bronco FAQ
Link Back to CB!
Photo Gallery
Event Calendar
Book Reviews
Bronco Wallpaper
Bronco FAQ
Link Back to CB!

Buy / Sell


Bronco Tech
3 Arm Wiper Setup
Fix Motor Mount
Roll Cage Braces
Throttle Body 65mm
Wheel Alignment
Heat Riser Replacement
Vent Window Repair
Center Console Mount
Straighten Bumper
Ford 6R80 6 spd
More Tech...
Fix Motor Mount
Roll Cage Braces
Throttle Body 65mm
Wheel Alignment
Heat Riser Replacement
Vent Window Repair
Center Console Mount
Straighten Bumper
Ford 6R80 6 spd
More Tech...

Install the app
-
Welcome to ClassicBroncos! - You are currently viewing the forums as a GUEST. To take advantage of all the site features, please take a moment to register. It's fast, simple and absolutely free. So please join our community today!If you have problems registering or can't log into your account, please contact Admin.
You are using an out of date browser. It may not display this or other websites correctly.
You should upgrade or use an alternative browser.
You should upgrade or use an alternative browser.
'72 Bronco project (Cypress, Tx)
- Thread starter Dne007
- Start date
OP
OP
Dne007
Jr. Member
- Joined
- Jul 18, 2021
- Messages
- 539
Thank you so much Blade!!! It's definitely been a challenge! ")
Incredible build, you have done a really amazing job on your bronco. Very impressive considering you have done the majority of the work yourself, most people couldn't do half of that on their own.
OP
OP
Dne007
Jr. Member
- Joined
- Jul 18, 2021
- Messages
- 539
In the meantime, I've been working on wiring, it's a slow go, but it is going. I hate my soldering gun~ I ordered some new tips and solder and see if that will help. Finally got the hose connected to the gas tank, just waiting on some hose clamps. Just piddly things you know; makes progress seem very slow. The ignition switch is wired and engine will turn over I'm confused on which type of transmission fluid to use for my C4? I asked the guy that overhauled it, but forgot what he said.
dne'
I'm confused on which type of transmission fluid to use for my C4? I asked the guy that overhauled it, but forgot what he said. dne'
Attachments
looking great Dne! Type F is what it came from the factory with and would be my go to.
- Joined
- Oct 28, 2015
- Messages
- 212
I couldn't find any decent soldering tips so I bent up my own using solid core copper wire. It works fine and is much cheaper.In the meantime, I've been working on wiring, it's a slow go, but it is going. I hate my soldering gun~ I ordered some new tips and solder and see if that will help. Finally got the hose connected to the gas tank, just waiting on some hose clamps. Just piddly things you know; makes progress seem very slow. The ignition switch is wired and engine will turn over
dne'
OP
OP
Dne007
Jr. Member
- Joined
- Jul 18, 2021
- Messages
- 539
I'll be darned , would have never thought about doing that! Thanks
ThanksI couldn't find any decent soldering tips so I bent up my own using solid core copper wire. It works fine and is much cheaper.
- Joined
- Oct 8, 2009
- Messages
- 1,498
I used to use a soldering gun. I liked the instant heat. But after using a pencil style iron at work, I realized that once heated up the pencil style was a lot easier to handle. Especially for automotive work.
I still have the gun, but haven't used it in over 30 years. Most of the time it's just a 25 watt iron, but I have a larger one for cable work. As for the delay heating up, I just plug in the iron while I'm getting everything else ready & keep it hot throughout the project.
I have a spring stand to rest the iron in while it's hot. And just like the gun, it's important that the tip is tight before heating it up. And tin the tip before each use. The tips also last a lot longer that they do on a gun.
Not mine, but these look similar:
OP
OP
Dne007
Jr. Member
- Joined
- Jul 18, 2021
- Messages
- 539
Thank you, yes, waiting for the gun to heat up is very frustrating~ I think I'll order one of these that you have showed me. Thank you!
I used to use a soldering gun. I liked the instant heat. But after using a pencil style iron at work, I realized that once heated up the pencil style was a lot easier to handle. Especially for automotive work.
I still have the gun, but haven't used it in over 30 years. Most of the time it's just a 25 watt iron, but I have a larger one for cable work. As for the delay heating up, I just plug in the iron while I'm getting everything else ready & keep it hot throughout the project.
I have a spring stand to rest the iron in while it's hot. And just like the gun, it's important that the tip is tight before heating it up. And tin the tip before each use. The tips also last a lot longer that they do on a gun.
Not mine, but these look similar:
OP
OP
Dne007
Jr. Member
- Joined
- Jul 18, 2021
- Messages
- 539
Thank you, yes, waiting for the gun to heat up is very frustrating~ I think I'll order one of these that you have showed me. Thank you!
I used to use a soldering gun. I liked the instant heat. But after using a pencil style iron at work, I realized that once heated up the pencil style was a lot easier to handle. Especially for automotive work.
I still have the gun, but haven't used it in over 30 years. Most of the time it's just a 25 watt iron, but I have a larger one for cable work. As for the delay heating up, I just plug in the iron while I'm getting everything else ready & keep it hot throughout the project.
I have a spring stand to rest the iron in while it's hot. And just like the gun, it's important that the tip is tight before heating it up. And tin the tip before each use. The tips also last a lot longer that they do on a gun.
Not mine, but these look similar:

OP
OP
Dne007
Jr. Member
- Joined
- Jul 18, 2021
- Messages
- 539
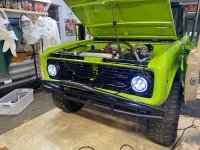
I can't believe how quickly time is going by I'm not working on the Bronco 100% at this time, just taking it easy. However, it does move on its own power now! The AC works very well Mostly to do is under the dash.
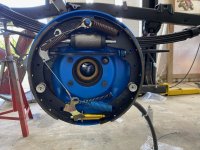
I'm having trouble with the brakes. With the rear wheels elevated and Gary stepping on the brake~ I can turn the rear wheels. The fronts disc are fine. The rears bleed well and the pedal is a good height. I have to really push on the pedal to keep it from sneaking forwardly.
I was concerned enough thinking the new rear wheel cylinders were rusted from idle time, but they are pristine.
Then I was thinking Brians power booster was at fault, and re-installed the one that came in the kit, but makes no difference
I do have the spacer thing which goes inside the bore .
I'm not ready to take it for a test spin as there are wires to be routed, plus need to see why the fuel gauge and temp gauge isn't working. I know I haven't ran a ground from the engine to the frame~ so I'll do that soon.

I can bleed fluid out where the line goes to the back wheels. Ok, have to go now, visiting our youngest for a couple days, but I'll keep my eyes open here
dne'

I'm not working on the Bronco 100% at this time, just taking it easy. However, it does move on its own power now! The AC works very well Mostly to do is under the dash. I'm having trouble with the brakes. With the rear wheels elevated and Gary stepping on the brake~ I can turn the rear wheels. The fronts disc are fine. The rears bleed well and the pedal is a good height. I have to really push on the pedal to keep it from sneaking forwardly.
I was concerned enough thinking the new rear wheel cylinders were rusted from idle time, but they are pristine.
Then I was thinking Brians power booster was at fault, and re-installed the one that came in the kit, but makes no difference
I do have the spacer thing which goes inside the bore .
I'm not ready to take it for a test spin as there are wires to be routed, plus need to see why the fuel gauge and temp gauge isn't working. I know I haven't ran a ground from the engine to the frame~ so I'll do that soon.
I can bleed fluid out where the line goes to the back wheels. Ok, have to go now, visiting our youngest for a couple days, but I'll keep my eyes open here
dne'
Attachments
Last edited:
- Joined
- Nov 3, 2003
- Messages
- 48,743
If it affects only the rears then it can’t be the booster or anything behind it up to the pedal.
Everything behind the master cylinder would affect both front and rear equally.
It can be a defective master cylinder, but the fact that it bleeds well and looks normal sounds good so far. But to know for sure I guess you’d have to put a pressure gauge on each port to see how much pressure is being applied out of the master.
Another thing is mechanical linkage under the drums. Are they adjusted perfectly? If there’s too much travel that could possibly explain it.
Is something blocking the linkage from pushing the shoes up against the drum? Hard to say at this point.
Are the shoes and friction material concentric with the drums? That’s usually something you test before you put it together, but most people assume that with manufacturing processes that this aspect would be accurate.
Not always the case.
Is any of the parking brake mechanism, or cabling creating a limitation in the rear? Should be easy to determine, but it is definitely something that needs to be looked at.
But the first thing I would do would be to verify adjustment.
71 CA Bronco
Sr. Member
- Joined
- Nov 25, 2015
- Messages
- 764
I didn't use the stock proportioning valve on mine. I used a small Wilwood single adjustible one on the rear and went straight to the brakes without the valve in the front. I copied (can't remember who) someone on the board here and it works great. I did have trouble bleeding the lines though. I felt like they were good but I never had a really great pedal. I then used speed bleeders and bleed the crap out of them and now the brakes will put you through the windshield. Easy fixes compared to everything else you have done. Keep it up. Good luck.
https://www.wildhorses4x4.com/produ...-Valve-Single-line/Bronco-Proportioning-Valve
https://www.wildhorses4x4.com/produ...-Valve-Single-line/Bronco-Proportioning-Valve
- Joined
- Oct 8, 2009
- Messages
- 1,498
An old shadetree trick is to partially set the parking brake, then try the juice brakes to see if they improve. If so, it points to an adjustment or fitment issue in the drum brakes.
Sometimes the star adjusters get reversed left to right, so they loosen instead tighten while self adjusting.
One other thought, looking at your underhood pic, does the master cylinder reservoir closest to the firewall feed the front brakes? Normally it should, even though having the lines cross front to back seems backwards.
Last edited:
OP
OP
Dne007
Jr. Member
- Joined
- Jul 18, 2021
- Messages
- 539
While drinking a cup of coffee at our daughters place, actually the star adjusters are screwed all the way in, the drums just fit with minimal persuasion to slide the drums on. If I clicked the adjuster two clicks it will be too tight.
I did have the drivers side drum off and instructed my husband to at first press the brake pedal lightly to look for expansion of the shoes, he had to press extremely hard, only then did the shoes start to expand.
It’s killing me to be away and not be able to resolve this
I did have the drivers side drum off and instructed my husband to at first press the brake pedal lightly to look for expansion of the shoes, he had to press extremely hard, only then did the shoes start to expand.
It’s killing me to be away and not be able to resolve this
OP
OP
Dne007
Jr. Member
- Joined
- Jul 18, 2021
- Messages
- 539
Hi
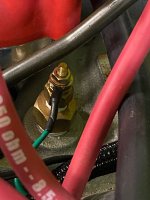
I've been working on the dash gauges and having a time getting the water temp and gas gauge to work. The factory oil pressure switch works fine. I have installed a new instrument voltage regulator and puts out 5 - 6 volts. I have the instrument cluster on the floor board for easy access. I don't know if the wires on the back of each gauge, is there a right way to push on the sender/6v sources. I've gone back and forth~ to no avail. I've
I had bench tested all gauges independently and all worked using 6v. I have replaced the amp meter with a volt meter.
Gas gauge: Before re-installing the fuel sender in the aftermarket tank, I checked it with an ohm meter and worked as all positions. Meaning different ohms at different positions. I ran a ground wire from the ring of the sender to the body (a good ground) and new wire to the sender nut. All soldered. The instrument housing in grounded to the metal dash. I first started off with 4 gallons, then up to 12 or so gallons of gas.
Water temp: Same goes here, bench tested the gauge and works fine. On the vehicle with getting the engine to operating temp, does nothing
In a bit, I'm going to check engine to ground. but again, the oil gauge works.
Good news: AC works great
ideas?
Attachments

Who needs gauges when you got AC in South Texas? Only coming from a guy that has no functioning oem gauges or AC in his truck..... The lifters rattle when there's no oil and it steams when it's hot right?
Not sure what the issue is other than maybe grounding of the instrument cluster itself. The other is did you use a regulator or a Module? If an adjustable regulator was used, it may be load sensitive and not have enough voltage with the load. I have a module sitting on my toolbox to put in mine if I ever take the time to pull it and recondition it.
Not sure what the issue is other than maybe grounding of the instrument cluster itself. The other is did you use a regulator or a Module? If an adjustable regulator was used, it may be load sensitive and not have enough voltage with the load. I have a module sitting on my toolbox to put in mine if I ever take the time to pull it and recondition it.
- Joined
- Nov 3, 2003
- Messages
- 48,743
If one of the three gauges work, then the voltage regulator is fine.
You definitely want to ground the gauge cluster however, if only to rule that out. When in normal use it is grounded to the dashboard which is grounded to the body.
The gauges are the primary reason a good body ground is necessary from the battery.
You definitely want to ground the gauge cluster however, if only to rule that out. When in normal use it is grounded to the dashboard which is grounded to the body.
The gauges are the primary reason a good body ground is necessary from the battery.
Similar threads
- Replies
- 0
- Views
- 145
City: Jackson Mi
Price: $15000
- Replies
- 20
- Views
- 1K
- Locked
City: Chicago, IL
Price: $25000
- Replies
- 8
- Views
- 848