• Welcome to ClassicBroncos! - You are currently viewing the forums as a GUEST. To take advantage of all the site features, please take a moment to register. It's fast, simple and absolutely free. So please join our community today!
    If you have problems registering or can't log into your account, please contact Admin.

74 EB Sandrunner under development

OP
OP
sstlaure

sstlaure

Bronco Slacker
Joined
Jun 7, 2004
Messages
1,881
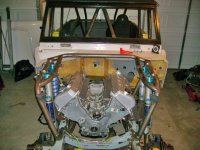
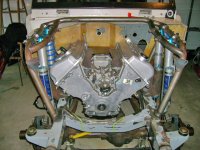
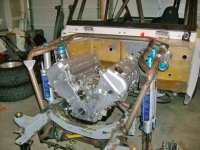
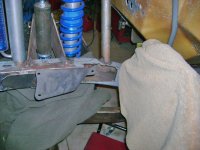
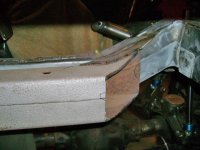
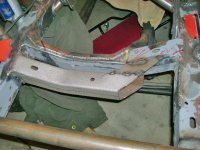
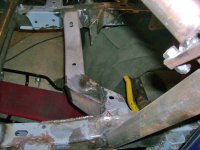
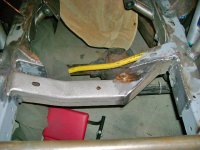
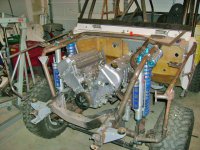
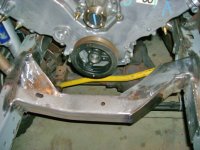
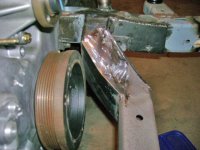
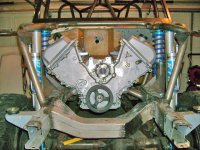
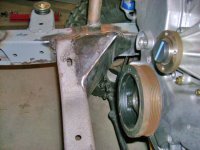
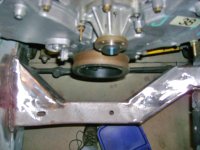
I'm going to make my own equal length stainless headers (1 3/4" primaries) and in order to fit them, I decided to remove the stock engine mounts (they take up a ton more room than necessary. I'm trying to minimize how far fwd I do put the motor to keep weight dist good for flight time. (about 1/2" clearance at firewall currently) I'm also trying to keep the engine as low as possible to give me the clearance on top for the supercharger and to keep the CG down. The custom motor mounts make all of that easier, and it's not a big deal to make the mounts myself as I already have some bushings that fit into 1 3/4" tubing.

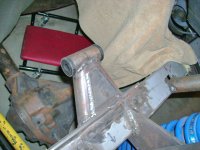
My lift is maybe around 4", but I compress way up. My driveshaft at full compressed is ~1" from the bellhousing. I think my truck compresses more than a stock Bronco does and maybe that's why the pan will interfere. I looked at the HP44, but the driveshaft would be through my bellhousing with where my truck sits at full comp. Maybe the top of the diff is shaped a little different where it will clear the pan? I'll have to look at my friend's truck, he's got a custom HP44 in his truck (center diff)

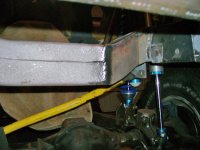
@ Full extension my driveshaft is at ~32 degrees, so I'll be going high-angle on that to prevent bind (full 14" of travel front compressed to extended.)

My friend with the Green prerunner had ~520 hp the first season he had it together (331 stroker) and yes it was scary fast, but in the sand you need the extra oomph to spin up the paddles. He's running close to 1000hp in that same truck now and it's controllable. (13.5:1 408 stroker and 2 stages of NOS) I don't need that kind of power, but I really like the way his performed with the 331, so that's my target. I should be really reliable at around 500 rwhp.

Definitely going with the clockable starter. I'll also be going with a remote mount hydroboost unit so that all I need on the firewall is a small slave cylinder. Trying to keep the engine bay clean to show off the motor.
 
Last edited:

DuneBuster

Sr. Member
Joined
Dec 14, 2004
Messages
423
Loc.
Canton
I can't wait to see Scott and Sean playing hide and seek out at Silver Lake Dunes..

Or..... How about who can jump further after a all out run up to the top of test hill???? I might pay some good repair money for that!!!!!!!!;D ;D ;D ;D ;D


These two will be unbelieveable....
 
OP
OP
sstlaure

sstlaure

Bronco Slacker
Joined
Jun 7, 2004
Messages
1,881
By the time this thing is on the road I'll have probably 8 or 9 years of pent up frustration waiting to be released via that skinny pedal.

Sean's got twice the power so I'll have to stay in the gas twice as long :cool: Not sure about jumping test hill though...a little too much pucker factor in that landing on the backside...I don't think I'll have any shortage of things to jump.

It's gonna be fun. Bring your camera.
 
OP
OP
sstlaure

sstlaure

Bronco Slacker
Joined
Jun 7, 2004
Messages
1,881
Maybe by 4th of July 2010 I'll be behind the wheel....maybe....if I can stop changing my mind on things.
 
OP
OP
sstlaure

sstlaure

Bronco Slacker
Joined
Jun 7, 2004
Messages
1,881
Engine has a new home

Well my friends came over on Sunday and helped me get the motor placed. I then worked into the night (about 2 am) to get the motor mounts finished before I headed out of town. I didn't want to leave the engine suspended by the lift. I just need to pull the motor back out to finish weld the motor mounts and add some roll gussets.
 

Attachments

  • 081008 Engine Front.jpg
    081008 Engine Front.jpg
    169.9 KB · Views: 114
  • 081008 Engine Front2.jpg
    081008 Engine Front2.jpg
    177.7 KB · Views: 110
  • 081008 Engine Top.jpg
    081008 Engine Top.jpg
    165.3 KB · Views: 94
  • 081008 Engine 3-quarter.jpg
    081008 Engine 3-quarter.jpg
    176.8 KB · Views: 129
  • 081008 Drvr Motor Mount.jpg
    081008 Drvr Motor Mount.jpg
    131 KB · Views: 121

DuneBuster

Sr. Member
Joined
Dec 14, 2004
Messages
423
Loc.
Canton
Man, I just never thought I'd see a modular V8 on an EB chassis.... this is just gonna be smokin.!!!

Congratulations Scott on a well thought out ride. Nice setup for the suspension hoops..

Next we will be seeing a V6 ecoboost hooked up in another 5-10 years,,,
 
OP
OP
sstlaure

sstlaure

Bronco Slacker
Joined
Jun 7, 2004
Messages
1,881
Thanks....with the Supercharger, consider this an Ecoboost V8....the power of a V10 out of a 281. ;)
 
OP
OP
sstlaure

sstlaure

Bronco Slacker
Joined
Jun 7, 2004
Messages
1,881
  • Boxed in the motor mounts
  • Finished the pass side motor plate w/gussets
  • Cut the hole in the frame to clear the stock Cobra starter solenoid ($130 vs $400 for the clockable starter)
  • Began the front x-member modification to clear the Supercharger pulley and belts

I want to get the front plate on the driver side made and welded into place before I cut the original x-member out. I've already made the face cut on the stock x-member and marked where it needs to be cut. There will be a large corner gusset on the pass side using what's left of the stock x-member.

I'll be boxing in the pocket for the starter solenoid, and I'm running gussets over the top of the frame.

Soon my rear shock tubes will also be getting cut and kicked closer to the firewall to make the header exit easier.
 

Attachments

  • 091008 Hole for starter solenoid.jpg
    091008 Hole for starter solenoid.jpg
    153.2 KB · Views: 59
  • 091008 Front x-member3.jpg
    091008 Front x-member3.jpg
    155 KB · Views: 56
  • 091008 Front x-member2.jpg
    091008 Front x-member2.jpg
    156 KB · Views: 62
  • 091008 Front x-member.jpg
    091008 Front x-member.jpg
    161 KB · Views: 76
  • 091008 Complete pass motor mount.jpg
    091008 Complete pass motor mount.jpg
    160.8 KB · Views: 62
  • 091008 Boxed motor mount drvr.jpg
    091008 Boxed motor mount drvr.jpg
    159.2 KB · Views: 59
  • 091008 Boxed motor mount2.jpg
    091008 Boxed motor mount2.jpg
    154.2 KB · Views: 69
OP
OP
sstlaure

sstlaure

Bronco Slacker
Joined
Jun 7, 2004
Messages
1,881
Exactly....I've figured out that I have still over $10K left of stuff to buy to finish the truck the right way, so I have to spread that cost over time.

Once I finish these engine bay modifications I should be able to put the motor in for an extended period and start getting all of the accessories needed to finish the motor. My plan is to run the front sway-bar between the motor and the radiator and I need all of the accessories in place to see what room I have to work with before I fab anything up.
 

csjr

Sr. Member
Joined
Apr 18, 2007
Messages
675
Loc.
Lighthouse Point, FL
You get an "A" for stick-to-it-ness....is that a word?

Very nice looking welding. Are you self taught with just lots of practice? Are your finish welds all done with TIG?
 
OP
OP
sstlaure

sstlaure

Bronco Slacker
Joined
Jun 7, 2004
Messages
1,881
Thanks csjr......getting to ride high-speed across the dunes in my friend Sean's green EB during the summer keeps me motivated.

Self taught with lots of practice is correct. I shudder to think of the amount of weld length I've put into this thing....I've probably used 40 lbs of weld wire.

I had laid maybe 12" of weld bead before I started this project (6 years ago almost to the day), and that was back when I was doing my undergrad work in Engineering in the early 90's.

There is a little TIG in the bumpers and cage, but a vast majority is MIG. All of the welds in the pics above are 100% MIG.

It's taken a little while but I finally have the settings (and my technique) dialed in on my welder where they come out real nice. I'll probably end up going over some of the first welds I did when I started to clean them up before I paint it (the chassis) next year.
 
OP
OP
sstlaure

sstlaure

Bronco Slacker
Joined
Jun 7, 2004
Messages
1,881
I got the front plate made for the new x-member and cut out everything I wasn't using of the original one.

I still need to make the plates for the backsides to fill the holes from cutting out the original x-member.....I might be able to finish this whole part up by the end of this coming weekend, then the motor goes back in for 1 more fit check of the starter solenoid pocket and I can plate that in as well.
 

Attachments

  • 091108 New x-member top.jpg
    091108 New x-member top.jpg
    158 KB · Views: 52
  • 091108 New x-member side.jpg
    091108 New x-member side.jpg
    156.6 KB · Views: 48
  • 091108 New x-member front.jpg
    091108 New x-member front.jpg
    151.6 KB · Views: 45
  • 091108 New x-member close.jpg
    091108 New x-member close.jpg
    159.9 KB · Views: 51
  • 091108 New x-member.jpg
    091108 New x-member.jpg
    156.7 KB · Views: 65
OP
OP
sstlaure

sstlaure

Bronco Slacker
Joined
Jun 7, 2004
Messages
1,881
I got the rest of the new x-member all gusseted and boxed in, I'll finish the bottom side when I flip the frame over to weld the bottom side of everything else.

Dropped the motor back in to double check the starter fit to the pocket I'm going to make in the frame.

I also found the lower intake I need to make my friend's 03 Cobra Supercharger work on this motor, so that will be going in soon.
 

Attachments

  • 091908 Engine.jpg
    091908 Engine.jpg
    184.9 KB · Views: 71
  • 091908 New x-member.jpg
    091908 New x-member.jpg
    146.7 KB · Views: 49
  • 091908 New x-member drvr.jpg
    091908 New x-member drvr.jpg
    160.3 KB · Views: 45
  • 091908 New x-member front.jpg
    091908 New x-member front.jpg
    199.6 KB · Views: 68
  • 091908 New x-member Pass.jpg
    091908 New x-member Pass.jpg
    149.6 KB · Views: 46
  • 091908 New x-member top.jpg
    091908 New x-member top.jpg
    138.8 KB · Views: 54
Top