• Welcome to ClassicBroncos! - You are currently viewing the forums as a GUEST. To take advantage of all the site features, please take a moment to register. It's fast, simple and absolutely free. So please join our community today!
    If you have problems registering or can't log into your account, please contact Admin.

Anyone Running Duff Tuff Tire Carrier?

JeepGuy

Contributor
Bronco Guru
Joined
Aug 24, 2006
Messages
1,521
Yes, very straight forward install as long as your stock rear bumper is pretty straight. Street driven only so far and it is solid. Haven't had a chance to get this into the dirt yet, but the latching system seems very tight with zero rattle going on. Tire on there is a 35 x 12.5. I did add a third lug and the center round tube to help with the mounting of the spare.

Rear Bumper Tire Carrier.jpg
 
OP
OP
CatskillCruiser

CatskillCruiser

Contributor
New Member
Joined
Jun 21, 2026
Messages
35
Loc.
New York
Yes, very straight forward install as long as your stock rear bumper is pretty straight. Street driven only so far and it is solid. Haven't had a chance to get this into the dirt yet, but the latching system seems very tight with zero rattle going on. Tire on there is a 35 x 12.5. I did add a third lug and the center round tube to help with the mounting of the spare.

View attachment 964552
Looks awesome, did you fabricate that center round tube?
 

ntsqd

heratic car camper
Joined
Jan 30, 2005
Messages
5,953
Loc.
Upper SoKA
No idea how Jeepguy made his, I rolled mine on a HF 3n1 sheet metal tool. Made it long enough that the wheel can sit on it and be spun without engaging the mounting studs. Cut a slot in the bottom of it so that dust can't collect there. Rolled a piece of 1/4" SS tube into a donut that *just* fit inside the tube, and welded it to the tube to strengthen the outer edge.
After making it I realized that a lock around the 1/4" tube and thru the slot would make it difficult to steal the spare. Since I built it to bolt on I used security torx bolts and a couple other invisible tricks to make it a real PITA to remove.
Only problem is that the lock beats on the wheel when located there, can see a mark on that wheel. On the round-tuit list is to drill a hole up near the top for the lock. Then it can hang in space and not hit anything.

i-7DcKXQX-L.jpg
 

gnsteam

Contributor
Bronco Guru
Joined
Jan 29, 2010
Messages
4,135
Loc.
Lincoln NE
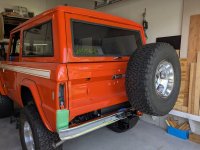
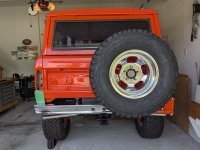
Yes, I have the Duff carrier as well. It fits very well and seems to be very stout. I'm still in the re-assembly stage of my build. So no real world testing yet.
 

Attachments

  • PXL_20260423_173035010.jpg
    PXL_20260423_173035010.jpg
    184.1 KB · Views: 100
  • PXL_20260423_173027806.jpg
    PXL_20260423_173027806.jpg
    179.6 KB · Views: 99
  • PXL_20260423_171734843.jpg
    PXL_20260423_171734843.jpg
    178.4 KB · Views: 100

gnsteam

Contributor
Bronco Guru
Joined
Jan 29, 2010
Messages
4,135
Loc.
Lincoln NE
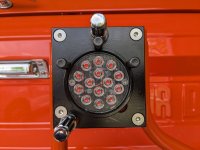
did you add a different wheel mount with an LED light in it?
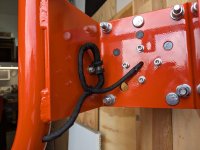
Yes. I added a 1/2 plate to the mounting surface. Giving me the added thickness so that I could press fit 3, 1/2 × 3" steel dowels into the plate and mounting surface. The dowels are positioned to match the inside diameter of the wheel opening. Giving me a guide and resting surface to postion the wheel and tire during mounting. Then I machined an aluminum mount for an led light for a third break light.
 

Attachments

  • PXL_20260423_171710262.jpg
    PXL_20260423_171710262.jpg
    148.3 KB · Views: 94
  • PXL_20260423_171656448.jpg
    PXL_20260423_171656448.jpg
    156.4 KB · Views: 88
  • PXL_20260423_171720932.jpg
    PXL_20260423_171720932.jpg
    138.8 KB · Views: 86
  • PXL_20260423_171604098.jpg
    PXL_20260423_171604098.jpg
    149.7 KB · Views: 86
  • PXL_20260423_171552744.jpg
    PXL_20260423_171552744.jpg
    148 KB · Views: 89

JeepGuy

Contributor
Bronco Guru
Joined
Aug 24, 2006
Messages
1,521
Looks awesome, did you fabricate that center round tube?
Kind of. Nothing fancy about it. Went to my local drive shaft shop and asked for some sturdy tube in whatever diameter that is (Bronco is currently not home), then just welded it to the back plate. Same concept as Ntsqd. I wanted something I could hoist that tire onto before trying to line up the studs. There is a basic wheel spacer between the tire and mounting rack so it fits straight and the lower portion of the tire doesn't rub against the mount.

Here is my thread on the subject:
https://classicbroncos.com/forums/t...er-portion-behind-stock-chrome-bumper.328810/
 

ntsqd

heratic car camper
Joined
Jan 30, 2005
Messages
5,953
Loc.
Upper SoKA
It was only after I'd built mine that I realized that I could have built it something like gnsteam's where there was a single post to hang the spare on. A simple pin or post would work well for hanging the spare, but not so well for being able to lock it to the carrier unless more/other parts were added. In the end I prefer what I have for the ability to lock the spare on, but I wish that the simple pin/post idea had occurred to me before I started building.
I tend to find projects that cause me to use tools that I haven't used before (like the slip-roll and the ring-roller) or to use a tool in a way that I've never used it before (carbide router bits on billet aluminum anyone?), and the spare rest was one of those.
 

gnsteam

Contributor
Bronco Guru
Joined
Jan 29, 2010
Messages
4,135
Loc.
Lincoln NE
It was only after I'd built mine that I realized that I could have built it something like gnsteam's where there was a single post to hang the spare on. A simple pin or post would work well for hanging the spare, but not so well for being able to lock it to the carrier unless more/other parts were added. In the end I prefer what I have for the ability to lock the spare on, but I wish that the simple pin/post idea had occurred to me before I started building.
I tend to find projects that cause me to use tools that I haven't used before (like the slip-roll and the ring-roller) or to use a tool in a way that I've never used it before (carbide router bits on billet aluminum anyone?), and the spare rest was one of those.
My design is a little overkill and not feasible for most DIY'ers to build. I'm a Tool and Die maker by profession and I have the equipment available to do machining. As for a lock on the spare. My design does not have a feature to do so. I am going to use one of those locking lug nuts until I can come up with a better solution.
 

ntsqd

heratic car camper
Joined
Jan 30, 2005
Messages
5,953
Loc.
Upper SoKA
A little overkill as in the adapter plate was first blanchard ground flat? :)

I'm not convinced that everyone needs to be able to lock the spare on. I felt like I do, but that's more a comment about where I live than anything else.

If the pins are large enough of an OD to have a cross-ways hole big enough for a lock shackle in it/them, then three more pins at the quadrant points would limit where the spare can be moved to. I think that I shot for the OD of the tube to be .06" smaller than the hole in the wheel. One of those pins could have a lock thru the hole if the hole is oriented in a way that the lock shackle creates a block to sliding the spare off the pins.
At least, that's how I'd start thinking about it.
 

Jdgephar

Bronco Guru
Joined
Sep 25, 2012
Messages
1,516
I'm not convinced that everyone needs to be able to lock the spare on. I felt like I do, but that's more a comment about where I live than anything else.
Anyone smart enough to see the whole tire swing is held on by one bolt doesn't care about the lock on the spare, either.
 

ntsqd

heratic car camper
Joined
Jan 30, 2005
Messages
5,953
Loc.
Upper SoKA
Yeah, can't just look at locking the spare to the support. Have to look at the whole system and figure out how to immobilize each junction without making it a PITA for you to work on it. In my case that pivot bolt is torqued to 150 lbs-ft with red Lock-tite and then safety wired. That just made stealing the spare a whole lot more complicated in terms of the tools needed. You aren't going to stop them if they really want it, but you can make it too slow or painful to be worth the trouble.

When there is a accessible nut on such a bolt I've been known to drill the nut thru two opposing flats, torque it into place, then drill the bolt thru those holes, and drive a roll pin into the hole. If I want to be particularly evil, and I don't expect to need to work on it myself, I'll drive a second, smaller roll pin thru the center of the larger one. It's all about slowing them down, not stopping them.

 
Top