


Community
Message Forum
Photo Gallery
Event Calendar
Book Reviews
Bronco Wallpaper
Bronco FAQ
Link Back to CB!
Photo Gallery
Event Calendar
Book Reviews
Bronco Wallpaper
Bronco FAQ
Link Back to CB!

Buy / Sell


Bronco Tech
3 Arm Wiper Setup
Fix Motor Mount
Roll Cage Braces
Throttle Body 65mm
Wheel Alignment
Heat Riser Replacement
Vent Window Repair
Center Console Mount
Straighten Bumper
Ford 6R80 6 spd
More Tech...
Fix Motor Mount
Roll Cage Braces
Throttle Body 65mm
Wheel Alignment
Heat Riser Replacement
Vent Window Repair
Center Console Mount
Straighten Bumper
Ford 6R80 6 spd
More Tech...

Install the app
-
Welcome to ClassicBroncos! - You are currently viewing the forums as a GUEST. To take advantage of all the site features, please take a moment to register. It's fast, simple and absolutely free. So please join our community today!If you have problems registering or can't log into your account, please contact Admin.
You are using an out of date browser. It may not display this or other websites correctly.
You should upgrade or use an alternative browser.
You should upgrade or use an alternative browser.
Barn Find Restomod Build
- Thread starter AZ73
- Start date
OP
OP
- Joined
- Mar 28, 2012
- Messages
- 3,593
Thanks to AZ73, I did mine last weekend. Everything worked out perfect. The wood dolly is working sweet. I went ahead and purchased taller casters and the lift slid right under the dolly. Thanks for the PDF designs!!!
Glad it worked for ya! Yeah, the taller casters are the key. And Welcome to the chat room!
OP
OP
- Joined
- Mar 28, 2012
- Messages
- 3,593
How is it going? Are you finished yet? I have followed your thread and "borrowed" a couple of your ideas along the way and am finally about to get started on some of my builds. From another zonie, thanks for the detailed info.
Thanks for the motivation! Severe family issues arose during prime AZ weather starting in November and I've had to put it on hold for a few months unfortunately, but they are finally resolved this weekend and I'll be working on finishing the dash wiring this coming week. I'll be posting again as I go along. At least it's still cool in the mornings!
- Joined
- Aug 14, 2018
- Messages
- 585
so AZ73 is this project on the road yet? you haven't posted any updates recently. It is getting chilly up here now, so I have to assume prime wrench turning season is about to commence in your neck of the woods, so I am hoping to see you post up some more details and see this rig on the road.
OP
OP
- Joined
- Mar 28, 2012
- Messages
- 3,593
so AZ73 is this project on the road yet? you haven't posted any updates recently. It is getting chilly up here now, so I have to assume prime wrench turning season is about to commence in your neck of the woods, so I am hoping to see you post up some more details and see this rig on the road.
Thanks for asking. It's motivation I desperately need.
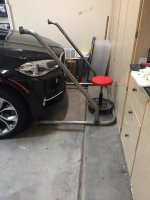
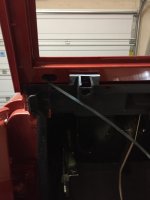
No updates recently as I don't work on it during the summer, however Protofab recently delivered my roll bar which I've been waiting for. The order for the shoulder belt mount got lost in translation and I loaned my welder to my son in California so I have to figure out a way to get it to a welder to have the tabs welded on. When that's done, I'll paint it and the bumpers. Then it gets pulled from my back-up garage to the main garage to take the top off for the install of the bar and seats. In the meantime this week is allocated to working on the wiring of the dash again. I hate wiring so the motivation is tough. So it's back on the rotation to spend some time on it. I think once I get the dash done, the rest should be pretty easy to just spend a couple hours a day on the rest of the little details.
Attachments
OP
OP
- Joined
- Mar 28, 2012
- Messages
- 3,593
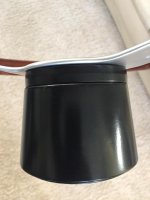
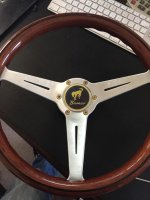
Still slowly wiring up my complex dash. Not my favorite job. In the meantime I needed to prepare the steering wheel. I'm using a Nardi wheel. In keeping with my brushed/glass beaded aluminum theme on the dash I purchased the version with the brushed finish instead of the polished finish. For some strange reason it was more expensive. When I got it, I realized they simply took a polished wheel and brushed it somewhat sloppily with some steel wool or a light wire wheel. I could have done that myself and saved some cash. The hub for the Flaming river column is (thanks to Nick!) FR20119TA 5/6 bolt adapter. On top of that you'll need a Nardi 4300.00.0002 adapter to adapt the Nardi 74mm bolt pattern to the Flaming River 70mm bolt pattern. The horn button is 55 mm while the Flaming river is 53 mm so I had to grind off the very bottom of the horn button case, about 5 mm to get it to fit. Easier than milling the hub. Flamming river hub was poorly machined and I had to re-tap the bolt holes 10-32. The Nardi spacer comes with crinkle finish. I sanded it off, and repainted with a satin black to match. In keeping with my other theme of grade 8 yellow zinc bolts everywhere, I used set of NRG "chrome gold" steering wheel bolts. Gonna try to get the Scott Drake steering wheel center sticker into the plastic cap in the Nardi horn button. Waiting for the size from SD. It came together just as I envisioned it.
Attachments


Last edited:
- Joined
- Aug 14, 2018
- Messages
- 585
That looks great 
OP
OP
- Joined
- Mar 28, 2012
- Messages
- 3,593
Which heavy duty steering kit did you go with? Duffs? Looks beefy.
I need to measure mine again but the last time I did it was not what they said it would be and I needed a custom setup
Ruff Stuff GM 1 Ton.
OP
OP
- Joined
- Mar 28, 2012
- Messages
- 3,593
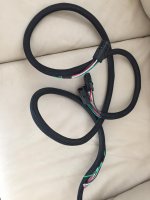
Just about finished wiring up the Dash. It's been a challenge because I had to go and build a custom dash and am dealing with some faulty components. Last piece is waiting for the replacement wiper controller and calling the manufacturer of the push button start system to ask a question on their instructions I can't quite understand. Also finished the wiper wire loom. It powers 2 wipers, the courtesy light in the wiper box, the interior lights I'm adding to the top, and an extra power line for whatever. I used weather pack connectors to make it easy to disconnect when I pull the top off for fair weather driving. Problem is the loom is pretty thick now. After testing continuity on all lines first, I tried an electrician's fishing tape. No luck. Is the top of the windshield frame on the sides open? Maybe I can take the top off and help push down from there, or add some soap to the braiding. If that doesn't work, I might have to just use one ground wire and tie the other 4 to it to make it thinner.
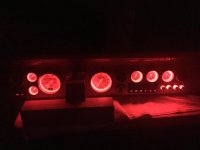
I added a dimmer for the dash lights, and pulled out the white incandescent lights in the Vintage Air controller and replaced them with red LEDs. I also
built the underdash courtesy light bars that will tie into the ones in the top. They'll be foam taped to the back lip under the dash. Still have to build the ones for the top but waiting for the headliner to arrive to figure out where I'll put them.
Attachments

- Joined
- Aug 14, 2018
- Messages
- 585
Just about finished wiring up the Dash. It's been a challenge because I had to go and build a custom dash and am dealing with some faulty components. Last piece is waiting for the replacement wiper controller and calling the manufacturer of the push button start system to ask a question on their instructions I can't quite understand. Also finished the wiper wire loom. It powers 2 wipers, the courtesy light in the wiper box, the interior lights I'm adding to the top, and an extra power line for whatever. I used weather pack connectors to make it easy to disconnect when I pull the top off for fair weather driving. Problem is the loom is pretty thick now. After testing continuity on all lines first, I tried an electrician's fishing tape. No luck. Is the top of the windshield frame on the sides open? Maybe I can take the top off and help push down from there, or add some soap to the braiding. If that doesn't work, I might have to just use one ground wire and tie the other 4 to it to make it thinner.
I added a dimmer for the dash lights, and pulled out the white incandescent lights in the Vintage Air controller and replaced them with red LEDs. I also
built the underdash courtesy light bars that will tie into the ones in the top. They'll be foam taped to the back lip under the dash. Still have to build the ones for the top but waiting for the headliner to arrive to figure out where I'll put them.
that is looking awesome!
OP
OP
- Joined
- Mar 28, 2012
- Messages
- 3,593
Installing the Nu-Relics power windows this weekend and the holes didn't line up. Sent an email and this was the response:
"This should not have got out of here like that. Most likely it was a set-up piece that should have been thrown out. I would just take a round file or die grinder and just move them over just enough to get the screws in."
Yeah, I can elongate the holes to correct their flaw, but then the holes allow for more movement and less grip for the washer since it's not gripping 360 degrees anymore. Normally I wouldn't mind, but these were $500. They should be correct. Not, "well they should have been thrown out, but we sent our mistake to you so you fix it." If I wanted that, I would have paid less for cheap Chinese crap.
Attachments


- Joined
- Aug 14, 2018
- Messages
- 585
so you got this thing on the road yet? No updates since january, I know its hot there in AZ, but surely you have some progress to update us on;D
Similar threads
- Replies
- 2
- Views
- 756