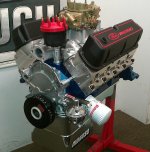
Yeah, the FordStrokers is a nice motor. When I pulled the motor out of this Bronco and decoded it, it turns out it was a factory crate motor from 1980. No idea what happened to the original stock one. Although I wanted a 347 I looked at the Ford racing 302,306 and 347 also, and spent a ton of time on the phone with those guys. There was a need to change out the cam and they gave me the name of some guys that redo the Ford Racing motors to move the torque band down by replacing the cam, but in the end, the 306 seemed like a good value motor, even with changing the cam out, but the 302 was pricey for the power (and didn't have enough power for me) and their 347 was based on their new Boss block, which has shorter deck height, and with a stroker, the piston is already coming out the bottom of the cylinder. I also tried to look for a local builder, but the major ones had bad reviews and I couldn't seem to locate any of the "word of mouth" guys. I wish I knew who 73AZBronco was using when I made my decision, but he's spending about what I am so it's a wash. Since I'm building the motor for dependability, durability, and power, and the FordStorkers was about the same price as the Ford Racing, I went with Jim's motor, and I got to make it EXACTLY what I wanted.
I know there's a lot of EFI going on, and I've set up the EB to make an easy change-over if I change my mind in the future, but I've run carbs on all my other "toys" and have been happy with them. Also Jim is an amazing machinist with exacting tolerances. I think this motor will be about 95% as efficient as an EFI motor without any potential EFI issues in the middle of nowhere.


")