• Welcome to ClassicBroncos! - You are currently viewing the forums as a GUEST. To take advantage of all the site features, please take a moment to register. It's fast, simple and absolutely free. So please join our community today!
    If you have problems registering or can't log into your account, please contact Admin.

Bronco Hut Project "Ginger"

Colorado75Bronc

Full Member
Joined
Jan 27, 2009
Messages
335
Loc.
Colorado Springs
Cool, didn't know they had a new version, didn't see it on their site, I think the original is probably stronger, and I can attest to how great it is, as it was in my bronco when my friend owned it and flipped 3 1/2 times at 75mph
 
OP
OP
B

BroncoHutTyler

Jr. Member
Joined
Aug 6, 2011
Messages
52
Bigbird, I do have the paint code at the shop. Ill get back to you.

Here's another "Ginger" type color. This is my personal bronco build. I picked this color out of hundreds of similar colors. It really pops in the sunlight and has a very deep, rich orange/red tone. I can get you this paint code too if you want it.

I love burnt orange on a bronco!

20120827_100902%20-%20Copy%20%28800x600%29_7283780.jpg


20120827_100932%20-%20Copy%20%28800x600%29_4097725.jpg


20120827_101019%20-%20Copy%20%28800x600%29_7218871.jpg


20120827_101850%20-%20Copy%20%28800x600%29_3361071.jpg
 
OP
OP
B

BroncoHutTyler

Jr. Member
Joined
Aug 6, 2011
Messages
52
Nah, that mustang is red and was being fixed at my friends body shop after a tree fell on the trunk.
 

Bigbird

Sr. Member
Joined
Jan 12, 2004
Messages
505
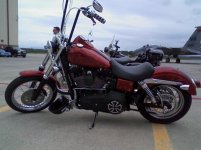
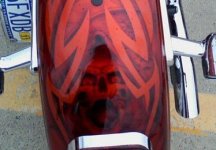
Tyler, I'm a really big fan of burnt orange. Here's a couple pics of my Harley in burnt orange with rootbeer airbrush.
 

Attachments

  • bike.jpg
    bike.jpg
    65.4 KB · Views: 70
  • bike2.jpg
    bike2.jpg
    28.4 KB · Views: 81
OP
OP
B

BroncoHutTyler

Jr. Member
Joined
Aug 6, 2011
Messages
52
Sorry for the late delay BigBird, the paint code for project "Ginger" is

Medium Chestnut Poly ( PPG 2504 )
 
OP
OP
B

BroncoHutTyler

Jr. Member
Joined
Aug 6, 2011
Messages
52
With 600hp under the hood. We feel the passengers need a way to brace themselves for the massive amount of air they are about to experience.

So I built a foot brace for the rear seat that will be tied into the roll cage.

Friz48%20%28800x600%29_7795018.jpg


Friz49%20%28800x600%29_3974123.jpg
 

Crude dude

Jr. Member
Joined
Feb 4, 2012
Messages
136
That is the new Protofab cage, I was going to have one installed in my truck but its way too fancy for my blood. For the guy that loves the extremes then that cage is for you. Ive known Mike and his family/crew for years and they have always build top notch stuff. Mike said that the purpose of the cage is not only to be very strong but also to provide a lot more head room for the driver and passengers. I heard its a real bear to bend and build that cage, a lot of detail involved!
 
OP
OP
B

BroncoHutTyler

Jr. Member
Joined
Aug 6, 2011
Messages
52
Here's a few pics of the front brake setup. They are 14" Wilwood rotors with the same Wilwood 6 piston calipers that are on the back with some custom caliper brackets.

Friz50%20%28800x600%29_1577530.jpg


Friz51%20%28800x600%29_5265638.jpg
 
OP
OP
B

BroncoHutTyler

Jr. Member
Joined
Aug 6, 2011
Messages
52
Since the axle tubes are so much larger, spacers had to be made for the radius arms. The problem is, the spring cups aren't flat on the bottom. So I had to space them up so they bolt on like they were meant to. I used a couple other spring cups as spacers.

Friz52%20%28800x600%29_9812832.jpg


Friz53%20%28800x600%29_7332732.jpg


Friz56%20%28800x600%29_9253413.jpg


Friz57%20%28800x600%29_6752755.jpg
 

NM_outdoors

Jr. Member
Joined
Nov 27, 2012
Messages
122
I'm at a similar point. The D44 upgrade on my '70 needed wedges and I have them assembled, but not welded yet. Running Duff long arms (flatter top) and my cups aren't sitting flush due to (helical?) spring contour on cup bottom. Springs are bowing a bit. Seems like driver side is worse than passenger. Trying to decide whether to space them up as you did, build (or buy) some flat bottom cups, or relieve arms to fit......... not!

Why the weld on your arm-to-cap spacer? Two thin plates to make a thick one?

BTW, I may stop by your shop on Friday. Driving to Denver to pick up some Explorer parts and wanted to do some business with you guys in the future. You're the closest vendor to me and will need some (a lot of!) sheet metal by this summer.
 
OP
OP
B

BroncoHutTyler

Jr. Member
Joined
Aug 6, 2011
Messages
52
I'm at a similar point. The D44 upgrade on my '70 needed wedges and I have them assembled, but not welded yet. Running Duff long arms (flatter top) and my cups aren't sitting flush due to (helical?) spring contour on cup bottom. Springs are bowing a bit. Seems like driver side is worse than passenger. Trying to decide whether to space them up as you did, build (or buy) some flat bottom cups, or relieve arms to fit......... not!

Why the weld on your arm-to-cap spacer? Two thin plates to make a thick one?

BTW, I may stop by your shop on Friday. Driving to Denver to pick up some Explorer parts and wanted to do some business with you guys in the future. You're the closest vendor to me and will need some (a lot of!) sheet metal by this summer.


The spring cup only hits the long arms on the driver side. But you want both cups to be level. I welded them all together for simplicity and ease of installation.

I will be at the shop all day on Friday, we would love for you to stop by and see what we are up to.
 

airbur

Bronco Guru
Joined
Jun 3, 2008
Messages
2,763
Loc.
Castle Pines, CO
With 600hp under the hood. We feel the passengers need a way to brace themselves for the massive amount of air they are about to experience. So I built a foot brace for the rear seat that will be tied into the roll cage....

Interested to know where the 600HP figure comes from. I know it's a 427 with Injection....what else?
 

5150bronco

New Member
Joined
May 28, 2007
Messages
22
Loc.
San Jose, Ca.
Fantastic Job!

Best skid plate I have seen yet! I will be looking at that when I fab mine up. Exhaust is awesome too. Similar routing to mine, but I will be looking at making something again for my new custom 351 using your bends so Thanks for sharing.

If you get time, maybe get more pics up of the exhaust and maybe send some info on your motor.

Thanks!
 
Top