• Just a reminder that you won't be able to start new posts or reply to existings posts in the Archive forum.

    This is where all the old posts go so they can still be used for reference and searched.
  • Welcome to ClassicBroncos! - You are currently viewing the forums as a GUEST. To take advantage of all the site features, please take a moment to register. It's fast, simple and absolutely free. So please join our community today!
    If you have problems registering or can't log into your account, please contact Admin.

Building a half cab [bulkhead update 11/1]

Entourage

Full Member
Joined
Jul 28, 2010
Messages
486
Loc.
Phoenix, Arizona
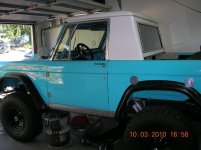
That is a great looking Bronco - love the color, bumpers, lift, fender exhaust, rims, tires, Flares, hood scoop, Denver Broncos Interior, everything. Great decisions all the way around. I am not a huge half-cab fan (which may be Blasphemous on this board) but yours could change my mind. Great Bronco - well done.
 

casadejohnson

Bronco Alchemist
Joined
Jan 21, 2005
Messages
3,587
Another update. The paints on, I'm not to happy with it but will see after the color sanding. Also the headliner is started to go in. Heading to Mammoth Lakes for some R&R and then get back on the top. got the ACC carpet in looks good but a little short at the kick panels about 1" on each side. Add a some sheet metal between the bow in the roof so I can add a dome light later. The underside is shot with sound deadiner and spray foam inbetween the bows and roof skin.


Thats very nice work! I'm interested in what you used for the headliner. On my full top I covered the original headliner with fabric but in my 1/2 cab I don't have anything to start with. Its been much harder than I expected to find a suitable backing similar to what the original headliner was made of.
 

zombie66

Full Member
Joined
Aug 29, 2003
Messages
983
Loc.
Beaverton, oregon
When i had my full top i used some aluminum angle (1/2-3/4" can't remember) screwed around the old headliner location and bolted a peice of FRP paneling onto it for a headliner. i also cut some sheets of pink foam insulation to sandwich in between and you could'nt hear a rain drop. The FRP comes in white, grey or black. picked mine up at Lowes and i will probably do that to my half cab. You can wash any scuff marks and don't have to worry about fabric sagging down the road.
 
OP
OP
getfuzzy

getfuzzy

Sr. Member
Joined
Mar 22, 2005
Messages
530
Thanks for all the kind words. I didn't think I headliner would be such a hit, but thanks. I went the a local supply house for the headliner board and the fabric. The hard part was the color they have a lot to chose from. The nice start was the two bows from the full top to attach the board to. The wife has a ton of arts and craft tools that I use to make fun of until it came to bendind the board. She has a tool for that to make a score in it to help with the bending.The main top part is two boards that I joined together before covering. I made everthing a little big and then trimed to fit. The metal that the old headliner is were the sides clip on and two clips in the middle. The dome light will also help hold up the back. One change I'm going to make is the two back peices will be changed to one. I'll get some close ups when I get back from fishing. I'm using tree clip that I ordered for Mc Master Carr [like new cars use for door panels], Drilled all the hole in the board and the metal top put the clips in the board then covered with the fabric, that way you don't see the clips. I hope this answers some of the questions. But if not ask a way. My typing and spelling need the work out.
 

casadejohnson

Bronco Alchemist
Joined
Jan 21, 2005
Messages
3,587
Thanks for all the kind words. I didn't think I headliner would be such a hit, but thanks. I went the a local supply house for the headliner board and the fabric. The hard part was the color they have a lot to chose from. The nice start was the two bows from the full top to attach the board to. The wife has a ton of arts and craft tools that I use to make fun of until it came to bendind the board. She has a tool for that to make a score in it to help with the bending.The main top part is two boards that I joined together before covering. I made everthing a little big and then trimed to fit. The metal that the old headliner is were the sides clip on and two clips in the middle. The dome light will also help hold up the back. One change I'm going to make is the two back peices will be changed to one. I'll get some close ups when I get back from fishing. I'm using tree clip that I ordered for Mc Master Carr [like new cars use for door panels], Drilled all the hole in the board and the metal top put the clips in the board then covered with the fabric, that way you don't see the clips. I hope this answers some of the questions. But if not ask a way. My typing and spelling need the work out.

I think I'm getting it but I look foreword to the photos. I'm thinking about adding a bow like the ones in the full top to my half cab so that my headliner has more support in the middle. I'm doing this all before I get to the paint and body work so at least I wont be messing up the paint if I have to weld on the inside of the top to install the bow.
 
OP
OP
getfuzzy

getfuzzy

Sr. Member
Joined
Mar 22, 2005
Messages
530
Been a lazy butt after vacation, But got back to work today[if only at half speed] put the lift gate back together and onto the top. Now I can start on the bulkhead. Oh the WH liftgate gas struts are the ticket!
 

Attachments

  • liftgate.jpg
    liftgate.jpg
    89.6 KB · Views: 106
  • liftgate2.jpg
    liftgate2.jpg
    86.1 KB · Views: 108
OP
OP
getfuzzy

getfuzzy

Sr. Member
Joined
Mar 22, 2005
Messages
530
Bulkhead update

So I finely got started on the bulkhead. Went through a few ideas but always came back to my first one. I made some templets for the bed sides and cut them out of 18g. Started the frame out of 3/4" x 3/4" .065 after a few changes it came down to whats in the pic's. I need to make one more templet for were the bulkhead meets the wheel wells. Then I'll trim the sheet metal and do a test fit or 20 and weld it up. The pic that is a little dark is of the weather striping to seal the liftgate. If you have read this far, how do you like the liftgate handle? Works just like the stock one and locks and its new.
 

Attachments

  • w strip.jpg
    w strip.jpg
    40.8 KB · Views: 106
  • t handle.jpg
    t handle.jpg
    42.9 KB · Views: 118
  • strip angle.jpg
    strip angle.jpg
    81.8 KB · Views: 113
  • bh frame.jpg
    bh frame.jpg
    90.2 KB · Views: 119
  • b h frame.jpg
    b h frame.jpg
    114.1 KB · Views: 119

sriha

Sr. Member
Joined
Jul 28, 2010
Messages
683
Nice Satchel picture on the window, I think Bucky would be a good one too.
 

phred

Contributor
Bronco Guru
Joined
Aug 25, 2006
Messages
3,548
Loc.
Earth
I really like the half cab with the operable lift gate. Great idea and nice work.
 
OP
OP
getfuzzy

getfuzzy

Sr. Member
Joined
Mar 22, 2005
Messages
530
i like the liftgate handle.
did it come black?
i have the same thing on my bronco but in chrome.

I found it at a local nut and bolt place that I go to. They buy up left over hardware form the airospace and other companys that over buy. And yes it came black for 5 bucks I couldn't pass it up.
 
OP
OP
getfuzzy

getfuzzy

Sr. Member
Joined
Mar 22, 2005
Messages
530
Here's some new pic's of the bulkhead with sound deadner on the inside and bedliner on the outside. I cut and fitted the tie down tracks for the side rails. Need to order some more weather striping for the liftgate ran about a foot short. Also some pic's of the side panels.
 

Attachments

  • tie d d.jpg
    tie d d.jpg
    106.6 KB · Views: 70
  • flor ribs.jpg
    flor ribs.jpg
    137.4 KB · Views: 70
  • inside bh.jpg
    inside bh.jpg
    98.8 KB · Views: 79
  • side pp.jpg
    side pp.jpg
    91.6 KB · Views: 73
Top