• Welcome to ClassicBroncos! - You are currently viewing the forums as a GUEST. To take advantage of all the site features, please take a moment to register. It's fast, simple and absolutely free. So please join our community today!
    If you have problems registering or can't log into your account, please contact Admin.

Cheaper Than Therapy: A Build Thread

OP
OP
M

marjama

Contributor
Sr. Member
Joined
Nov 24, 2004
Messages
435
Ceracoat is awesome stuff and fairly easy to do consistently with great results. It is much easier to do at home than powder and is above and beyond more durable. I do know first hand how durable it is:p;);D

Thanks Yeller - good to hear that it lives up to the marketing hype! I have some swatches on the way, and will have to start keeping any eye out on Craigslist for an oven. Wife probably wouldn't think it was a good idea to use the one in the house ;D
 

sprdv1

Contributor
REBEL
Joined
Mar 8, 2007
Messages
81,985
Thanks Yeller - good to hear that it lives up to the marketing hype! I have some swatches on the way, and will have to start keeping any eye out on Craigslist for an oven. Wife probably wouldn't think it was a good idea to use the one in the house ;D

don't listen to that guy.. hhaha.. j/k
 

Hinmaton

Full Member
Joined
Oct 17, 2017
Messages
592
Cerakote is a great option as it is durable and the spoke mil thickness of the coat is very thin. It’s used in the gun industry a lot and is designed to function well with sliding and moving tight fit components.
In fact, I spoke with a coater that used it extensively and he said that the practice piece to judge coating thickness and coverage was to spray a complete hinge (door hinge), and if when you’re done, the hinge operates as it did before you sprayed it, then you’ve coated it properly.
Black Zinc on the other hand is a conversion process that turns the zinc black, but it isn’t very durable. Parkerizing is another cool process that is very durable with a thin buildup. You can get diy kits or find a gun shop that does work on guns, they would also be able to do the cerakote. If it was me, I would probably mask off the spindle and spray it with black Steel-It or have it Cadmium plated.

Hh


Sent from my iPhone using Tapatalk
 
OP
OP
M

marjama

Contributor
Sr. Member
Joined
Nov 24, 2004
Messages
435
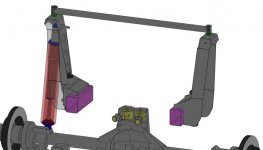
Rear shock tower support...

Alright...continuing work on the Bronco again (at least a little). I've finished machining the front and rear caliper mounts, so I'm off on other projects. Still need to figure out how to machine the electronic parking brake brackets, but one of these nights I'll get to it.

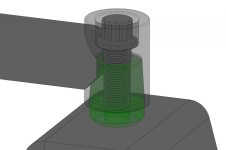
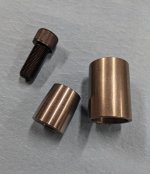
In the meantime, here's what I came up with for the rear shock tower support. I'm honestly not in love with it, but may still go ahead with it and see how it works. I've machined two tapers (self releasing - like a machine collet) with mating parts that I'll weld to the top of the towers and connect with a 1.5" tube. The thinking behind this was that I can pass through the body vertically, seal the lower portion with a seals-it seal, and it'll keep the towers from moving much. I've been trying to keep the body isolated from the suspension as much as possible, and this is the solution I came up with. I'm curious what you guys think about it.

The taper can locate and offer some torsional rigidity. However, it's precise. If stuff moves when I weld everything or after the fact, it won't be great. I figure I will weld it last. It's also only one point of contact, and it's up there pretty high. I can't say I've actually done any real analysis on it. Thoughts?
 

Attachments

  • 2021-07-27_13-38-38.jpg
    2021-07-27_13-38-38.jpg
    40.4 KB · Views: 59
  • 2021-07-27_13-40-22.jpg
    2021-07-27_13-40-22.jpg
    35.7 KB · Views: 52
  • PXL_20210727_130823347.jpg
    PXL_20210727_130823347.jpg
    112.4 KB · Views: 49
  • PXL_20210727_131051496.jpg
    PXL_20210727_131051496.jpg
    98.3 KB · Views: 55

Yeller

Contributor
Bronco Guru
Joined
Mar 27, 2012
Messages
6,886
Loc.
Rogers County Oklahoma
I don’t see why that wouldn’t work. The forces there are pretty minimal. They live with spring eye bushings and what you have is far more rigid.
 
OP
OP
M

marjama

Contributor
Sr. Member
Joined
Nov 24, 2004
Messages
435
I don’t see why that wouldn’t work. The forces there are pretty minimal. They live with spring eye bushings and what you have is far more rigid.

Thanks Yeller! That was my thinking too...I'm really just trying to resist the inward bending moment of shock. I think the Bronco frame is pretty stiff, especially in that area (it's right next to the rear cross member that is in front of the fuel tank). I don't expect much front to back movement from side to side. We'll see. I'm going to install it and see how it goes! It just looked a little 'dinky' once I finished the parts and brought them home!
 

Yeller

Contributor
Bronco Guru
Joined
Mar 27, 2012
Messages
6,886
Loc.
Rogers County Oklahoma
It takes surprisingly little to accomplish what your doing. I’ve used spring eye bushings with a piece of 1/4” flat plate between them, it is all that would clear the hood and intake. 15 years later it is still surviving a happy life, and it’s on a Jeep that gets used…. 14” coil overs, ton’s and sticky 40’s
 
OP
OP
M

marjama

Contributor
Sr. Member
Joined
Nov 24, 2004
Messages
435
Another quick update - still making slow progress while I'm trying to get the 'overland trailer' on the road.

I managed to machine the electronic parking brake mounts from aluminum on the cnc at work. It was actually a bit tough to figure out how to program them. I'm definitely not an expert, and the Prototrak we have doesn't necessarily have a ton of flexibility (well, it might...like I said, I'm not an expert!). If you look close I did mess up a bit on one of them, but they are parking brake mounts...and they are done ;D (Apparently I didn't take a pic of the EPB actually mounted - I'll update later!)

I had a second baby step forward when my remote mount Wilwood master cylinder finally showed up. Looks like it will definitely work to solve the clearance issues with the crossover tube / hydroboost / intake manifold / steering column. Not the cheapest solution, but that's one more problem solved. I think I posted this before, but I ended up moving the entire brake hanger (under the dash) over a bit to increase clearance. A lot of things want to be in the same space in that area. I think I like how it's all turning out. The brake system is now complete other than plumbing everything!

Still a long way to go, but as long as I get something done on projects every day I feel pretty good about it. Eventually I may even be able to drive this thing again :)
 

Attachments

  • PXL_20210731_010612943.jpg
    PXL_20210731_010612943.jpg
    138.5 KB · Views: 55
  • PXL_20210731_214924882.jpg
    PXL_20210731_214924882.jpg
    157.7 KB · Views: 53
  • PXL_20210801_142306557.jpg
    PXL_20210801_142306557.jpg
    100.5 KB · Views: 55
  • PXL_20210729_143312335.jpg
    PXL_20210729_143312335.jpg
    141.4 KB · Views: 53
  • PXL_20210729_143258518.jpg
    PXL_20210729_143258518.jpg
    142.6 KB · Views: 73
  • PXL_20210729_143222696.jpg
    PXL_20210729_143222696.jpg
    124.8 KB · Views: 53

nvrstuk

Contributor
Just a Bronco driver for over 50 yrs!
Joined
Jul 31, 2001
Messages
9,425
Loc.
PNW
Looking good Marcus. Love some of those details you're designing in to it.

Been missing some posts- Shock brace, like Steve mentioned you don't need much to brace them. I braced my strut mts with 1" sq tube in the rear. Strut mts stick up above the frame over 12". Lot of potential stress but not nearly what I imagined anyway.

I ran a pc of 1/4" plate along the frame rail to help stiffen it some where the strut mts are welded to the rails. Probably extends 4+ inches on either side of the strut mount.
 
OP
OP
M

marjama

Contributor
Sr. Member
Joined
Nov 24, 2004
Messages
435
Looking good Marcus. Love some of those details you're designing in to it.

Been missing some posts- Shock brace, like Steve mentioned you don't need much to brace them. I braced my strut mts with 1" sq tube in the rear. Strut mts stick up above the frame over 12". Lot of potential stress but not nearly what I imagined anyway.

I ran a pc of 1/4" plate along the frame rail to help stiffen it some where the strut mts are welded to the rails. Probably extends 4+ inches on either side of the strut mount.

Thanks Brian! I'm probably overly into the details, and that is why getting a project like this done takes forever (well, that and the 7 other projects I keep trying to move forward at the same time)!

Good to know you have had luck with a similar setup. The spring rates in the rear of a Bronco are pretty low, and the offset of the coilover to the frame is not huge. So, I'm sure it'll work! I just need to get the welder out and get to tacking more stuff together. I have a lot of sheet metal work to do, and not a lot of sheet metal skills yet!
 

nvrstuk

Contributor
Just a Bronco driver for over 50 yrs!
Joined
Jul 31, 2001
Messages
9,425
Loc.
PNW
;DI am definitely low on the "skills" but I keep at it!! :)

You do have a couple projects! Mine are more farm related. lol Like today, 3 hrs of digging around pipe with a shovel and hand trowel. In my "loam" which means creek rock with very little dirt. This hole is relatively rock free since the conduit was buried in sand.

Oh well, beats last Sundays luck when digging with the backhoe when I had a location and I STILL DUG UP the main electical feed to my daughters house across the creek. Whooops. :) At least they let me do the repairs so I didn't get dinged for 3 guys leaning on shovels, one guy doing the work and another overseeing the operation and no fine for location services either. I skated on this one. whew...

So use those skills but not the way I do! lol

Keep up the progress Marcus!
 

Attachments

  • 20210802_101519.jpg
    20210802_101519.jpg
    226.3 KB · Views: 61
Last edited:
OP
OP
M

marjama

Contributor
Sr. Member
Joined
Nov 24, 2004
Messages
435
;DI am definitely low on the "skills" but I keep at it!! :)

You do have a couple projects! Mine are more farm related. lol Like today, 3 hrs of digging around pipe with a shovel and hand trowel. In my "loam" which means creek rock with very little dirt. This hole is relatively rock free since the conduit was buried in sand.

Oh well, beats last Sundays luck when digging with the backhoe when I had a location and I STILL DUG UP the main electical feed to my daughters house across the creek. Whooops. :) At least they let me do the repairs so I didn't get dinged for 3 guys leaning on shovels, one guy doing the work and another overseeing the operation and no fine for location services either. I skated on this one. whew...

So use those skills but not the way I do! lol

Keep up the progress Marcus!

Ahhh...I feel your pain Brian! Can't say I've dug up a power main yet, but I've done plenty of similar things. I've always thought that some of my problem solving skills came from years of breaking stuff on the farm, and trying desperately to fix it before my dad showed up! Ha!
 

nvrstuk

Contributor
Just a Bronco driver for over 50 yrs!
Joined
Jul 31, 2001
Messages
9,425
Loc.
PNW
QUOTE: "Ahhh...I feel your pain Brian! Can't say I've dug up a power main yet, but I've done plenty of similar things. I've always thought that some of my problem solving skills came from years of breaking stuff on the farm, and trying desperately to fix it before my dad showed up! Ha"

Ain't that the truth!! lol
 

Yeller

Contributor
Bronco Guru
Joined
Mar 27, 2012
Messages
6,886
Loc.
Rogers County Oklahoma
Ahhh...I feel your pain Brian! Can't say I've dug up a power main yet, but I've done plenty of similar things. I've always thought that some of my problem solving skills came from years of breaking stuff on the farm, and trying desperately to fix it before my dad showed up! Ha!

my butt hurts just thinking about that statement:p
 

nvrstuk

Contributor
Just a Bronco driver for over 50 yrs!
Joined
Jul 31, 2001
Messages
9,425
Loc.
PNW
Karma thing is I used to be the guy responding to contractors digging up Public Utililities decades ago... lol
 

sprdv1

Contributor
REBEL
Joined
Mar 8, 2007
Messages
81,985
Looking good Marcus. Love some of those details you're designing in to it.

Been missing some posts- Shock brace, like Steve mentioned you don't need much to brace them. I braced my strut mts with 1" sq tube in the rear. Strut mts stick up above the frame over 12". Lot of potential stress but not nearly what I imagined anyway.

I ran a pc of 1/4" plate along the frame rail to help stiffen it some where the strut mts are welded to the rails. Probably extends 4+ inches on either side of the strut mount.

totally agree....
 
OP
OP
M

marjama

Contributor
Sr. Member
Joined
Nov 24, 2004
Messages
435
Well, I see my build thread has moved to page 5...that's a bad sign, isn't it? ;D

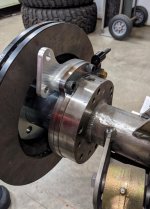
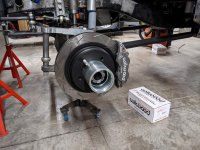
As usual, life and other projects have been getting in the way. No really significant updates, but I did manage to pick up some new brake rotors for the Bronco project and machined the inside to fit the D60 hubs. I had a set of rotors I was planning to use before, but I machined them to fit the inside of the hub (the original plan), and when I swapped them to the outside they were not the correct ID. I also ended up using the same 2010 Dodge 1500 front rotors on all four corners. DBA rotors all around, made in AUS...not Asia! Time to order a ton of fittings and brake line...

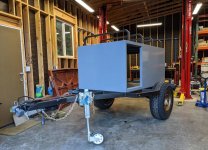
Also getting pretty close to having a usable overland trailer! It has been a lot more work than I imagined...doing too many things I've not done before, and attempting to do a decent job at it. Hoping to get it out at least a couple of times this year! (This has honestly been the main distraction along with two other car projects I'm trying to ignore. I have WAY too many projects happening at once, and not nearly enough cash to fund them all at the same time! 1st world problems for sure.) The box is just epoxy primer grey. We'll paint or Raptor line it once we decide it's actually "done". So, maybe never?
 

Attachments

  • PXL_20210815_230247091.jpg
    PXL_20210815_230247091.jpg
    140.9 KB · Views: 59
  • PXL_20210817_063242946.jpg
    PXL_20210817_063242946.jpg
    128.3 KB · Views: 63
  • OA Trailer.jpg
    OA Trailer.jpg
    134.2 KB · Views: 60

sprdv1

Contributor
REBEL
Joined
Mar 8, 2007
Messages
81,985
life and masks seem to get in the way a lot these days

concentrate on what you want done first..

then go from there..
 

nvrstuk

Contributor
Just a Bronco driver for over 50 yrs!
Joined
Jul 31, 2001
Messages
9,425
Loc.
PNW
First step is admitting that it's a lot more work than you imagined! lol We've ALL been there buddy! :)

Keep plodding, never give up. Sure is looking good-better than good... and you'll enjoy it forever!
 
OP
OP
M

marjama

Contributor
Sr. Member
Joined
Nov 24, 2004
Messages
435
Hey gang! It makes me sad to see that my last update was last Sept. Sheesh. I'm still eyeballing the Bronco and keeping little things creeping along, but have been pre-occupied with other projects. Since my last update I've built a full 4 link w/ panhard for the F100 and swapped in a Lexus SC400 front suspension, built an english wheel from scratch, remodeled an office, continued the overland trailer build, etc...needless to say, I've taken on WAY too much over the last year. I keep finding myself contemplating if I could stuff a Coyote engine into the Bronco since I might be borrowing the 331 for the F100. Crazy talk, I know!

Regardless, I'm still lurking around...expect more progress updates soon!
 
Top