• Welcome to ClassicBroncos! - You are currently viewing the forums as a GUEST. To take advantage of all the site features, please take a moment to register. It's fast, simple and absolutely free. So please join our community today!
    If you have problems registering or can't log into your account, please contact Admin.

Driver door Post replacement... Questions

OP
OP
904Bronco

904Bronco

Contributor
Bronco Guru
Joined
Sep 28, 2004
Messages
6,042
Loc.
San Martin, CA
Here are the pictures I just took with the door about an inch from closing...
 

Attachments

  • DSCN4743.jpg
    DSCN4743.jpg
    78.5 KB · Views: 223
  • DSCN4741.jpg
    DSCN4741.jpg
    90.4 KB · Views: 195
  • DSCN4739.jpg
    DSCN4739.jpg
    71.1 KB · Views: 186
  • DSCN4740.jpg
    DSCN4740.jpg
    57.3 KB · Views: 187
  • DSCN4742.jpg
    DSCN4742.jpg
    41.5 KB · Views: 174
OP
OP
904Bronco

904Bronco

Contributor
Bronco Guru
Joined
Sep 28, 2004
Messages
6,042
Loc.
San Martin, CA
Heading out to do a parts run... Be back in an hour or so.

Your seeing a lot with just pictures...

I know I am close to getting where it needs to be.
 
OP
OP
904Bronco

904Bronco

Contributor
Bronco Guru
Joined
Sep 28, 2004
Messages
6,042
Loc.
San Martin, CA
If you remove the upper shim it will pull the window frame away from the hard top.

There were washer shims before I took things apart and replaced the post.

Currently, I reassembled everything without them... So there is nothing to remove.

Sorry if I was confusing...
 

rjrobin2002

Contributor
Bronco Guru
Joined
Oct 13, 2007
Messages
2,716
Add a shim to just the bottom and see if it will raise the body line a hair. It may move that window frame forward also. Then I would loosen all the bolts on the driver side top and move it back .125".

I still vote the post is super close and where it needs to be welded.
 

rjrobin2002

Contributor
Bronco Guru
Joined
Oct 13, 2007
Messages
2,716
I have adjusted a door like that up before with just a floor jack and the door almost closed. Then over raise it a few times till it settles right. But that is plan C.
 
OP
OP
904Bronco

904Bronco

Contributor
Bronco Guru
Joined
Sep 28, 2004
Messages
6,042
Loc.
San Martin, CA
Add a shim to just the bottom and see if it will raise the body line a hair. It may move that window frame forward also. Then I would loosen all the bolts on the driver side top and move it back .125".

I still vote the post is super close and where it needs to be welded.

I have reached the point where I think I will weld it in...

I will check for the hardtop movement back 1st...

There is very little movement of the post. Most of my screws are loose from all the jiggling with the door. The door post is positioned very close to the previous numbers I took and the numbers from the sheet...

I am slowly driving myself mad try to manipulate everything to get it just so... By myself...But so far no lost sleep or door nightmares!

But my knees are starting to complain...
 

bronkenn

Contributor
Bronco Guy
Joined
Apr 27, 2017
Messages
2,688
Loc.
Southeast Ohio
That is how the factory final fits the closure panels. The classification was called Door Fitter. Bend them to fit. Little at a time though. Ken
 

74 Bronco Billy

Contributor
Sr. Member
Joined
Jul 4, 2016
Messages
791
You are inspiring others! Keep at it. My driver door gets stuck closed after I open it. Very frustrating.

Sent from my SAMSUNG-SM-G930A using Tapatalk
 
OP
OP
904Bronco

904Bronco

Contributor
Bronco Guru
Joined
Sep 28, 2004
Messages
6,042
Loc.
San Martin, CA
The Deed is done...

95% welded in, a few more welds to do and finish up the front upper corner of the post.

The top is all the way forward, so there is room to slide it back.

I took the door off, rechecked the measurements, made an adjustment at the top and started welding.

Tomorrow I will hang the door and hope that I am where I need to be!
 

Attachments

  • IMG_20180226_171937846.jpg
    IMG_20180226_171937846.jpg
    106.5 KB · Views: 246
  • IMG_20180226_171943073.jpg
    IMG_20180226_171943073.jpg
    88.7 KB · Views: 244
  • IMG_20180226_171951288.jpg
    IMG_20180226_171951288.jpg
    76.2 KB · Views: 264
  • IMG_20180226_172007161.jpg
    IMG_20180226_172007161.jpg
    71.5 KB · Views: 247
  • IMG_20180226_172100564.jpg
    IMG_20180226_172100564.jpg
    90.9 KB · Views: 250
  • IMG_20180226_172246004.jpg
    IMG_20180226_172246004.jpg
    76 KB · Views: 265

rjrobin2002

Contributor
Bronco Guru
Joined
Oct 13, 2007
Messages
2,716
I have found the door fits better once welded compared to just screws due to more rigidity.
 
OP
OP
904Bronco

904Bronco

Contributor
Bronco Guru
Joined
Sep 28, 2004
Messages
6,042
Loc.
San Martin, CA
So for those of you that are wondering...

I hung the door and fender today and then had to step away to watch my son play JV baseball.

Yes welding the door post in makes it much more rigid and takes a lot of play out of it. Confidence? Blind faith maybe to just go ahead... Or good direction from rjrobin2001 ;D

I went back at it after dinner and everything was very close. I just could not get the upper hinge to come out far enough to match the fender?

So here is something to write down: The plate inside the door post is different from the factory plate. The two outer holes are farther inboard. So I had to support the door, take the upper hinge off, move the plate as far inboard as I could and then take a carbide bit through the hinge bolt holes to trim it. I wish that I had looked at that closer before welding. And it took sometime.

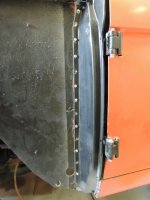
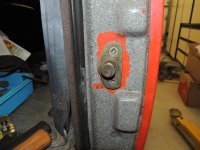
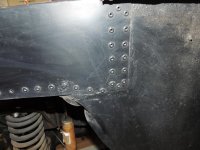
1st picture - shows the post door clearance from the A-pillar. Before it was making contact.
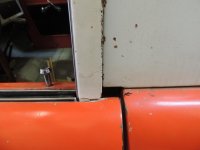
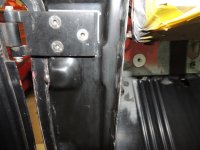
2nd picture - This is how much the hinge had to move outboard. See marker pen marks...

After I got the door to slide out everything just sort of fell into place.
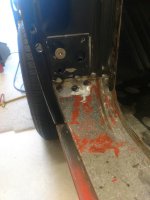
I had to adjust the striker/Nader pin. Clean the the paint off it, run a tap through the threads, reassemble with anti seize.
Make adjustment, lube, readjust...

There still was a little binding, so I put the two stainless washer shims that were there before on the outer bolts. And the binding stopped :) Guessing the Hinges are not quite right.

The Hardtop still needs to move back 1/8" on the drivers side, but the upper door is not making contact. The bolts are out of the top, but I think the old gasket is holding it?

So the next step is to finish welding a number of spots, grind smooth, take the door and fender back off, Primer and some rattle can paint, seam seal, then rehang the door.

Then I have to fix the inner fender dent, remove 7 spot welds, flatten panels, remove the PO's pop rivets, every other one > plug weld back together.

Been an interesting ride so far. Thanks for your help Folks.
*
 

Attachments

  • DSCN4745.jpg
    DSCN4745.jpg
    77.4 KB · Views: 220
  • DSCN4746.jpg
    DSCN4746.jpg
    43 KB · Views: 230
  • DSCN4744.jpg
    DSCN4744.jpg
    90.8 KB · Views: 228
  • DSCN4747.jpg
    DSCN4747.jpg
    125.6 KB · Views: 233
  • DSCN4749.jpg
    DSCN4749.jpg
    91.9 KB · Views: 233
  • DSCN4750.jpg
    DSCN4750.jpg
    72.7 KB · Views: 237
  • DSCN4674.jpg
    DSCN4674.jpg
    82.7 KB · Views: 223
  • DSCN4672.jpg
    DSCN4672.jpg
    101.8 KB · Views: 219
Last edited:

bronkenn

Contributor
Bronco Guy
Joined
Apr 27, 2017
Messages
2,688
Loc.
Southeast Ohio
You done good. The fit looks like a really good starting point when you get ready for final adjustments. Ken
 
Joined
Jul 24, 2018
Messages
21
Loc.
Boca Raton
South East Florida Refrence

I am looking for a restoration shop in the Fort Lauderdale area with experience restoring these classic Broncos. I am in need of body and mechanical support.

Your experienced response would be greatly appreciated.
 

Pa PITT

Contributor
Bronco Guru
Joined
Jul 15, 2005
Messages
11,288
Loc.
Stephenville TEXAS
I need to come back & read this article, but I'd really like to see a post on replacing the post on driver side behind the door. tHE POST THE DOOR LATCHED TOO.
 

ngsd

Contributor
Bronco Guru
Joined
Mar 2, 2019
Messages
2,613
This has been helpful thanks. I begin my door post journey today!
 

Knuck

Jr. Member
Joined
Aug 3, 2015
Messages
159
I did mine back in 1990 or so. I need to redo them on both sides. Going to do new kick panels, floor pans, striker posts, and new quarters at the same time. I did mine before the advent of inexpensive mig welders so mine are currently brazed in, so I have that mess to deal with too. Back when I did mine there wasn't nearly the parts support we have today so hopefully this time around things will go together a bit easier. Going to tackle one side at a time. Will hopefully start this winter sometime when its to crappy to be out doing anything else. :p
 
Joined
Sep 7, 2018
Messages
9
Nice job! Looks like it just need a tiny bit of adjusting and you will be there. May have to do this on my 74 so this is great reference material.
 
Top