- Joined
- Nov 28, 2001
- Messages
- 10,362
I watched a new Monster Mike video the other day on some updates to the James Duff rear plate bumper which reminded me to snap some pictures of a few mods I've done to mine that might be useful or interesting to someone else.
If I'm doing the math correctly, this is the 6th rear bumper I've had on my Bronco over the years and it's my favorite to date - hands down. Construction is top notch and its very functional. I like that the spare tire is mounted low enough that I don't have a huge blind spot on the passenger's side of the truck and the eccentric cam latches work great and don't require adjustment.
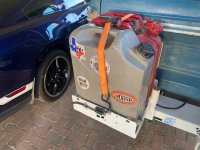
Michael Duff and crew built a custom 2-jerry can carrier for the driver's side of the bumper for me that's easily removable. I only use that carrier when I'm going on longer trips when I want extra gas or my 5 gallon water jug along.
All of our trucks have their own personality traits (quirks and features as Doug DeMuro might say) and mine is no different. Mine seems to have a bit of a vibration in the rearend that causes it to 'bounce' a little bit on certain road surfaces. It's done this over the years with different axle housings, axle shafts, springs, tires, wheels, nothing seems to change the inherent 'feature'. Every year when I get it emissions tested, I watch the rear end run on the rollers and see the up and down motion. That motion translates into vibration/shaking in the spare tire carriers on certain road surfaces.
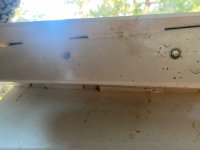
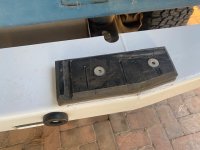
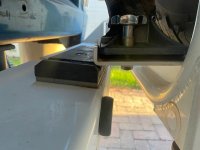
When I got the Duff rear bumper, one thing I *didn't* like is that the spare tire bounced/shook more than on the bumper it replaced. It was enough that you could feel the whole truck moving back and forth and I worried about fatiguing the bumper enough that my spare tire might part company with the truck at some point and end up on the freeway. I knew that to solve it, I'd probably have to increase the vertical seating plane for the tire carrier somehow or add some other restraint on the horizontal surface of the bumper to try and restrain it in 2 planes. I visited Paul at Bent Fab here in Phoenix - he's done a lot of work on my rig in the past 10 years and I've always been pleased with his work. We talked over what I wanted, some potential solutions, and I left the truck for him to go to work on it. He came up with a mounting pad on the bumper that the bottom of the nutsert (more on that later) of the Hi-Lift carrier rides on. It effectively gives the horizontal stabilization to the carrier that I was looking for. It won't win any prizes at the car shows but it works. The shaking was probably reduced by 90% with this simple addition.
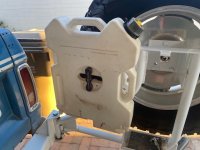
While the truck was at Bent Fab, I also had him fab a bracket to allow me to mount a Rotopax to the carrier. Here in AZ, I like to carry an extra 2 gallons of water with me at all times - might need it for the cooing system for the Bronco or my personal cooling system if I run into trouble in the backcountry. Paul's solution, as typical of his work, is simple, elegant, and looks good. The Rotopax adds just a slight counterweight on the opposing side of the carrier and is mounted as to not interfere with the tailight or the tailgate.
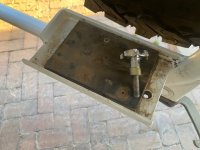
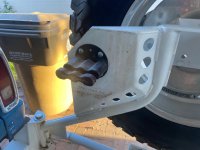
I hate rattles and my Hi-Lift was rattling on the tire carrier as well. Now I know that the ultimate solution for a rattling Hi-Lift is to leave it at home in the garage but in this case, I'd like to still have it along. I found that the jack base didn't quite sit tight down on the bumper plate so I added a couple pieces of rubber sheet (I think it was originally conveyor belt material?) to the base via pop rivets. Coupled with the mounting nut up top, this put the jack in compression to a small degree and quieted it down. I also had noticed the jack base moved around a lot on rough roads so I drilled a hole in the carrier base and installed a nut-sert. I found a small threaded handle on McMaster-Carr, glued a spacer to it for the proper spacing and stuck it through a hole in the jack base and then into the outsert. This keeps the base of the jack in one spot. Jack problems solved.
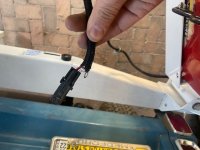
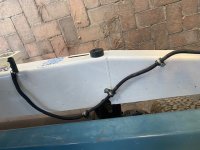
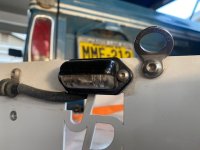
For the jerry can carrier, I added nut-serts for mounting the license plate, tie down rings for the ratchet strap that retains the cans, and a small LED light for the license plate. The wiring attaches to the backside of the bumper using some Adel clamps and I added a single Weatherpack connector in the wiring that easily allows me to disconnect the tailgate plate mount light and hook up the light on the jerry can carrier for the license plate. A long trip to CO for Super Cell in 2020 revealed I need to revise my tie-down locations a bit but otherwise it's solid.
Special thanks to Mike and Suzy for working with me on the custom gas can carrier when I ordered this thing a few years back.
I've attached a few pics that hopefully illustrate a few of the things I've done to the bumper.
Todd Z.
Note: After looking closer at my pictures, I realized that I should add the caveat that my truck is not a show truck. It occasionally get a hose pointed in its general direction, but it's a faded almost 54 year old truck that sees a lot of dirt and not a lot of clean up when I return. So I apologize for the dust/dirt/grime you see in the pictures.
Attachments
-
 IMG_8575.jpg50.7 KB · Views: 104
 -
 IMG_8576.jpg72.2 KB · Views: 96
 -
 IMG_8577.jpg60.3 KB · Views: 90
 -
 IMG_8578.jpg78.6 KB · Views: 94
 -
 IMG_8579.jpg75.5 KB · Views: 91
 -
 IMG_8581.jpg72.2 KB · Views: 93
 -
 IMG_8582.jpg52 KB · Views: 93
 -
 IMG_8584.jpg58.7 KB · Views: 105
 -
 IMG_8583.jpg106.5 KB · Views: 108
 -
 IMG_8585.jpg102.8 KB · Views: 106
Last edited:


