• Welcome to ClassicBroncos! - You are currently viewing the forums as a GUEST. To take advantage of all the site features, please take a moment to register. It's fast, simple and absolutely free. So please join our community today!
    If you have problems registering or can't log into your account, please contact Admin.

Front Axel Bump Stop Frame Mount

NickC24

Contributor
Full Member
Joined
Apr 4, 2017
Messages
171
Hi,

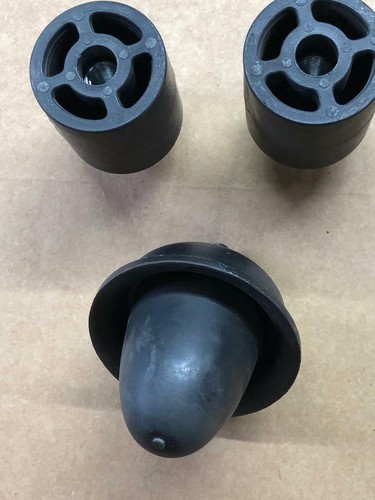
I am running the Duff steering linkage and they require to weld on the track bar riser bracket. That makes it so the axel mounted bump stops don't work because the riser bracket is taller than bump stops. I got the larger rear stop that toms sells and drilled and taped a hole for them in the frame (see pictures).

My questions is are they in the right place. I just centered them on the spring mount as that's the center of where the axel is mounted but looking at them installed it seems like it should be forward a bit more. Anybody have experience with this. My frame is going to powder coat and I want to get this right before so I don't have to fix anything after its back from powder coating.
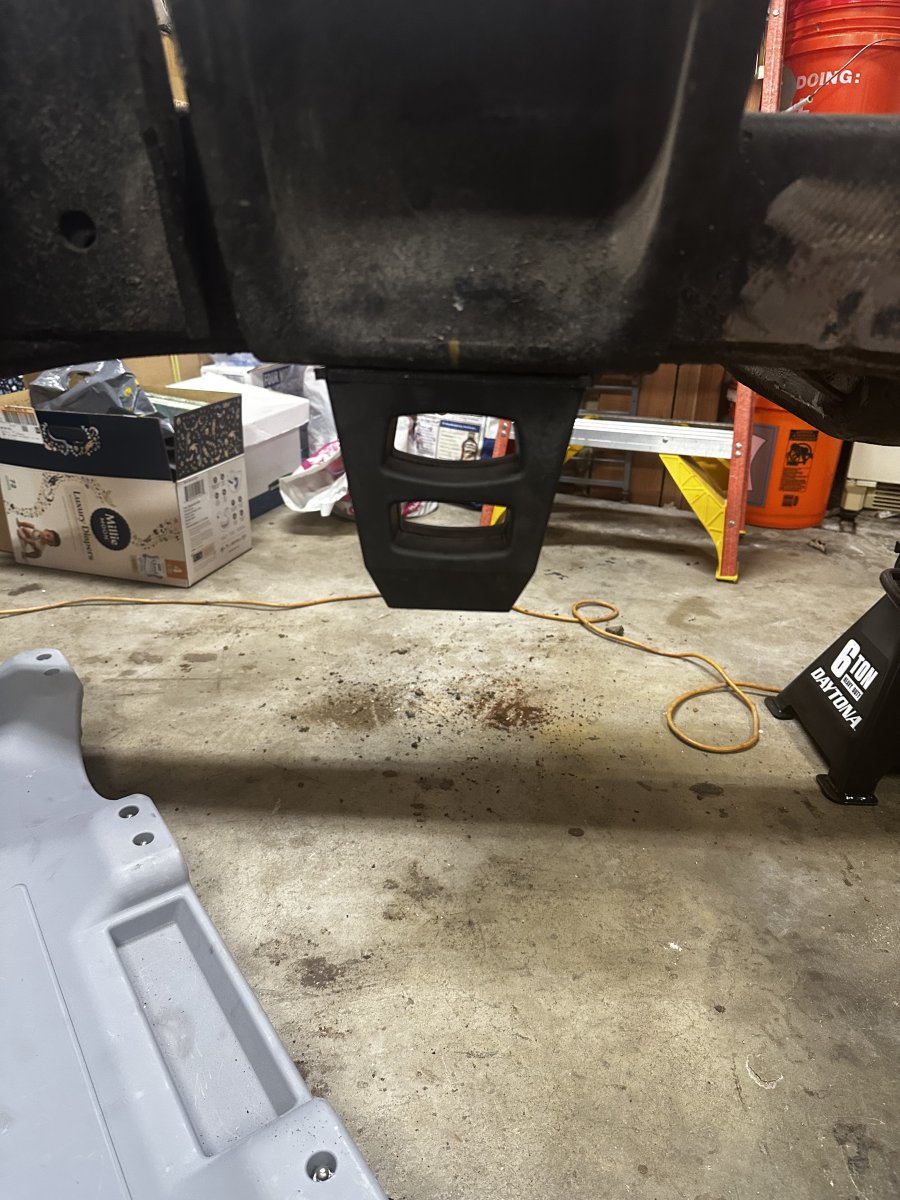

IMG_5422.jpeg
 

Broncobowsher

Total hack
Joined
Jun 4, 2002
Messages
37,067
I bolted the bump stop to my riser bracket. I don't see what would make Duff's so different that it can't be done that way?
 
OP
OP
N

NickC24

Contributor
Full Member
Joined
Apr 4, 2017
Messages
171
I bolted the bump stop to my riser bracket. I don't see what would make Duff's so different that it can't be done that way?
There's not a place to put it on the bracket. And the base for the larger one doesn't fit in the stock location.

IMG_5427.jpeg
 

DirtDonk

Contributor
Bronco Guru
Joined
Nov 3, 2003
Messages
51,619
What about spacing up the stock one? Or even sourcing a rectangular one with a smaller footprint?
If you bolt your larger one to the frame, won’t moving it forward make it bump up against the riser instead of the top of the old mount?
Pretty sure you don’t want it coming down on the riser itself as that would just cut through the bumpstop eventually. Fairly quickly I would think.
Looks awful big on the frame though. Like it’s not leaving you much of travel.

How much lift are you using?
 
OP
OP
N

NickC24

Contributor
Full Member
Joined
Apr 4, 2017
Messages
171
Yeah I was thinking as the radius arm moves up toward he frame when going over a bump it would make the contact point on the frame a little more forward. Kinda like a pendulum or swing. Or maybe im overthinking it and just keeping it center like the stock one is the way to go.

I am running a 2.5" lift.
 

DirtDonk

Contributor
Bronco Guru
Joined
Nov 3, 2003
Messages
51,619
There is some movement, of course, but with the rear of the radius arm semi rigidly mounted to the frame, it’s not much.
Since you don’t have springs in it, and it sounds like things are coming apart again anyway, you might just raise and lower the front axle with a jack to see exactly where it falls.
 

Ol'Blue

Contributor
Bronco Guru
Joined
May 28, 2013
Messages
1,981
Looks close but I would hold off with the bump stops until you have the axle in to confirm location by leaving, the springs/shocks out and moving the axle up as Paul advises. I would also connect the Duff steering linkage just to make sure everything clears before installing springs etc. When I was mocking mine up, I was able to trim/notch the metal plate inside the bump stop to allow room for the riser plate and install on the axle, but I was still in need of a spacer or under heavy compression the riser was definitely going to hit the frame.

Here are some pics when I was mocking mine up for the riser and tie rod over that may help. Although I put that plan on hold as there was other clearance issue that you shouldn't have if you are not doing TRO.
 

Attachments

  • IMG_2482 (2).jpg
    IMG_2482 (2).jpg
    63.3 KB · Views: 169
  • IMG_2487 (1).jpg
    IMG_2487 (1).jpg
    74.6 KB · Views: 186
  • IMG_2480.jpg
    IMG_2480.jpg
    55.2 KB · Views: 154

Broncobowsher

Total hack
Joined
Jun 4, 2002
Messages
37,067
The front is so easy to leave the springs out and do articulation tests. Always worth it. Gain a little travel here, limit travel (and damage) there. Up, down, articulated, and sweep the steering while doing all the above. If you have an issue now, so much easier to fix it now and not later after you are committed in so many different areas. Really sucks to cut a tire and crunch sheetmetal that a little spacing would have prevented.
 

Oldtimer

Contributor
Jr. Member with Sr. moments
Joined
Feb 4, 2005
Messages
1,795
Loc.
Sunnyvale, CA
I used long allen head set screw and a coupling nut to lengthen stud on stock bump stop.
Cut spacers out of 1/2 aluminum plate with hole saw, drilled center hole to clear coupling nut, and stacked to add 1" to stop. Use allen wrench to hold stud when tightening nut.

2023-10-17_181325.jpg


2023-10-17_181236.jpg
 

catfan

Contributor
Sr. Member
Joined
Jul 1, 2016
Messages
358

migs

Sponsor/Vendor
Bronco Guru
Joined
Nov 12, 2011
Messages
1,451
A while back I happened to notice the rear bump stops on a 2007 F250..... I've been using them as front bump stops now on multiple Bronco builds ever since.
They are round, taller than stock and have a center mounting stud. I mostly use them in the factory location on the axle but one time I did make some custom provisions to weld to the frame to mount them above. As has been mentioned I mocked it up by cycling the suspension with the springs removed to determine where they needed to go. That Bronco did have long arms, and other things can vary as well, but they did end up just slightly forward of center on the spring mount towers.
Another important reason to cycle the suspension.... to make sure that the bump stops are sufficient enough to keep the track bar from potentially crushing the oil pan under full compression, as a track bar riser typically moves the track bar up closer as compared to a drop bracket.

Here's some pictures of the F250 bump stops mounted on the axle, the pieces I made to weld on and mount them up on the frame rails, and then mounted up there.
IMG_5103.JPG IMG_7206.jpg IMG_7208.jpg IMG_9072.JPG
 

Broncobowsher

Total hack
Joined
Jun 4, 2002
Messages
37,067
Those are microcellular bumpstops. Many manufacturers are running them these days. They are a lot more progressive than the old rubber ones. The hardest are the fancy urethane stops. When I ran those I made sure to get the ones with the air slots, just so they would have a little give. I think I have a set out of a Transit Connect on one of my projects.

If you want to get all fancy, they are tune-able as well. https://www.speedwaymotors.com/Search?query=bump stop&facet=GA_Brand:Speedthane
Both height and hardness.

My general setup is to factor that a bumpstop will squish about 50% of its original height on a hard hit. Use that when checking suspension travel.
I also do suspension stroke check with the shocks in place. You get to see if they are limited in any number of ways (compression, extension, mounts binding, general interference, etc.) I once found the shocks were the compression limiter, so shimmed the bumpstops down just a little.
 
Top