• Welcome to ClassicBroncos! - You are currently viewing the forums as a GUEST. To take advantage of all the site features, please take a moment to register. It's fast, simple and absolutely free. So please join our community today!
    If you have problems registering or can't log into your account, please contact Admin.

Heater air intake box rebuild question

Jfryjfry

Sr. Member
Joined
Aug 28, 2017
Messages
503
My apologies if this has been answered already. I searched and couldn’t find anything.

We just got our truck back from the body shop after nearly a year and I fear that I will have a lot of questions but this will be my official first one with the rebuild.

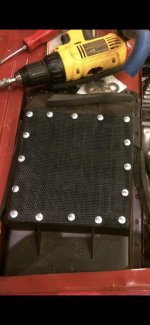
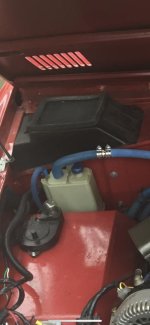
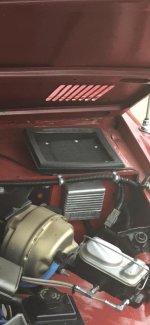
I took the heater air intake box off of the passenger side and while the truck was gone I drilled out the rivets to repaint and clean up the rusty metal part of it. Now that I’m about to reassemble it I am planning on riveting the cover back on with regular rivets that protrude on the bottom about an eighth of an inch. My question is this: when the hood shuts, does it push the box down onto the cowl?

The Rivets I’m using are longer than the factory ones I drilled out and I don’t want them digging into the cowl when the hood is shut. For reasons too ridiculous to describe here I can’t get the fender off right away to check myself. Thanks!
 
Last edited:

904Bronco

Contributor
Bronco Guru
Joined
Sep 28, 2004
Messages
6,017
Loc.
San Martin, CA
I use button head SS screws facing down with SS lock nuts on top...

Typically the fender side of the air box is held pretty tight to the cowl, the other end toward the center may sit up just a tad and be pushed down by the hood closing. But every Bronco is different.

You could put a little dab of black silicon on the rivets down side to add some cushion?
 

hankjr

Contributor
Bronco Guru
Joined
May 11, 2013
Messages
1,761
I used the sort of rivets that split out when pulled with the head of the rivet on the cowl side. i will run some rubber tape over the heads before mounting. i also made a little screen assy to go on the inside to keep junk from getting inside.

Hank
 

DirtDonk

Contributor
Bronco Guru
Joined
Nov 3, 2003
Messages
49,308
Did you post up pics anywhere of your custom screens Hank?
Lots of different ways to do it, but we're always looking for good ones. There used to even be some for sale by manufacturers, but some were not very good, others fell by the wayside, and with most EB owners at the time kind of ignoring them, probably nobody sold many of them anyway.

But anytime someone comes up with a new mousetrap, it's good to see.

Thanks

Paul
 

hankjr

Contributor
Bronco Guru
Joined
May 11, 2013
Messages
1,761
Did you post up pics anywhere of your custom screens Hank?
Lots of different ways to do it, but we're always looking for good ones. There used to even be some for sale by manufacturers, but some were not very good, others fell by the wayside, and with most EB owners at the time kind of ignoring them, probably nobody sold many of them anyway.

But anytime someone comes up with a new mousetrap, it's good to see.

Thanks

Paul

I will get some pics this weekend and post them. i need to mock up something similar for the drivers side soon.

Hank
 

hankjr

Contributor
Bronco Guru
Joined
May 11, 2013
Messages
1,761
here are the pics i found. i made a frame, welded it, including nuts in the 4 corners, and then hot glued screen to the frame and painted it. Maybe not the classiest but it will keep the crud out.

also a pic of the rivets i used.

screen 1.jpg

screen 2.jpg

screen 3.jpg

screen 4.jpg

Hank
 

Crush

Contributor
Bronco Guru
Joined
May 30, 2007
Messages
3,463
Loc.
Greenbottom, WV
I used some pet resistant window screen, because that is what i had layin around. Cut it a little large, about 1” extra all the way around then folded the edges under and button head screwed them down. On the passenger side i glued down the seal right over top of the button head screws. Keeps everthing but water out. Lol
 

Attachments

  • F7CA3CAD-C6E3-4D49-A0C5-3E4F1B7C1E20.jpg
    F7CA3CAD-C6E3-4D49-A0C5-3E4F1B7C1E20.jpg
    64.1 KB · Views: 96
  • C0E8E9D7-2934-4DB0-AABC-0F86D58B31C9.jpg
    C0E8E9D7-2934-4DB0-AABC-0F86D58B31C9.jpg
    41.1 KB · Views: 54
  • 257AE5F6-1875-4568-9143-021882E3EEE3.jpg
    257AE5F6-1875-4568-9143-021882E3EEE3.jpg
    52.3 KB · Views: 51
OP
OP
J

Jfryjfry

Sr. Member
Joined
Aug 28, 2017
Messages
503
I wanted the clean look of the river head showing but after grinding the tails down a bit and affixing a rubber spacer to keep the metal off of the cowl, it was too tall.

So I just put new rivets in with the tails up and a piece of tape across the river heads as previously described. The only thing now is that it is still tall enough that the hood just starts to hit it when it is shut and I have no room for the foam gasket between the hood and the intake.

I’ll probably just leave it off but I wish there was more room.
 
Top