• Welcome to ClassicBroncos! - You are currently viewing the forums as a GUEST. To take advantage of all the site features, please take a moment to register. It's fast, simple and absolutely free. So please join our community today!
    If you have problems registering or can't log into your account, please contact Admin.

Help with direction on sheet metal replacement after trans swap

guidoverduci

Contributor
Sr. Member
Joined
Mar 8, 2012
Messages
731
Loc.
NorCal
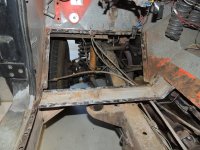
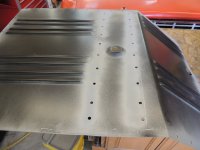
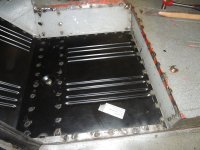
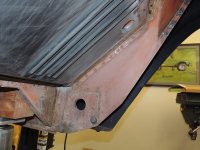
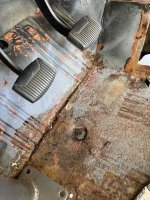
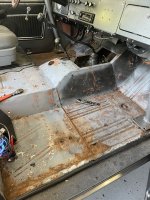
I’m going to be doing a trans swap, but eventually I have some sheet metal I need to replace. To me, most seems salvageable except there’s a decent sized gap between drivers floor pan and lower firewall panel. Definitely the worst spot and the PO filled it with something that just peels right out. My question… What’s the best course of action here after trans replacement. I’d like to get a solid tunnel piece, since there were access panels cut out, and I’d like to fix that gap. This isn’t a show rig, but I definitely plan on treating and painting to help stop the rust from getting worse.

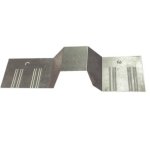
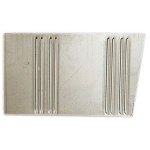
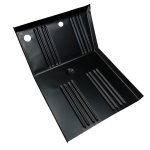
Do I replace with the floor and center pan section, along with a lower firewall panel? Or a different combo? Or patches? I’m not a sheet metal guy, so I’ll be looking for someone to help do this for me. Also… can this all be done with body on the frame? Thanks!
 

Attachments

  • 719106D8-AC36-4FFA-B242-FC3975C41FAE.jpeg
    719106D8-AC36-4FFA-B242-FC3975C41FAE.jpeg
    321.3 KB · Views: 79
  • 7F3FC196-47FB-4DA8-9FF4-F5FDD7579A0F.jpeg
    7F3FC196-47FB-4DA8-9FF4-F5FDD7579A0F.jpeg
    39.6 KB · Views: 51
  • 4E962D7B-9DFA-462F-8511-05B91808349D.jpeg
    4E962D7B-9DFA-462F-8511-05B91808349D.jpeg
    79.5 KB · Views: 67
  • 90D8A32A-C0E4-4729-9687-B9266B82C819.jpeg
    90D8A32A-C0E4-4729-9687-B9266B82C819.jpeg
    42.8 KB · Views: 60
  • 8F2F1EED-9034-4CAF-8024-0EDE7CABDD98.jpeg
    8F2F1EED-9034-4CAF-8024-0EDE7CABDD98.jpeg
    317.7 KB · Views: 57

904Bronco

Contributor
Bronco Guru
Joined
Sep 28, 2004
Messages
5,951
Loc.
San Martin, CA
My personal take is, without seeing it in person, that you need to cut out the old pieces leaving a lip to reattach the replacement panel to...
(The panel is from Tom's) Apply seam sealer top and bottom. Take pictures so if you decided to sell it some day, no one claim BS on you....
Examples...

The 3 spd shifter hole, patch it rather than replace the whole section, if that is all it needs.
 

Attachments

  • DSCN4647.JPG
    DSCN4647.JPG
    246.4 KB · Views: 62
  • DSCN4658.JPG
    DSCN4658.JPG
    155.7 KB · Views: 73
  • DSCN4663.JPG
    DSCN4663.JPG
    208.1 KB · Views: 59
  • DSCN5198.JPG
    DSCN5198.JPG
    178.8 KB · Views: 59

kman67

Contributor
Jr. Member
Joined
Apr 8, 2005
Messages
115
Loc.
Aptos
My personal take is, without seeing it in person, that you need to cut out the old pieces leaving a lip to reattach the replacement panel to...
(The panel is from Tom's) Apply seam sealer top and bottom. Take pictures so if you decided to sell it some day, no one claim BS on you....
Examples...

The 3 spd shifter hole, patch it rather than replace the whole section, if that is all it needs.

Looks good Doug. Did you use a spot weld drill bit over the cross brace or air chisel? I’m going to be replacing some floor pans this winter and getting ideas.


Sent from my iPhone using Tapatalk
 

904Bronco

Contributor
Bronco Guru
Joined
Sep 28, 2004
Messages
5,951
Loc.
San Martin, CA
Looks good Doug. Did you use a spot weld drill bit over the cross brace or air chisel? I’m going to be replacing some floor pans this winter and getting ideas.


Sent from my iPhone using Tapatalk
Spot weld drill bit with replaceable cutters... Some prying, air chisel might be a tad aggressive.
 
Top