
• Welcome to ClassicBroncos! - You are currently viewing the forums as a GUEST. To take advantage of all the site features, please take a moment to register. It's fast, simple and absolutely free. So please join our community today!
    If you have problems registering or can't log into your account, please contact Admin.

Liftgate assembly

Torkman66

Contributor
Sr. Member
Joined
Apr 3, 2022
Messages
854
Loc.
New Braunfels, Tx
Been almost 2 years since I broke down the lift gate mechanism. I know there are two pins on each side that need to go into strikers and spring but cant remember how it looks. At help or pics would be appreciated.

 

gnsteam

Contributor
Bronco Guru
Joined
Jan 29, 2010
Messages
4,148
Loc.
Lincoln NE
Here are some pre-disassembly pictures I took.
 

Attachments

  • PXL_20211010_161719755.jpg
    PXL_20211010_161719755.jpg
    123.7 KB · Views: 354
  • PXL_20211010_162556689.jpg
    PXL_20211010_162556689.jpg
    149.4 KB · Views: 377
  • PXL_20211010_162559520.jpg
    PXL_20211010_162559520.jpg
    145.3 KB · Views: 400
  • PXL_20211010_162545685.jpg
    PXL_20211010_162545685.jpg
    136.9 KB · Views: 369
  • PXL_20211010_162549682.jpg
    PXL_20211010_162549682.jpg
    132.6 KB · Views: 361
  • PXL_20211010_162611831.jpg
    PXL_20211010_162611831.jpg
    126.8 KB · Views: 309
  • PXL_20211010_162603852.jpg
    PXL_20211010_162603852.jpg
    138.7 KB · Views: 350
  • PXL_20211010_162608337.jpg
    PXL_20211010_162608337.jpg
    113.2 KB · Views: 378
OP
OP
Torkman66

Torkman66

Contributor
Sr. Member
Joined
Apr 3, 2022
Messages
854
Loc.
New Braunfels, Tx
Thanks so much that really helps. I know there is a second friction pin under the spring. Wished someone had a DIY video on this. Once I figure it out I’ll post the process. Your pics are very helpful.
 

gnsteam

Contributor
Bronco Guru
Joined
Jan 29, 2010
Messages
4,148
Loc.
Lincoln NE
I'm going to be reassembling mine this week. I'm not good at video production but I could post some more pictures.
 

AZ73

Bronco Guru
Joined
Mar 28, 2012
Messages
3,813
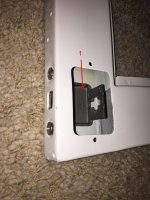
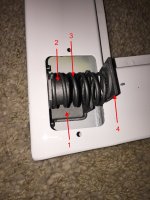
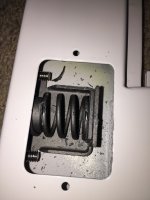
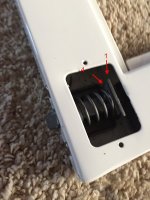
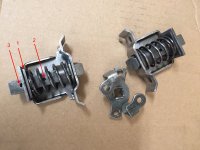
You must put the housing (1) in first, then put the spring base (2), spring (3), and spring plate (4) in. The spring plate goes on the inside of the housing. Make sure the little tab on it is facing up and towards the rod end. (see the tab in GNSTEAM 4th picture ending in 685). My third picture is the finished spring set-up.

IMG_6849.JPG IMG_6850.JPG IMG_6852.JPG

Next, insert the bolt through the frame, housing, and spring.
IMG_6855.JPG
Next insert a roll pin through the spring and in hole #2 in my picture 5.
IMG_6847.JPG

Next slide the handle rod through the handle hole at the center of the lift gate. There are 2 different sizes. I don't recall which side gets the longer rod but it's pretty obvious when you look at the set up. Insert the end into the "fork" of the bolt.

Now the exciting part: You must slide the spring plate up to the roll pin (#2 my picture 5) already in the bolt, then line up the rod roll pin hole with elongated hole in the fork of the bolt (#3 my picture 5) and insert another roll pin. GNSTEAM 4th picture ending in 685 shows you what it looks like when done.

If you have any additional questions don't hesitate to ask.
 
Last edited:
OP
OP
Torkman66

Torkman66

Contributor
Sr. Member
Joined
Apr 3, 2022
Messages
854
Loc.
New Braunfels, Tx
Thank you. I’m certain this will assist many people. I’m assuming the unit won’t fit through the opening if assembled outside of lift gate?
 

AZ73

Bronco Guru
Joined
Mar 28, 2012
Messages
3,813
Well now that I think about it, you can probably assemble up to picture #3 before and then install it, but you can't put the bolt in until the housing is in the opening. Won't fit. It's been a while since I did it but I believe I installed the housing first to hold it in place while I compressed the spring. But you can certainly try and compress it into the housing while it's out.
 

gnsteam

Contributor
Bronco Guru
Joined
Jan 29, 2010
Messages
4,148
Loc.
Lincoln NE
You must put the housing (1) in first, then put the spring base (2), spring (3), and spring plate (4) in. The spring plate goes on the inside of the housing. Make sure the little tab on it is facing up and towards the rod end. (see the tab in GNSTEAM 4th picture ending in 685). My third picture is the finished spring set-up.

View attachment 935601 View attachment 935602 View attachment 935603

Next, insert the bolt through the frame, housing, and spring.
View attachment 935604
Next insert a roll pin through the spring and in hole #2 in my picture 5.
View attachment 935600

Next slide the handle rod through the handle hole at the center of the lift gate. There are 2 different sizes. I don't recall which side gets the longer rod but it's pretty obvious when you look at the set up. Insert the end into the "fork" of the bolt.

Now the exciting part: You must slide the spring plate up to the roll pin (#2 my picture 5) already in the bolt, then line up the rod roll pin hole with elongated hole in the fork of the bolt (#3 my picture 5) and insert another roll pin. GNSTEAM 4th picture ending in 685 shows you what it looks like when done.

If you have any additional questions don't hesitate to ask.
Thanks AZ73, for posting your pictures. I may not get to mine this week as I thought.
 

gnsteam

Contributor
Bronco Guru
Joined
Jan 29, 2010
Messages
4,148
Loc.
Lincoln NE
I was able to get my lift gate assembled yesterday. And I have a few pictures to add to the thread for reference. I try to post them in sequence as assembled.
06e5283a-1c49-4a08-91a1-edfb33e85f8a-1_all_4660.jpg
06e5283a-1c49-4a08-91a1-edfb33e85f8a-1_all_4658.jpg
06e5283a-1c49-4a08-91a1-edfb33e85f8a-1_all_4661.jpg
06e5283a-1c49-4a08-91a1-edfb33e85f8a-1_all_4657.jpg
06e5283a-1c49-4a08-91a1-edfb33e85f8a-1_all_4663.jpg
06e5283a-1c49-4a08-91a1-edfb33e85f8a-1_all_4665.jpg
06e5283a-1c49-4a08-91a1-edfb33e85f8a-1_all_4664.jpg
06e5283a-1c49-4a08-91a1-edfb33e85f8a-1_all_4667.jpg
06e5283a-1c49-4a08-91a1-edfb33e85f8a-1_all_4675.jpg
06e5283a-1c49-4a08-91a1-edfb33e85f8a-1_all_4674.jpg
06e5283a-1c49-4a08-91a1-edfb33e85f8a-1_all_4670.jpg
06e5283a-1c49-4a08-91a1-edfb33e85f8a-1_all_4673.jpg
06e5283a-1c49-4a08-91a1-edfb33e85f8a-1_all_4678.jpg
 
OP
OP
Torkman66

Torkman66

Contributor
Sr. Member
Joined
Apr 3, 2022
Messages
854
Loc.
New Braunfels, Tx
Assembled the lift gate. All your pics made it very easy. Couple things I learned helped.
I used a simple clamp to compress spring and plate in order to install rod pin.
IMG_9157.jpeg


I also use fuel line wrapped around the rods to stop any “rattling” sounds. Just cut the length of the fuel line in a spiral. That keeps it on the rod nice.
IMG_9158.jpeg


Finally, I used nutserts on the mounting hinge plates. Makes it much easier to mount.
IMG_9159.jpeg


Overall, pretty easy job. Thanks for everyone’s assistance!
 

76 MS. bronco

New Member
Joined
Sep 9, 2009
Messages
16
Loc.
Brandon
I feel like my wild horse rods are to long. I’m wondering if I have something in wrong, like the handle mechanism. Does anyone have a video of installing it.
 

Broncoguy55

New Member
Joined
Nov 22, 2025
Messages
2
We are trying to fix our liftgate right this minute and we are having trouble with finding where the pins go. It look just like this it’s on our classic bronco
 
Top