• Just a reminder that you won't be able to start new posts or reply to existings posts in the Archive forum.

    This is where all the old posts go so they can still be used for reference and searched.
  • Welcome to ClassicBroncos! - You are currently viewing the forums as a GUEST. To take advantage of all the site features, please take a moment to register. It's fast, simple and absolutely free. So please join our community today!
    If you have problems registering or can't log into your account, please contact Admin.

Mass Confusion Build. After 2 1/2 years It started!!

OP
OP
71massbronco

71massbronco

Bronco Guru
Joined
Mar 13, 2011
Messages
1,321
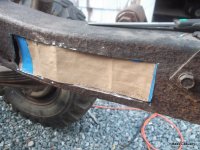
Finishing up with the temp frame. I have a VERY thick coat of paint that I want to bring down to the metal. Don't know what kind of primer they used, but man it is THICK almost like a thin layer of bondo. Body guys, do you know what this could be? When i wire wheeled through it to see what I was up against, it dusted up like bondo would. At first I thought I had just hit a spot of bondo but it was on like a layer of paint. Really now considering getting it professionally blasted.
 
OP
OP
71massbronco

71massbronco

Bronco Guru
Joined
Mar 13, 2011
Messages
1,321
It's been a while.

My FIL has been ill so I have had KID duty while the wife visits her dad in the hospital. So time on the Bronco has been limited. But I have managed to sneak in a little love now and then. Also picked up a bench grinder from HF to put a shine on the rusty parts. Attached a wire wheel to make things PERTY. Worked pretty good, now on with the pics of the build (or destruction).
 

Attachments

  • DSCF0268.jpg
    DSCF0268.jpg
    63.4 KB · Views: 185
  • DSCF0282.jpg
    DSCF0282.jpg
    51 KB · Views: 167
  • DSCF0279.jpg
    DSCF0279.jpg
    204.8 KB · Views: 164
  • DSCF0278.jpg
    DSCF0278.jpg
    219.1 KB · Views: 169
  • DSCF0275.jpg
    DSCF0275.jpg
    216.4 KB · Views: 161
  • DSCF0274.jpg
    DSCF0274.jpg
    213.1 KB · Views: 164
  • DSCF0272.jpg
    DSCF0272.jpg
    253.1 KB · Views: 179
  • DSCF0269.jpg
    DSCF0269.jpg
    226.8 KB · Views: 181
  • DSCF0281.jpg
    DSCF0281.jpg
    153.9 KB · Views: 158

sgtdcoulter

Sr. Member
Joined
Jun 15, 2010
Messages
692
Loc.
Peachtree City Ga.
Great thread, makes me not want to pull mine down, just bash it till all the hard work is done and nothing but thin air remains! Keep the pics coming, I,m loving it!
 
OP
OP
71massbronco

71massbronco

Bronco Guru
Joined
Mar 13, 2011
Messages
1,321
Great thread, makes me not want to pull mine down, just bash it till all the hard work is done and nothing but thin air remains! Keep the pics coming, I,m loving it!

Yeah, seems everytime I start to cut into it I am like "ahh s*#@, I will just buy THAT replacement panel." Then I find another one beyond repair.

My ailing FIL used to own a bodyshop and now the place is just collecting dust. His son sometimes goes in to mess around but it is basically an abandoned shop fully stocked with tools! I would move the operation to the shop but then my wife would never see me. It's killing me. His compressor tank is the size of a small car. When I get to paint stage and the Mass Casualty is running, I will shoot it over there. Plus it perks the old man up when I show him pics of the Bronco and ask him if I can use the shop.:D

Update on my Father in Law: Sadly, eight days after I posted this he passed away. RIP Euclide "Babe" Melanson.
 
Last edited:
OP
OP
71massbronco

71massbronco

Bronco Guru
Joined
Mar 13, 2011
Messages
1,321
Things are getting ready to roll. I just did a punch list last night and ordered my inner fenders from JBG yesterday. Just need to get a lower window cowl frame, and the body work completion can begin! Also need to go pick up the brake at my FIL's shop to bend some sheet metal, and it's FAB time.;)
 
OP
OP
71massbronco

71massbronco

Bronco Guru
Joined
Mar 13, 2011
Messages
1,321
So I decided to do a little work on the frame. Half of the supports had the typical Bronco corrosion so I decided to follow the tech article on how to fix these. I had to go to my local steel supplier to get the right size washers and while I was there picked up some plate for another frame patch that needed to be placed. My welding skills were hit and miss, some turned out better then others but over all, all will hold sufficiently and anything is better then what was there before. I thought this would be a more daunting task then it was, but just took some time and patience. I am still learning to weld, so be gentle. I took the grinder to a couple of spots and surprisingly, my cheapo HF welder had good penetration.

My first attempt, I wire wheeled the surface. but ended up switching to the grinder. My surface was just too contaminated for a good weld. Got better results after doing the prep with the grinder. After doing all the mount points, I covered it with some spare rattle can flat black to prevent flash rust, since I am leaving the frame outside for now. Definitely, if I can do this repair, anyone can!

Enjoy the pics. ;D
 

Attachments

  • DSCF0290.jpg
    DSCF0290.jpg
    118.7 KB · Views: 158
  • DSCF0288.jpg
    DSCF0288.jpg
    189.3 KB · Views: 157
  • DSCF0287.jpg
    DSCF0287.jpg
    124.4 KB · Views: 169
  • DSCF0283.jpg
    DSCF0283.jpg
    142.5 KB · Views: 162
  • DSCF0294.jpg
    DSCF0294.jpg
    148.5 KB · Views: 168
OP
OP
71massbronco

71massbronco

Bronco Guru
Joined
Mar 13, 2011
Messages
1,321
Now on to the next frame repair. Next to the gas tank the frame had been chewed thru so thought I should take care of this as well. Since I just finished with the frame mounts, on to a little more challenging task. I cut out the offending portion beginning with my sawzall. Hmmm. After almost breaking my elbow twice from kickback decided to switch to my grinder with a cutoff wheel. Ahhhh, much nicer. Was so focused on trying to get a straight cut (which I didn't succeed at) that almost wore down my wheel to the bone.:eek: I would caption that pic of the cut off wheel as "Tunnel Vision". I then made a template, soapstoned my plate, and proceded to go through another wheel.%) I then finessed the plate by taking some edge off with the bench grinder until I got it to fit. The sun was going down on me and my lighting in that area is weak so my weld was sloppy, but got the job done. I grinded it down. The pic is pretty forgiving, but there are gaps here and there that I will take of tomorrow to make it solid.

More pics....SUUUWeeet! (My four old son took the first PIC for me.:))
 

Attachments

  • DSCF0311.JPG
    DSCF0311.JPG
    250.6 KB · Views: 181
  • DSCF0308.JPG
    DSCF0308.JPG
    242.5 KB · Views: 177
  • DSCF0306.JPG
    DSCF0306.JPG
    219.4 KB · Views: 149
  • DSCF0305.JPG
    DSCF0305.JPG
    226.9 KB · Views: 152
  • DSCF0304.JPG
    DSCF0304.JPG
    260.4 KB · Views: 154
  • DSCF0300.JPG
    DSCF0300.JPG
    227.8 KB · Views: 170
  • DSCF0299.JPG
    DSCF0299.JPG
    175.8 KB · Views: 157
  • DSCF0298.JPG
    DSCF0298.JPG
    225.4 KB · Views: 184

Stutsmo

Contributor
Bronco Guru
Joined
Jan 24, 2009
Messages
2,549
That patch looks pretty good. Way better than I could do!
 
OP
OP
71massbronco

71massbronco

Bronco Guru
Joined
Mar 13, 2011
Messages
1,321
That patch looks pretty good. Way better than I could do!

Thanks, It looked pretty scary before I grinded it down. I really need to pop for a MIG welder. Just don't have the $$ right now, so this will have to do.
 
OP
OP
71massbronco

71massbronco

Bronco Guru
Joined
Mar 13, 2011
Messages
1,321
More fiddlin' today. Got some goodies from JBG. I had two inner fenders and a rocker shipped to me and was surprised at the lack of packing finesse for the rocker. If I was a picky sob expecting a scratch free part, I would have been sending it back. But I am not. For future ref, guys, maybe a little bubble wrap would have been in order.;D Any who I mocked up my radiator support to the inner fenders and all looked pretty good.

Got the glass grill, and the stock grill to see the comparison. I really like the original grill and think I am going to stay with it. So started bending some metal back into it's "as original as I can get it to look" shape. Being a novice body guy, I was pretty pleased with the results. I even knocked a couple of dents out that was originally covered by bondo. Shot a little PB blaster into the hood mech and it is slowly coming to life. Took out the running lamp assemblies and ran one through the wire wheel to buff it up. The running lights pic is the before and after. Let's go to the replay.....
 

Attachments

  • DSCF0340-1.jpg
    DSCF0340-1.jpg
    32.8 KB · Views: 126
  • DSCF0339-1.JPG
    DSCF0339-1.JPG
    222 KB · Views: 128
  • DSCF0338-1.jpg
    DSCF0338-1.jpg
    32.5 KB · Views: 123
  • DSCF0337-1.JPG
    DSCF0337-1.JPG
    161.6 KB · Views: 118
  • DSCF0333-1.JPG
    DSCF0333-1.JPG
    182 KB · Views: 119
  • DSCF0327-1.jpg
    DSCF0327-1.jpg
    57.3 KB · Views: 111
  • DSCF0323-1.JPG
    DSCF0323-1.JPG
    220.1 KB · Views: 113
  • DSCF0313-1.JPG
    DSCF0313-1.JPG
    194.3 KB · Views: 112
  • DSCF0341-1.JPG
    DSCF0341-1.JPG
    166.6 KB · Views: 123
OP
OP
71massbronco

71massbronco

Bronco Guru
Joined
Mar 13, 2011
Messages
1,321
Today, got set to work on the Bronco, realized I would need some additional tools to progress the build and since it was tax free weekend here in Mass, good excuse to buy some. Picked up a chain hoist,and brake press. Also had to get some re-enforcement lumber so my roof joists don't come crashing down. I made a red neck gantry crane that took the weight of my Bronco frame with the motor in it! I was pleasantly surprised with it's stability. Also took the exhaust pipe off, removed the brake lines from the frame took off the rear drive, removed the hoses and electrical from the motor. I didn't take any pics, camera battery was dead. :p
 
OP
OP
71massbronco

71massbronco

Bronco Guru
Joined
Mar 13, 2011
Messages
1,321
Your state has a tax free weekend? How often does that happen?
About once or twice a year. They do it to try to stimulate the local economy. New Hampshire just laughs at us, no sales tax there, ever. I love NH. I am trying to talk the wife into moving north:cool:
 

tasker

Contributor
all knowing of nothing
Joined
Jun 2, 2006
Messages
20,878
Loc.
NH
no we don't.....i work in the Commonwealth...makes me cry
 
OP
OP
71massbronco

71massbronco

Bronco Guru
Joined
Mar 13, 2011
Messages
1,321
Battery recharged, pics ready for viewing. Nothing too exciting.:cool:
 

Attachments

  • engine2.jpg
    engine2.jpg
    210.3 KB · Views: 131
  • engine1.jpg
    engine1.jpg
    241.1 KB · Views: 140
OP
OP
71massbronco

71massbronco

Bronco Guru
Joined
Mar 13, 2011
Messages
1,321
I was in the garage trying to bang out u joints on the front drive shaft and cussing out the long retired Bronco engineers for not supplying a couple of U bolts like they did in the rear axle when I finally realized, that they actually did.%) I was just too lazy to bend down a little bit more and look. To my defense, they were camouflaged very well with dirt and grease.

So I got the front driveshaft removed, took out the transfer case mount bolts, and engine mount nuts. Good to go. Put my hoist to the test and it passed. Got a little over enthusiastic and pushed the frame out of the way, and for some unknown reason, thought it would be a good idea to lower the engine down. Don't worry I didn't drop it all the way down. I guess I was doing a test run to see how easy it would be to put the engine back on by myself. It wasn't too bad, but I will be getting assistance when the real install occurs. I think I am going to go ahead and get a cheapo HF engine stand.

I would post pics, but it mostly aftermath. When I do the hoist for real, I will post for posterity. Best thing now is I can start to get to work on cleaning up my frame. I still have a few small pieces that need to come off. I am having trouble with just one of the nuts that is for the clutch arm assembly on the frame.
 

tasker

Contributor
all knowing of nothing
Joined
Jun 2, 2006
Messages
20,878
Loc.
NH
it's a long winter up here....need a hand gimmie a shout sometime
 
OP
OP
71massbronco

71massbronco

Bronco Guru
Joined
Mar 13, 2011
Messages
1,321
Decided it was time to get out my new nibbler to cut some metal for the inner rockers. Start to go very well, very smooth, nice straight line, then my nibbler started acting weird. Thought maybe it was my inexperience and well, it was because a little retention nut inside broke. I think it controls the reciprocation of the mechanism or something. I was a little bummed, but broke out the jigsaw to finish the cut. I got impatient and kind of screwed up one of the cuts. I can make it work though.

I also bought a small brake from HF but think I have to reserve that for the little pieces to bend. I need to mount it to something solid to get the most out of it.

Then today I went out with the grinder/wirewheel and removed the rust on the rear half of the frame, and rear axle. That was kind of fun, but my arms are still vibrating:p

Got tired of looking at the ugly 30 year old shocks (had to be, they were beyond tired) and decided to put some replacements on that were supplied by my PO.

Wouldn't you know it, I put the breaker bar on the passenger side and roll the nut and the end of the shaft right off the mount. As Yosemite Sam would say #$@!!&*. Add that to the list.
 

Attachments

  • DSCF0373.jpg
    DSCF0373.jpg
    79.5 KB · Views: 100
  • DSCF0375.jpg
    DSCF0375.jpg
    81.2 KB · Views: 98
  • DSCF0376.jpg
    DSCF0376.jpg
    84.3 KB · Views: 104
  • DSCF0379.jpg
    DSCF0379.jpg
    75.8 KB · Views: 108
Top