• Just a reminder that you won't be able to start new posts or reply to existings posts in the Archive forum.

    This is where all the old posts go so they can still be used for reference and searched.
  • Welcome to ClassicBroncos! - You are currently viewing the forums as a GUEST. To take advantage of all the site features, please take a moment to register. It's fast, simple and absolutely free. So please join our community today!
    If you have problems registering or can't log into your account, please contact Admin.

Mazama Father/Son Build '66 (copious amounts of bodywork)

Old Bronco Guy

New Member
Joined
Apr 24, 2011
Messages
79
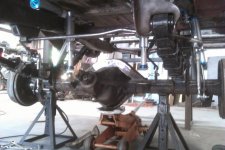
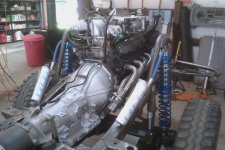
Seems with all the 'dry fitting' we need a large selection of wing nuts. Had those Kings off and on a number of times.;) 
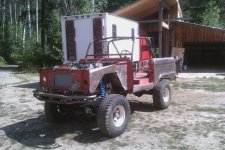
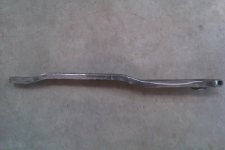
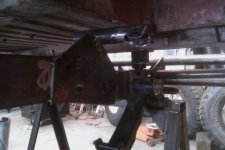
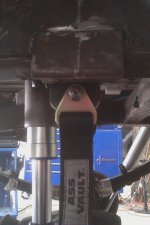
This is the first build since the sale of my offroad shop in 1983. It appears this is gonna work! The drivers side is a lot 'busier' with steering, tracking bar and all. Today it seemed to come together...the Kings, sway bar, bump stop and soon the down travel limit straps. ..gonna take a day off!:p
 
OP
OP
kurtboyd

kurtboyd

Contributor
Jr. Member
Joined
Aug 14, 2010
Messages
274
Loc.
Cave Creek, AZ
Taking the day off. We're going to trailer the project down to a car gathering at friend's shop.
 

Attachments

  • trailering 2.jpg
    trailering 2.jpg
    130.1 KB · Views: 138
  • trailering.jpg
    trailering.jpg
    124.4 KB · Views: 116

Old Bronco Guy

New Member
Joined
Apr 24, 2011
Messages
79
Feels good, back to work on the Bronco today. Fitting the sway bar arm and setting the distance for the r/f bump stop. Tomorrow we should fully articulate the front suspension sway bar and all. Real busy inside those wheelwells. Lots of parts moving. Still waiting...........for the rear Kings to arrive.
 
OP
OP
kurtboyd

kurtboyd

Contributor
Jr. Member
Joined
Aug 14, 2010
Messages
274
Loc.
Cave Creek, AZ
Spent the day working on the passenger side front suspension. We shaped the sway bar arm to get clearance for the coils. We used the coil sliders to measure clearances. Took the coils out of both c/os and jacked the front up so we could reassure that we are bumping before the shocks bottom out. Also started modifying two stock pitman arms to make one drop pitman arm.

After much drama, we hope to have the rear shocks by next Wednesday.
 

Attachments

  • sway bar arm.jpg
    sway bar arm.jpg
    49.4 KB · Views: 65
  • pass front.jpg
    pass front.jpg
    83.4 KB · Views: 79

Old Bronco Guy

New Member
Joined
Apr 24, 2011
Messages
79
.....it all articulates!! Ran the front end through the ups and downs today. Final setting for the bump stops. It's nice to take the coils off the Kings then compression is quite easy. Will order the down limit straps soon. Looks like finally the rear shocks shipped.
Soon be time to remove the body and get at the final areas of welding and lots of clean up.:)
 
OP
OP
kurtboyd

kurtboyd

Contributor
Jr. Member
Joined
Aug 14, 2010
Messages
274
Loc.
Cave Creek, AZ
Worked on the dropped pitman arm today. After much fab work, my father welded the two arms together. Slowly cooling now. In prep for work to begin on the rear suspension, I reinstalled the gas tank and cut the old bump stops off.
 

Attachments

  • pit arm.jpg
    pit arm.jpg
    62.6 KB · Views: 71
OP
OP
kurtboyd

kurtboyd

Contributor
Jr. Member
Joined
Aug 14, 2010
Messages
274
Loc.
Cave Creek, AZ
Got the rear shocks mounted, installed the rear bump stops, and fabricated the perches for the bump stops to land on the axle housing. Shocks are 28 3/4 extended and 18 3/4 collapsed with 10 inches of travel. Made for a challenging install. Started fitting the rear sway bar. Need to get some heim joints for the link pins.
 

Attachments

  • shock ount.jpg
    shock ount.jpg
    70.7 KB · Views: 68
  • perch.jpg
    perch.jpg
    60.7 KB · Views: 65
  • r bump stops.jpg
    r bump stops.jpg
    62.2 KB · Views: 72
  • r shocks 2.jpg
    r shocks 2.jpg
    83 KB · Views: 81
  • r shocks.jpg
    r shocks.jpg
    68.6 KB · Views: 72

Old Bronco Guy

New Member
Joined
Apr 24, 2011
Messages
79
OK, It's dinner time, soon to be 'taco time'. Nearly ready to remove the tub and drive train. Finnish fabrication will be easier. 'Taco' style gusseting will reinforce new mounting locations of shocks, engine and other points.;)
 
OP
OP
kurtboyd

kurtboyd

Contributor
Jr. Member
Joined
Aug 14, 2010
Messages
274
Loc.
Cave Creek, AZ
Had to take a couple weeks off from the Bronco project, but we were back at it today. Fabricated tabs for limit straps front and rear and installed the straps. Also ripped some tubing for cradles for the shock reservoirs. Hope to have the reservoirs installed tomorrow.
 

Attachments

  • front straps.jpg
    front straps.jpg
    85 KB · Views: 66
  • rear strap.jpg
    rear strap.jpg
    73.1 KB · Views: 61
  • rear strap 2.jpg
    rear strap 2.jpg
    62.5 KB · Views: 61
OP
OP
kurtboyd

kurtboyd

Contributor
Jr. Member
Joined
Aug 14, 2010
Messages
274
Loc.
Cave Creek, AZ
Got our reservoir mounts made front and rear and installed them. Also installed the rear anti-sway bar. The anti-sway bar was an artifact of the old build, but we have made some mods to it so that it will work with the current upgrades.

Were getting ready to remove the tub so we can finish welding the frame.
 

Attachments

  • rear sway 2.jpg
    rear sway 2.jpg
    69.2 KB · Views: 86
  • rear sway.jpg
    rear sway.jpg
    91.3 KB · Views: 89
  • shock res 2.jpg
    shock res 2.jpg
    71.9 KB · Views: 88
  • shock res.jpg
    shock res.jpg
    86 KB · Views: 75
OP
OP
kurtboyd

kurtboyd

Contributor
Jr. Member
Joined
Aug 14, 2010
Messages
274
Loc.
Cave Creek, AZ
Fabricated brackets for the transmission cooler and the PS cooler and got them installed. This is the last of the work that needed to be done prior to removing the body. We plan on removing the body on Saturday. Once it's off, we'll have lots of welding to do on the chassis in the spots we couldn't get to during the first part of the build.
 

Attachments

  • Cooler 2.jpg
    Cooler 2.jpg
    91.3 KB · Views: 60
  • Coolers.jpg
    Coolers.jpg
    91.5 KB · Views: 50
OP
OP
kurtboyd

kurtboyd

Contributor
Jr. Member
Joined
Aug 14, 2010
Messages
274
Loc.
Cave Creek, AZ
Removed the tub today. Now we can do the rest of the welding on the chassis. Then disassemble for paint.
 

Attachments

  • body off 5.jpg
    body off 5.jpg
    100.1 KB · Views: 102
  • body off 2.jpg
    body off 2.jpg
    63.9 KB · Views: 93
  • body off.jpg
    body off.jpg
    81.5 KB · Views: 103
  • body off 4.jpg
    body off 4.jpg
    75.8 KB · Views: 96
  • body off 3.jpg
    body off 3.jpg
    105 KB · Views: 97

sgtdcoulter

Full Member
Joined
Jun 15, 2010
Messages
692
Loc.
Peachtree City Ga.
Great build, I just read thru this thread and it is going great, I did have to look at the OD unit for a minute to realize what it was, then figured it out.
I like the Luber look!
But I am partial to that!
Great job w/ the pics also!
Keep it up!
 
OP
OP
kurtboyd

kurtboyd

Contributor
Jr. Member
Joined
Aug 14, 2010
Messages
274
Loc.
Cave Creek, AZ
Started dismantling things today. Did a lot of pick-up welding and grinding. Also built gussets for the rear shock mounts. My dad calls them tacos because they are made of 14 gauge sheet metal and then bent like a taco to fit using a template. So, I guess you could say it's "Taco Time". We are going to make some more when we get to the front.

It was about 90 degrees in Mazama today. We are at 2100ft in the foot hills of the cascades. When you walk out of the shop, you can smell the fragrant pine trees. The forest is very dry right now.

But fall is around the corner. It was 35 degrees here last night. My father is leaving in a few days and will head down south (chasing the 70's) for the next seven months.

I'm going to miss him when he goes, and the warm summer days we have spent in my shop working on the Bronco.
 

Attachments

  • dismantling.jpg
    dismantling.jpg
    86.6 KB · Views: 80
  • taco.jpg
    taco.jpg
    73.4 KB · Views: 87
  • taco 2.jpg
    taco 2.jpg
    69.1 KB · Views: 80
OP
OP
kurtboyd

kurtboyd

Contributor
Jr. Member
Joined
Aug 14, 2010
Messages
274
Loc.
Cave Creek, AZ
Pulled the motor today and did more welding. Installed gussets for the motor mounts we made.
 

Attachments

  • MM Taco.jpg
    MM Taco.jpg
    70.6 KB · Views: 54
  • MM Taco2.jpg
    MM Taco2.jpg
    66.9 KB · Views: 60
  • MM taco3.jpg
    MM taco3.jpg
    81.1 KB · Views: 66
Top