• Welcome to ClassicBroncos! - You are currently viewing the forums as a GUEST. To take advantage of all the site features, please take a moment to register. It's fast, simple and absolutely free. So please join our community today!
    If you have problems registering or can't log into your account, please contact Admin.

Meddle’s (interior) rebuild

Meddle

Contributor
Jr. Member
Joined
Dec 22, 2023
Messages
80
Loc.
Upstate NY
I’m fortunate that my new-to-me 1974 is in sound mechanical order and the exterior is in very good shape. The PO invested wisely with many upgrades to engine, electrical, brakes, exhaust, and paint. The interior, on the other hand… is a gut job. However, I knew this going in and that is in some ways what drew me to this particular sample.

So come along on my modest rebuild of the inside. Everything is out, parts are either here or ordered and it is now time to put her back together!

IMG-0220.jpg
 
OP
OP
Meddle

Meddle

Contributor
Jr. Member
Joined
Dec 22, 2023
Messages
80
Loc.
Upstate NY
In upstate NY, it’s still very much winter with relentless below-freezing temps… and somehow always colder in my garage. So putting the vinyl flooring install and (minor) paint detail on hold for now until more mild temps arrive…in May :(.

Naturally, I decided the first order of business should be none other than sprucing up the rather sad looking j-shifter. The paint on the shifter arm is a bit rough for taste and I certainly don’t feel like going through the hassle or expense of replacing the arm. Since a repaint is out, I’m thinking a stainless sleeve with an ID precisely sized for the OD of the arm might look fine and dandy. Found a 16mm 304 tube on Amazon for $13 that should work okay.

Polished that bad boy to a mirror on my buffer wheel. Cut to length with a pipe cutter. The bend in the arm and the locknut under the knob captures the sleeve. There is no movement. The leather boot hides what’s “beyond the bend”. It’s a tight fit and a tighter look! I also replaced the j-shifter knob with a chromed stainless version to complete the look.

IMG-0210.jpg

IMG-0221.jpg
 

Scoop

Contributor
Have Bronco, Will Travel
Joined
Feb 1, 2006
Messages
10,754
Loc.
Cuchara, CO
Looks good! No interest in twin sticks? Rough paint on the J-shifter is the perfect excuse for twin sticks!! LOL
 

DirtDonk

Contributor
Bronco Guru
Joined
Nov 3, 2003
Messages
48,743
Hmm, you an old Pink Floyd fan, by any chance? :)
Just thinking about your username.
 

DirtDonk

Contributor
Bronco Guru
Joined
Nov 3, 2003
Messages
48,743
An epic album in fact. Got lots of love on the radio back in the day, at least around here.
Especially if you stayed up late. They’d play the full length version of Echoes fairly often.
 

Speedrdr

Contributor
Not so wise OLD owl
Joined
Nov 27, 2017
Messages
1,523
Loc.
Paris, MS
They’d play the full length version of Echoes fairly often.
DJs at the Rock stations around here (late night, anyway) played a LOT of Floyd as the cuts gave them enough time to leave the studio and go outside and burn one. Lol

Randy
 
OP
OP
Meddle

Meddle

Contributor
Jr. Member
Joined
Dec 22, 2023
Messages
80
Loc.
Upstate NY
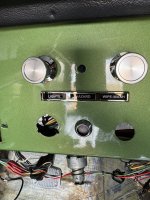
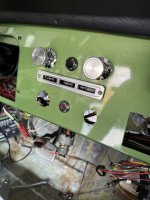
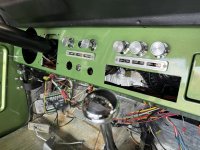
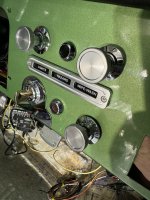
Knobs are coming along. The PO had a mystery toggle switch (non-factory) between the lights and wiper knob. The switch wasn’t wired to anything and I cannot leave the gapping hole. Figured a hazard light might look swell in that location. It’ll matching the brake warning light below for some nice symmetry, but I do need to find or fab a red lens as I destroyed the original trying to remove the word “brake”. I saw another user holed out a red reflector, I might have a go at that. Also placed the new dash control lights/labels and bezels as a nice touch .

Next up is the ignition switch and cigarette lighter. Have to have a way to light my stogies! I would like to have a word with whoever designed the spring, spacer, locking cam situation on the ignition switch. This thing is a major b-word.
 

Attachments

  • IMG_0231.jpeg
    IMG_0231.jpeg
    302.1 KB · Views: 132
  • IMG_0232.jpeg
    IMG_0232.jpeg
    203.2 KB · Views: 130
  • IMG_0233.jpeg
    IMG_0233.jpeg
    194.5 KB · Views: 129
  • IMG_0234.jpeg
    IMG_0234.jpeg
    209 KB · Views: 135

gnsteam

Contributor
Bronco Guru
Joined
Jan 29, 2010
Messages
3,695
Loc.
Lincoln NE
Dash is looking good. I'm a huge Floyd, David Gilmour fan as well. Alway playing while in the shop.
 
OP
OP
Meddle

Meddle

Contributor
Jr. Member
Joined
Dec 22, 2023
Messages
80
Loc.
Upstate NY
Ignition switch is finally in and looking fine. What a bear. I had to shorten the spring and even then it was a very tight fit. The dash protector surround probably didn’t help matters but I wanted some protection from my janitor like key chain plus I like the look. Bolted her to the dash at the bottom for a tight fit and polished her to a mirror finish on the wheel. Yes I know she is going to get marred to sh*t by swinging keys and whatnot… no I don’t care, I think the patina will give it character.

IMG_0241.jpeg
 
OP
OP
Meddle

Meddle

Contributor
Jr. Member
Joined
Dec 22, 2023
Messages
80
Loc.
Upstate NY
I ran into an issue with the headlight switch not being not seated correctly, so out she came. Luckily I was able to work around the ignition switch and didn’t have to undo all that. My problem stemmed from not getting the bezel retainer tightened down. A bit of two sided tape also helped keep the spacer in correct orientation and alignment. I didn’t have a flat head screwdriver big enough to torque the retainer and I really didn’t want to scratch up the bezel. So I ground down a washer to the right shape and size and that ended up working perfectly. Sometime you have to make the right tool 😬.

IMG_0225.jpeg
 
OP
OP
Meddle

Meddle

Contributor
Jr. Member
Joined
Dec 22, 2023
Messages
80
Loc.
Upstate NY
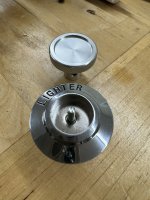
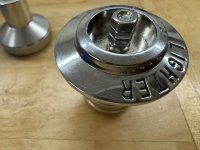
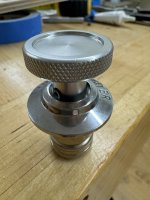
I got the stogie lighter kit from WH but it comes with the plastic knob. I wanted it to match the billet knobs I put in so I ended up swapping it. Unfortunately, it’s not a direct swap as the lighter post is way too small for the billet knob set screw to tighten down on. The post is a 3mm threaded bolt so I ended up threading a few 3mm nuts onto the post and then bored out the knob just a tad to accept the diameter of the nut. I was then able to tighten the set screw down on the very last nut in the stack. I did have to shorten the set screw a smidge to make the knob get home into the recess of the bezel. Now everything’s matchy matchy!

IMG_0249.jpeg IMG_0250.jpeg
IMG_0252.jpeg
IMG_0253.jpeg
 

Soylent

Contributor
Jr. Member
Joined
May 4, 2016
Messages
425
Loc.
California
Billet pedals are in and looking spiff. Had to replace the firewall boot on the accelerator rod while I was down there.

View attachment 919014
Do those have rough texture so a wet shoe doesn’t slip? How was changing that boot. Seems that there is a bolt on the inside and a nut that spins on the engine side. Challenging if you don’t have 20 foot arms.
 
OP
OP
Meddle

Meddle

Contributor
Jr. Member
Joined
Dec 22, 2023
Messages
80
Loc.
Upstate NY
Do those have rough texture so a wet shoe doesn’t slip? How was changing that boot. Seems that there is a bolt on the inside and a nut that spins on the engine side.
Yes the pedals are extremely textured, almost cheese grater like. I am very impressed with the quality. Changing the boot wasn’t too bad. I unbolted and removed the whole pedal assembly from the passenger side and also removed the accelerator rod from the engine side. The pedal assembly is bolted to the firewall with three bolts. The accelerator rod is clipped into the accelerator lever with some kind of retainer. The boot itself is actually bolted to the back of the pedal assembly so it pretty much has to come out to replace. Reaching the rod was a challenge but you only need one free hand to unclip/clip the rod retainer, so I got high on a stool and balanced with one hand on the valve cover.
 

Howard2x4x4

Contributor
Bronco Guru
Joined
Apr 19, 2014
Messages
2,465
I got the stogie lighter kit from WH but it comes with the plastic knob. I wanted it to match the billet knobs I put in so I ended up swapping it. Unfortunately, it’s not a direct swap as the lighter post is way too small for the billet knob set screw to tighten down on. The post is a 3mm threaded bolt so I ended up threading a few 3mm nuts onto the post and then bored out the knob just a tad to accept the diameter of the nut. I was then able to tighten the set screw down on the very last nut in the stack. I did have to shorten the set screw a smidge to make the knob get home into the recess of the bezel. Now everything’s matchy matchy!

View attachment 918995 View attachment 918996
View attachment 918997
View attachment 918998
Love the ingenuity!
 
OP
OP
Meddle

Meddle

Contributor
Jr. Member
Joined
Dec 22, 2023
Messages
80
Loc.
Upstate NY
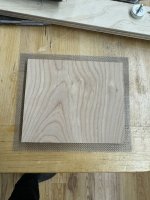
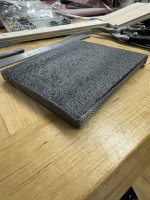
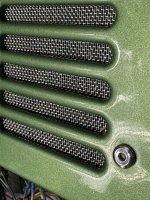
The dash speaker needed some snazz plus I don’t feel like seeing behind my dash anymore. There’s no sense in putting a speaker in with a sound system already installed and I wasn’t enamored with stock offerings to cover the space. I wanted to add some texture and match the rest of the dash affixments and overall look. I found some stainless mesh off the ‘zon for $10. The grade I used is “20 mesh” but there is finer and courser. I made a plywood template the correct size and bent the mesh around the template. I then placed some black foam, 1/2 thick, snug in the mesh square. Because I think it’s really important to have the mesh pattern be straight and square to the speaker vents, I placed witness marks on my plywood template, then drilled one hole and placed it in the dash, aligned and drilled the other holes through the dash. Finally, I placed the template back in the mesh square and drilled holes through the mesh. Repeated with black foam in place of template. Perfect fit. I polished some stainless 5mm flat button bolts which holds the grille/foam to the dash. I like the look!

IMG_0273.jpeg
IMG_0258.jpeg IMG_0261.jpeg IMG_0264.jpeg IMG_0265.jpeg IMG_0269.jpeg
 
Top