• Welcome to ClassicBroncos! - You are currently viewing the forums as a GUEST. To take advantage of all the site features, please take a moment to register. It's fast, simple and absolutely free. So please join our community today!
    If you have problems registering or can't log into your account, please contact Admin.

Newbie - STC Doors - How do they attach, on NEW to me Bronco

mytmouse75

New Member
Joined
Nov 4, 2016
Messages
117
Loc.
Medford
Hey guy's just getting back to the Bronco after being away for a bit and the Holidays and all.... Hope everyone is enjoying the Holidays....
Up next - I've been wanting to figure out/fix the STC doors.
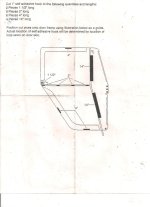
As far as the STC Doors go, as mentioned in the beginning of the looooong post I had posted when I first got the Bronco, it looks like from the body and paint work they filled in where snaps would've been and/or any kind of bracket holes, etc.... - See link of pictures below - what am I missing, HOW do the doors attached to the windshield pillar ?

I cleaned them up quite good reshaped and painted the door frames. I've been experimenting with different kind of handles to replace the missing ones, and I'm changing the snaps (on the soft door) to black snaps. I think I'm going to use industrial Velcro in place of the snaps on the body, maybe up the windshield pillar too. I painted the bracket black, where the front of the doors slide into and hinges on. I figured with the black velcro and the bracket black, would create one continuous black line at the door opening edge.
I just wanted to know how / what's missing to attached the doors the the windshield pillar...

https://goo.gl/photos/wtsWYAr3sy5TyKcp8

Thanks,
-TC
 

WILDHORSES

Sponsor/Vendor
Bronco Guru
Joined
Nov 7, 2003
Messages
2,239
Loc.
USA
You need 1/4" square aluminum about the length of the channel on the side of the windshield. Slide the aluminum into the small slot at the front of the soft door wing window. Once this is done it folds into the channel on the side of the wind shield frame. A small sheet metal screw can be used to hold it in place. Add three snaps to your front fenders and that about it. O hope some of this make sense.

Jim
 

bbow

Bronco Guru
Joined
Apr 18, 2012
Messages
1,160
Loc.
Ozark, Alabama
Kayline / STC Information

Here's some stuff I dug up. I had a set at one time.
 

Attachments

  • Kayline Door Instructions Page 2.jpg
    Kayline Door Instructions Page 2.jpg
    161.8 KB · Views: 29
  • Kayline Door Instructions Page 1.jpg
    Kayline Door Instructions Page 1.jpg
    79.4 KB · Views: 45
  • Kayline Door Instructions Page 3.jpg
    Kayline Door Instructions Page 3.jpg
    56.2 KB · Views: 41
OP
OP
mytmouse75

mytmouse75

New Member
Joined
Nov 4, 2016
Messages
117
Loc.
Medford
Sweet Thank you Jim !
That's just what I've been searching for.
I had contacted Wild Horses also, and they were able to supply me an Install sheet with drawing pictures/diagrams. They just weren't sure on the size of the Aluminum tubing.... Now we know it's 1/4".
The sheet metal screw - your talking about is to hold the Aluminum tubing within the soft door in the slot/pocket of the fabric next to the vent window -right ?
***Thank you and to all @ Wild Horses ! ***
Have a Happy and SAFE New Years !


STC Convertible Doors
Install sheet with drawing pictures/diagrams:
https://goo.gl/photos/WCbiHaXwVbpQJNyt9

640 North El Dorado Street Stockton, CA 95202 Phone (209)943-0991 Fax (209)943-7923
www.wildhorses4x4.com
STC Convertible Doors
#3253, 3255 Date 9/13/06
Parts list:
1 - Right door frame 2 - Door handle sets
1 - Left door frame 8 - Snaps
1 - Pair convertible doors 1 - 80” Velcro

Hardware list:
2 - Bottom hinge plates
2 - Aluminum square bar
2 - Aluminum extrusion
24 - Screws

Door inserts are also required
Note #1: Please note that in order to install doors properly you will need a helper. Depending on your skill level, patience,
and meticulousness this job should take between 3-6 hours.
Note #2: The diagonal measurement from the corner of the windshield to the rear edge of the door insert should be 33
3/4”. This is critical for the proper fit of the new door. To adjust the windshield loosen the bolts through the dash
and shim the windshield frame. Check both sides at the same time.
Note #3: Many Broncos by this can be overcome with a few adjustments. This instruction sheet is to be used as a
guideline. There will be slight variations from one Bronco to the next.
1. Figure #1 shows the location of the door hinges with the door insert already in place.
2. Locate top hinges as shown in Fig. #2. Measure 4” from the top of the windshield frame to the top of the hinge. Drill 2
1/8” holes and screw into position.
3. Insert door frame as shown in Fig. #1, step 3.
4. Push the bottom of the door frame back as shown in Fig. #1 step 4 by the arrows. When proper clearance for the door
frame has been obtained over the top rear ledge of the door insert, place a mark as shown in Fig. #3 as a locator for the
bottom hinge plate. This should be approximately 33 1/2” frome the rear of the door insert. Remove door.
5. Locate the hinge plate as shown in Fig. #3. The outside edge of the hinge plate is 1/8” from the edge of the door insert.
Mark in proper position and drill holes. Use a 1/8” drill bit for B and 9/16” drill bit for A. Screw plate into position.
6. Insert door frame and check for proper clearance. The door should open with minimal amounts of effort.
7. Attach the canvas door to the frame shown in Fig. #4. Cut the velcro as follows: 2 ea. 1/2” - 8ea. 2” - 6 ea. 4” - 4 ea.
14”. Match the cut of the velcro on the canvas and attach to framework Fig. #4.
8. Slide the aluminum bar into the sleeve in the fabric next to the vent window and slide the aluminum extrusion into the
position as shown in Fig. #4.
9. With the door on the vehicle mark snap positions at the front of the door insert. Drill 1/16” holes in the door insert
and screw down snaps. The positions should coincide with those in Fig. #5. Using the holes in the aluminum extrusion
as a guide, drill into the insert, then screw into place. Next, open the door and push the sleeve containing the aluminum
bar into the rain gutter on the windshield frame.
10. Assemble the door handles as shown in Fig. #6. It will be necessary to cut a hole approximately 7/16” in diameter in
the canvas to facilitate the handle.
 
OP
OP
mytmouse75

mytmouse75

New Member
Joined
Nov 4, 2016
Messages
117
Loc.
Medford
WOW - thanks all for the replies - I replied to Jim and then I saw all y-all replied too, with helpful info - thanks !

I'm running out the door now , but I'll have to read that other thread on the kayline door install...
-
Does anyone have pictures of the door / windshield portion?
-
 

catfan

Contributor
Full Member
Joined
Jul 1, 2016
Messages
307
You can also use 1/4x1/4 steel in the windshield gutter as long as you paint it , it's 21" long.
 

garberz

Bronco Influencer
Joined
Jun 24, 2007
Messages
6,861
Loc.
Conejo Valley, Ca.
Mine are the stock Kayline hardware, they're painted steel. They slip in from the bottom, just above the three snaps. I made some retainers from 1/2"x1/2" aluminum angle.

Now you get to figure out something for mirrors.;)

Mark
 

Attachments

  • IMG_1899.jpg
    IMG_1899.jpg
    68.4 KB · Views: 36
  • IMG_1900.jpg
    IMG_1900.jpg
    76.1 KB · Views: 35
  • IMG_1901.jpg
    IMG_1901.jpg
    91.6 KB · Views: 32
  • IMG_1902.jpg
    IMG_1902.jpg
    83.2 KB · Views: 40
  • IMG_1907.jpg
    IMG_1907.jpg
    76.6 KB · Views: 28
OP
OP
mytmouse75

mytmouse75

New Member
Joined
Nov 4, 2016
Messages
117
Loc.
Medford
Thanks, all. I haven't seen the angle retailers in the documentation or used before. Are they really necessary, if the 1/4 x 1/4 tube fits tightly enough in the windshield channel with the fabric?
 

catfan

Contributor
Full Member
Joined
Jul 1, 2016
Messages
307
Thanks, all. I haven't seen the angle retailers in the documentation or used before. Are they really necessary, if the 1/4 x 1/4 tube fits tightly enough in the windshield channel with the fabric?

It does fit tight in the channel, you shouldn't have any problem with it coming out.
 
Top