


Community
Buy / Sell


Bronco Tech
3 Arm Wiper Setup
Fix Motor Mount
Roll Cage Braces
Throttle Body 65mm
Wheel Alignment
Heat Riser Replacement
Vent Window Repair
Center Console Mount
Straighten Bumper
Ford 6R80 6 spd
More Tech...
Fix Motor Mount
Roll Cage Braces
Throttle Body 65mm
Wheel Alignment
Heat Riser Replacement
Vent Window Repair
Center Console Mount
Straighten Bumper
Ford 6R80 6 spd
More Tech...

-
Welcome to ClassicBroncos! - You are currently viewing the forums as a GUEST. To take advantage of all the site features, please take a moment to register. It's fast, simple and absolutely free. So please join our community today!If you have problems registering or can't log into your account, please contact Admin.
You are using an out of date browser. It may not display this or other websites correctly.
You should upgrade or use an alternative browser.
You should upgrade or use an alternative browser.
On the road again 1/6/11 - 1971 big green machine build thread
- Thread starter mavman427
- Start date
OP
OP
mavman427
Jr. Member
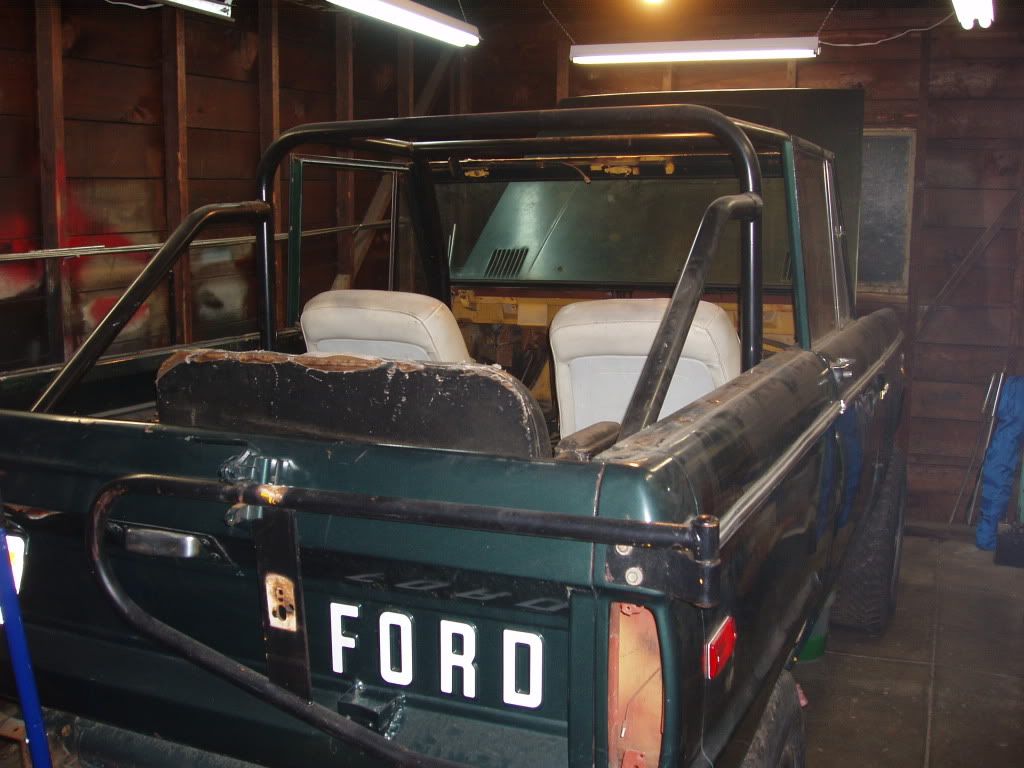
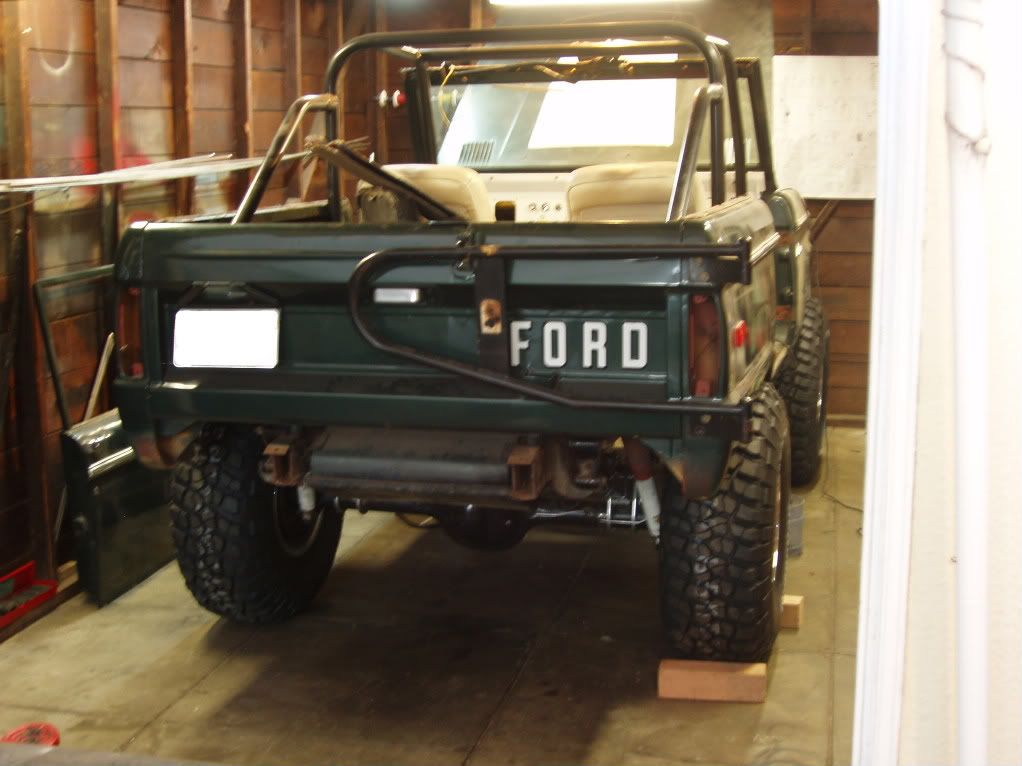
Well, she's topless ladies and gentlemen...
farnorthdan
Jr. Member
Lookin good there mavman, i don't know why but this is the first time i've come across your build, looks like you have a decent rig to start with, thats a plus. Know what you mean about the snowball thing, kinda stuck right now on my 73', theres just so much it needs.
Sounds like you at least have a plan, look forward to watching your progress.
dan
Sounds like you at least have a plan, look forward to watching your progress.
dan
OP
OP
mavman427
Jr. Member
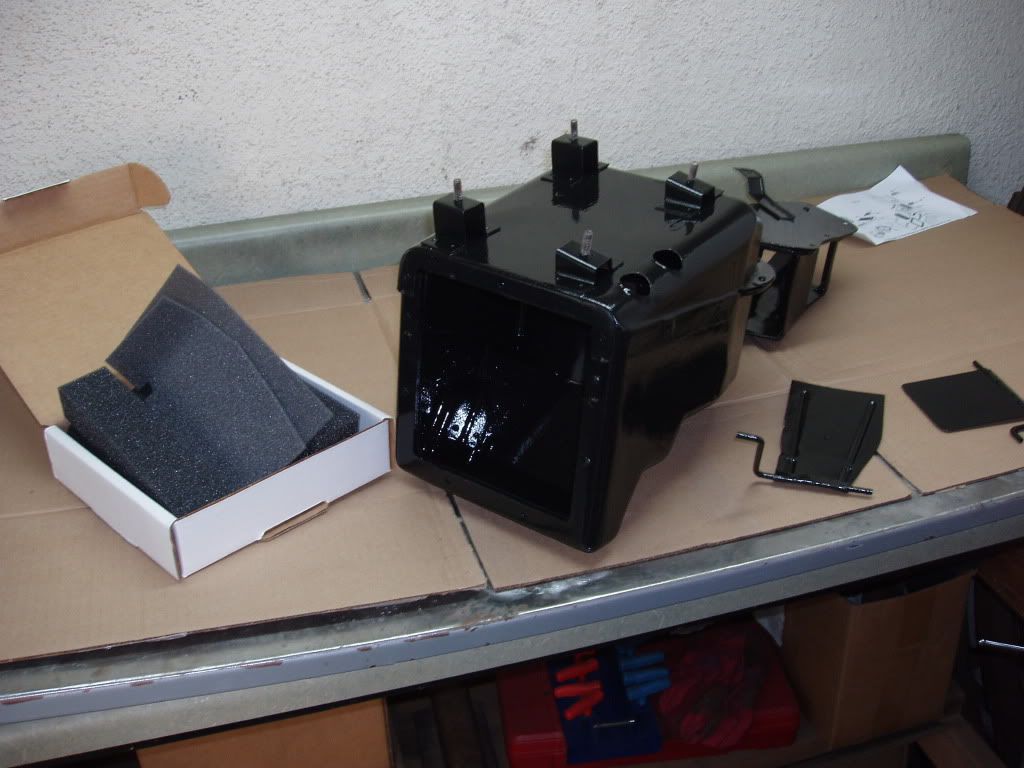
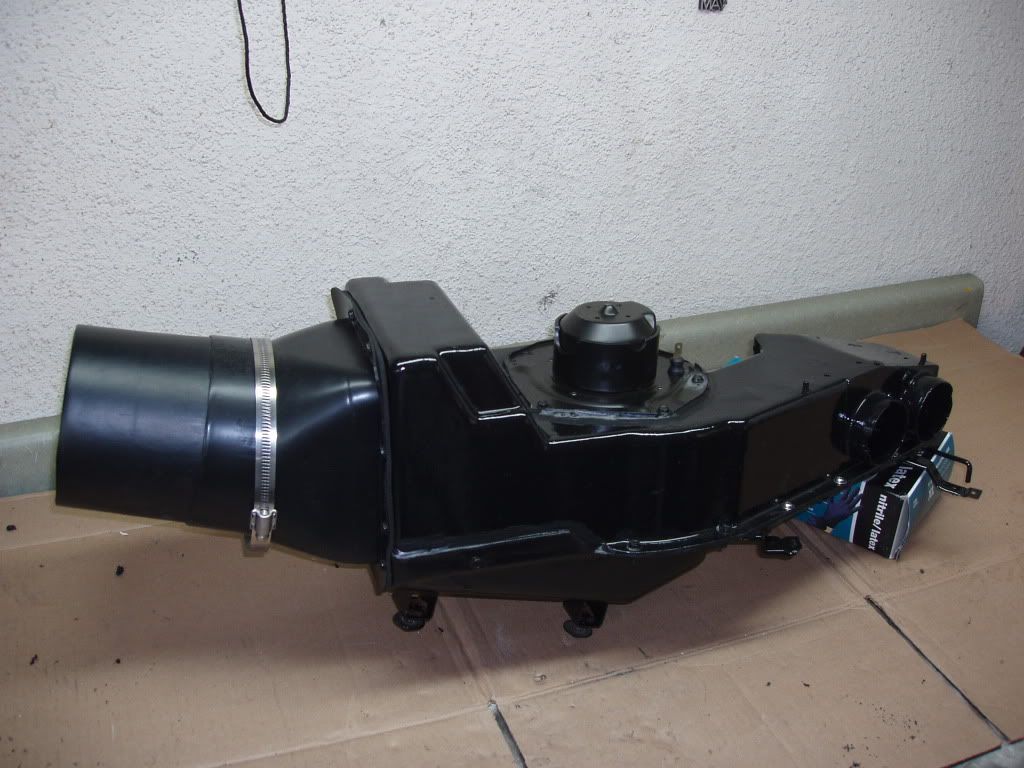
The snail's pace of my work continues, just gotta remind myself the turtle wins the race, not the hare ") . Anyway, here are some pics of my heater box that I just completely rebuilt. Blasted everything down to bare metal, repaired the defroster flap and box, painted everything, installed new gaskets/seals, installed the Chevy blower motor, new heater core, and sealed everything up tight with Eastwood seam sealer. Here are some pics of the work...pretty happy with how it turned out. And let me tell you, the heater box really HONKS now, can't believe how much air it puts out.
. Anyway, here are some pics of my heater box that I just completely rebuilt. Blasted everything down to bare metal, repaired the defroster flap and box, painted everything, installed new gaskets/seals, installed the Chevy blower motor, new heater core, and sealed everything up tight with Eastwood seam sealer. Here are some pics of the work...pretty happy with how it turned out. And let me tell you, the heater box really HONKS now, can't believe how much air it puts out.
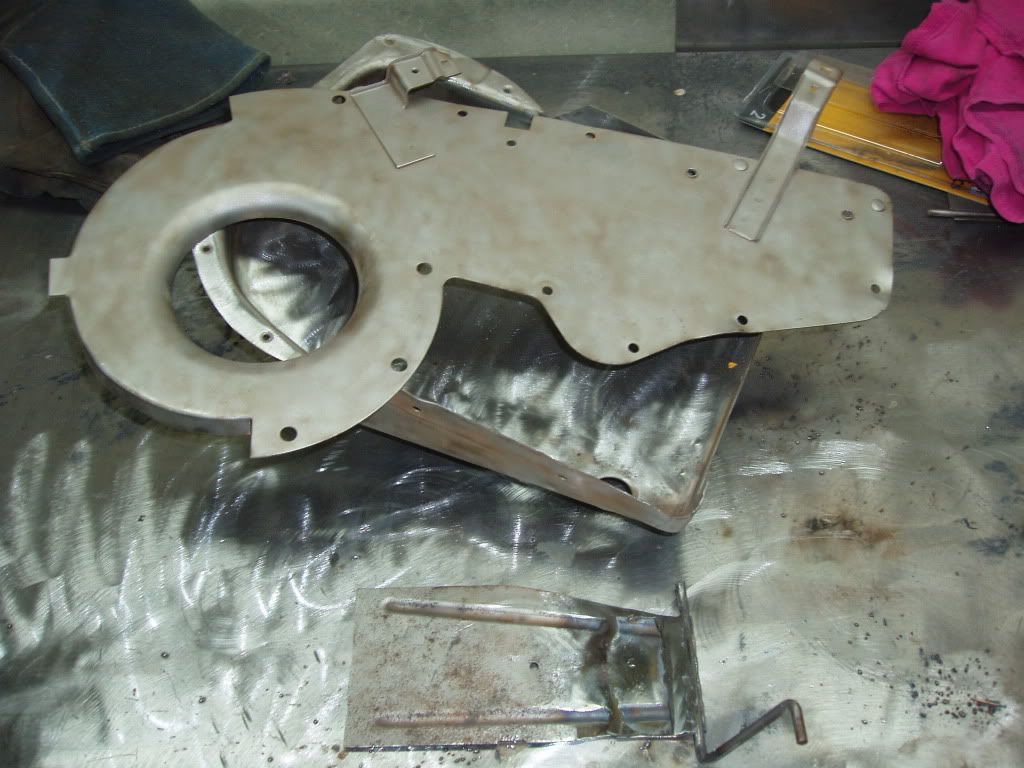
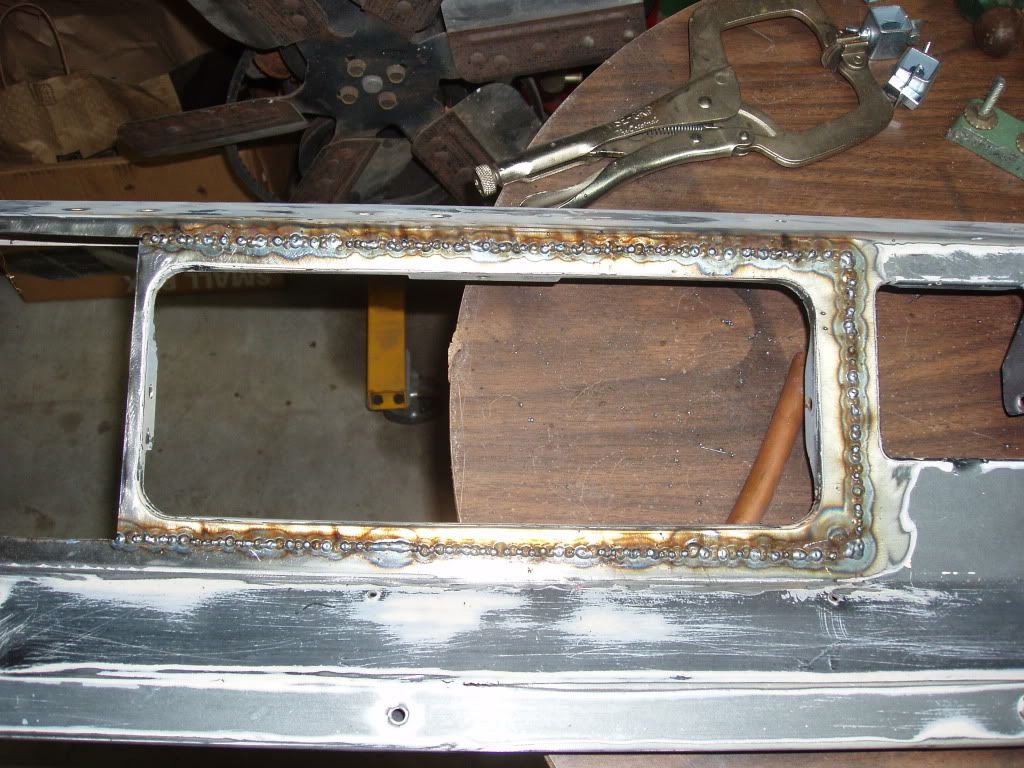
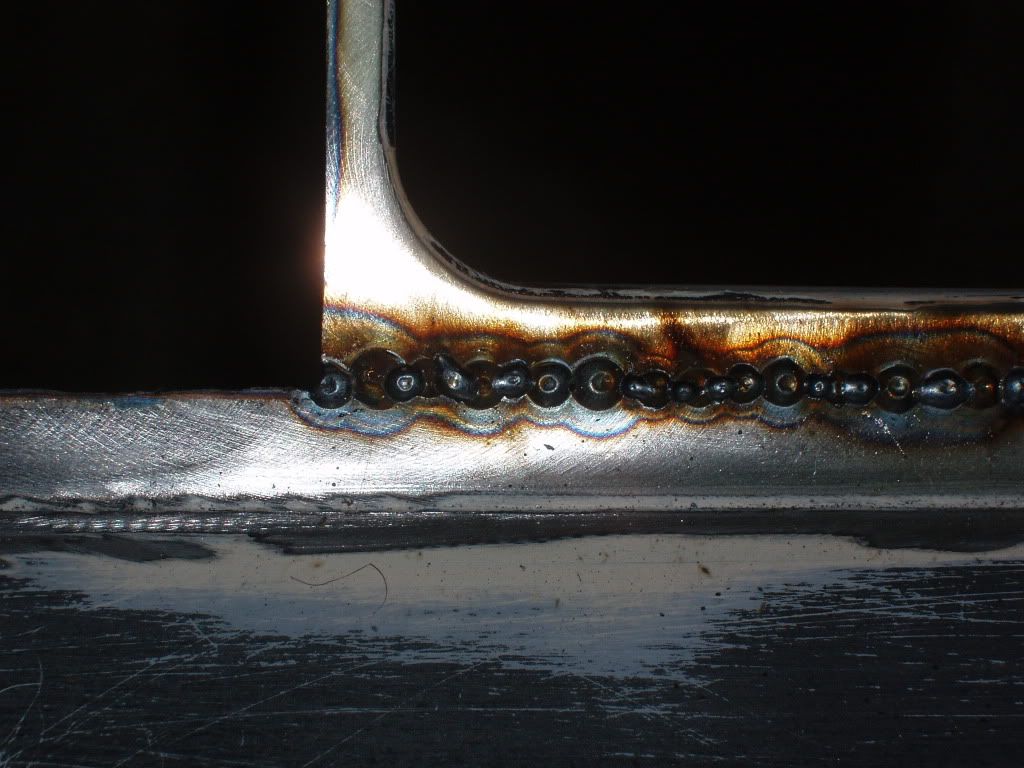
I also made a little progress on my glove box relocation project, here are a couple of pics. Should be finishing the welding and grinding the welds down this week to get ready for paint and installation, finally!
. Anyway, here are some pics of my heater box that I just completely rebuilt. Blasted everything down to bare metal, repaired the defroster flap and box, painted everything, installed new gaskets/seals, installed the Chevy blower motor, new heater core, and sealed everything up tight with Eastwood seam sealer. Here are some pics of the work...pretty happy with how it turned out. And let me tell you, the heater box really HONKS now, can't believe how much air it puts out.
I also made a little progress on my glove box relocation project, here are a couple of pics. Should be finishing the welding and grinding the welds down this week to get ready for paint and installation, finally!
OP
OP
mavman427
Jr. Member
I've been picking up the pace on the work lately, trying to get ready for a trip to the Oceano Dunes on 4th of July!
Here's some of the work I've done lately:
-Finished designing my custom wiring harness
-Finished fab work on dash, sealed and painted entire dash, started assembly of various components and custom parts on dash
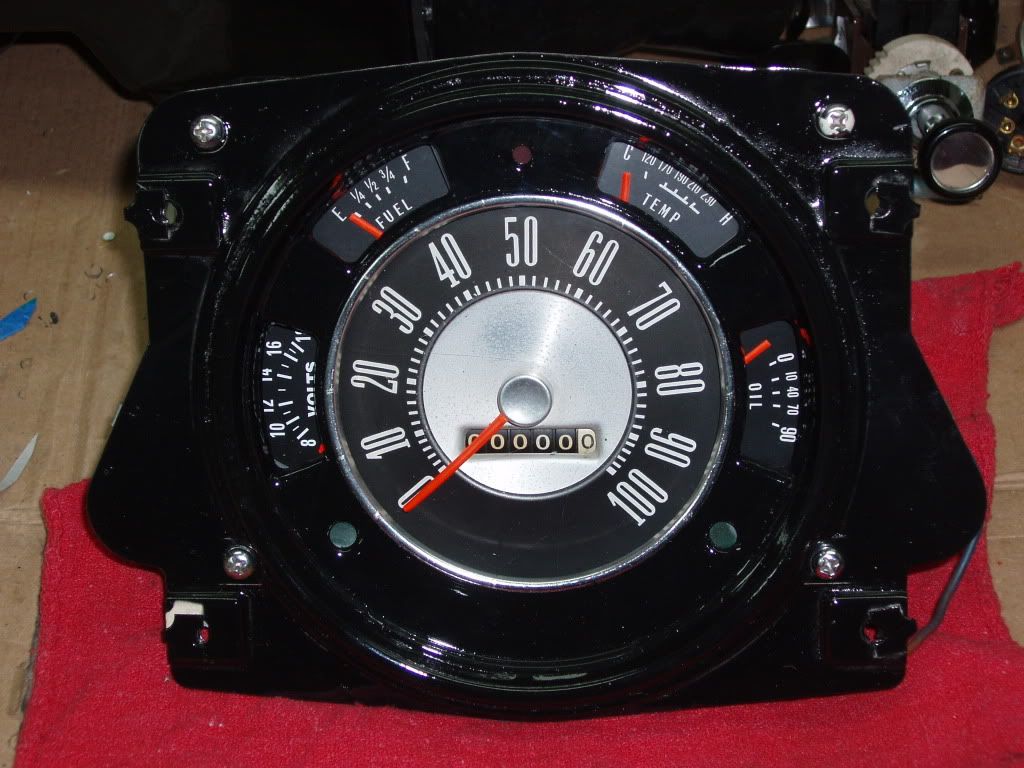
-Rebuilt instrument cluster, repainted gauge needles, tested gauges, replaced stock ammeter with Autometer voltmeter (which was a bit of a challenge), replaced stock bulbs with LED's, sealed cluster.
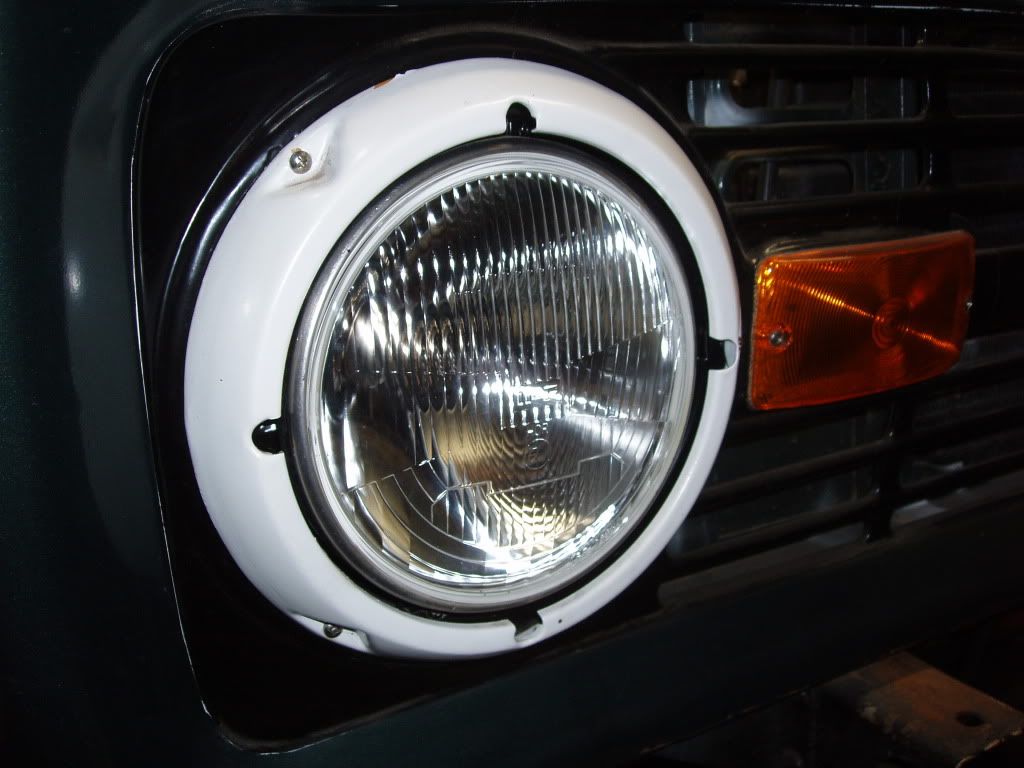
-Installed IPF H4 Halogen Headlight Housings with 100/170W Offroad head lights. These technically aren't legal for street use, but who's going to know that haha.
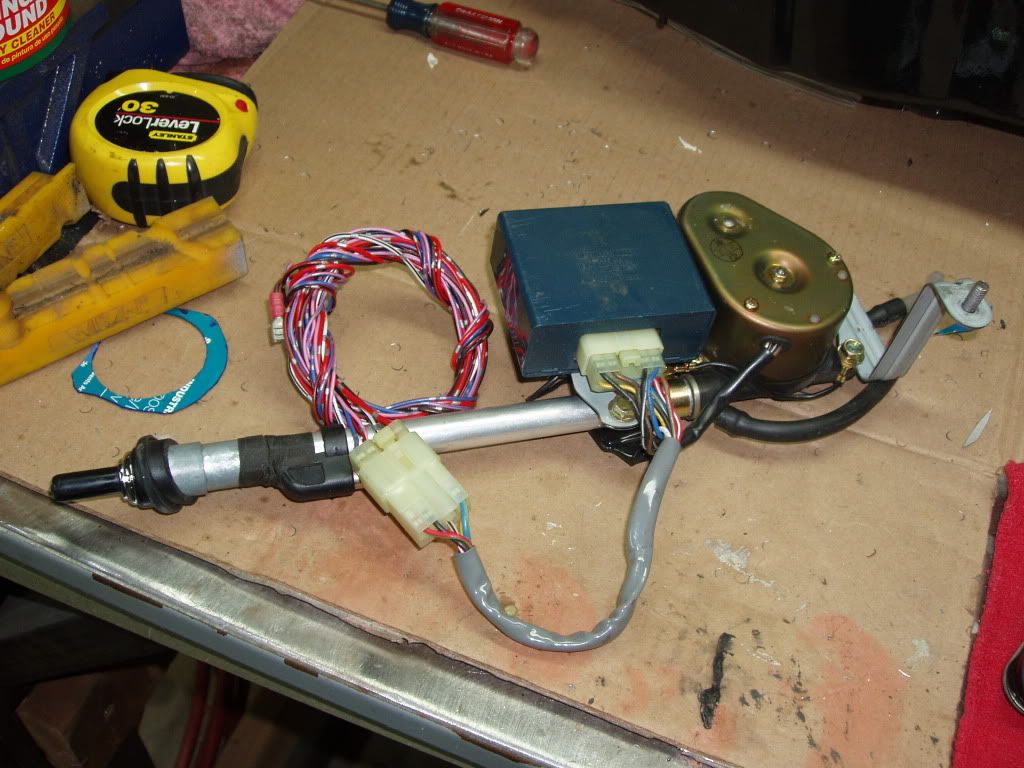
-Figured out wiring and customized automatic antenna from an old Toyota Supra of mine that was totaled out years ago. Had to customize the support bracket, reweld it on other side of solenoid, and drill a hole through the kickpanel. Should be a pretty clean install.
I can see my skills improving and it's amazing what you can accomplish once you have a decent set of tools, a welder, and a little imagination.
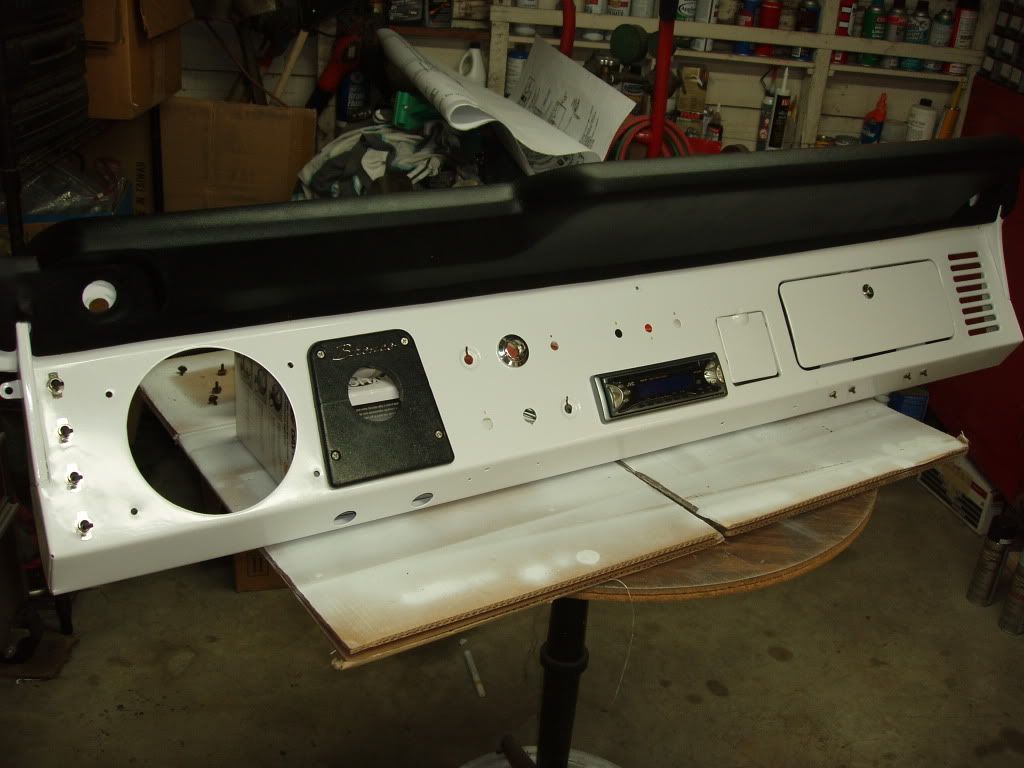
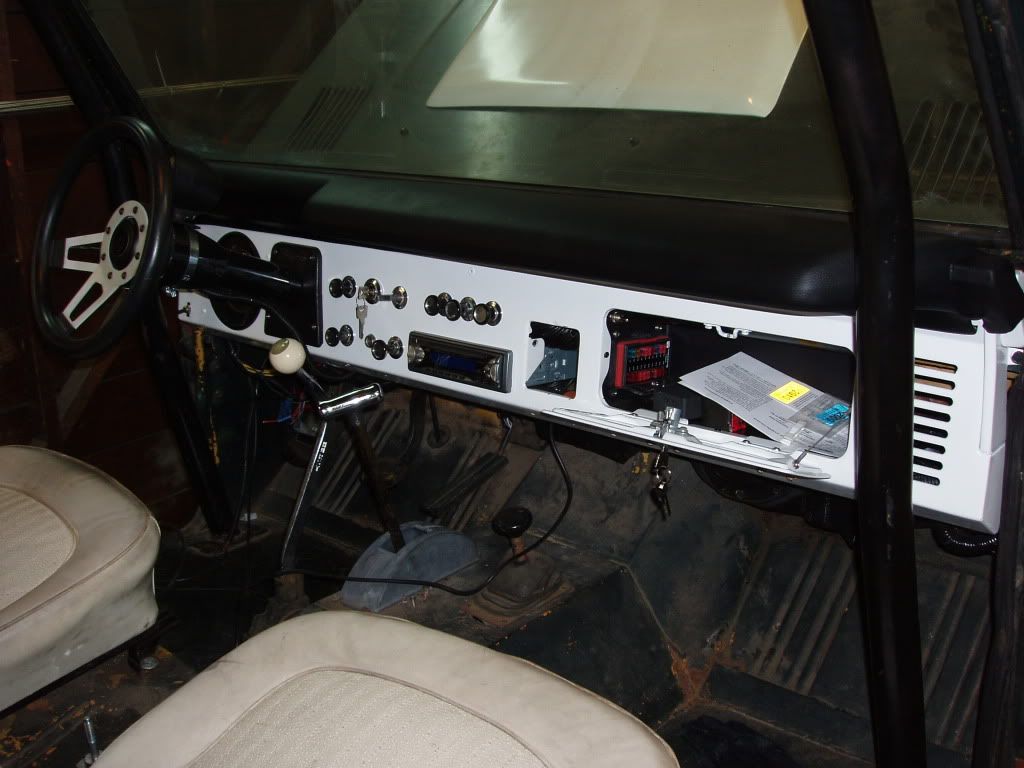
Here's a picture of the finished dashboard with glovebox/speaker grill relocated to allow glovebox to open up with rollcage, custom toggle switch row on left side, and modification to allow a modern stereo to fit in dash.
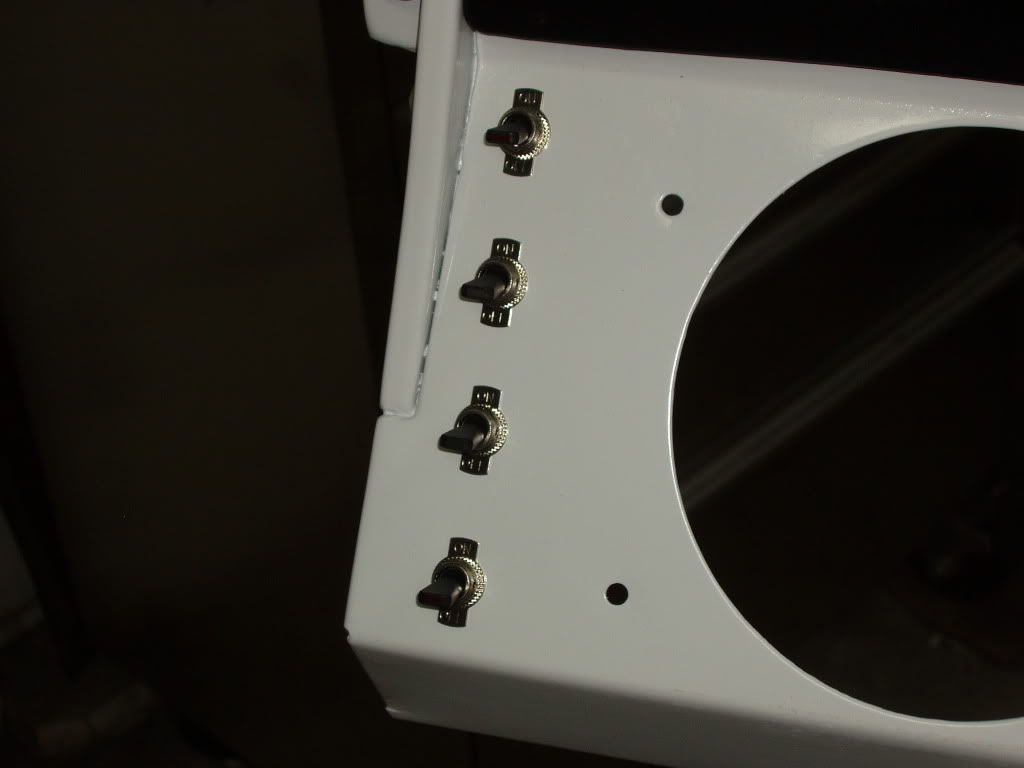
Closeup of heavy-duty LED toggle switches, which will power auxiliary offroad lights on front bumper, rear flood lights, train horn, and onboard electric air compressor.
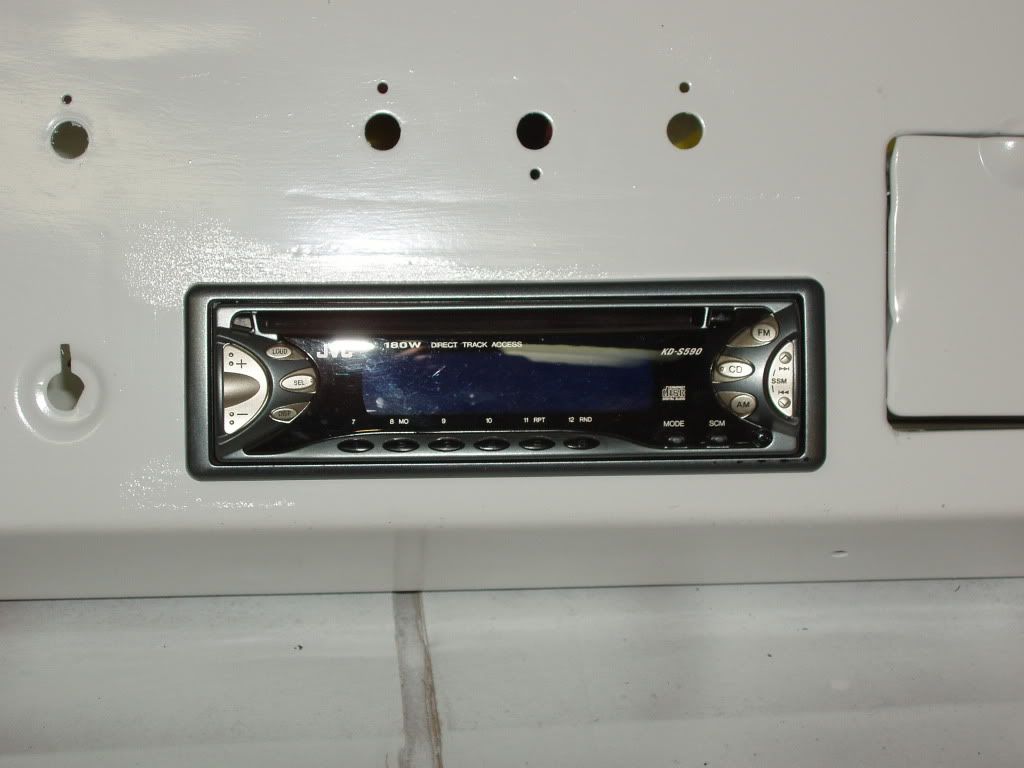
Closeup of custom stereo installation.
Here's a shot of my rebuilt instrument cluster, looks pretty decent but not perfect (like everything else).
Here's a shot of the IPF H4 housings, look pretty good. They are a bit flatter than the stock headlights.
Here's the automatic antenna.
Here's some of the work I've done lately:
-Finished designing my custom wiring harness
-Finished fab work on dash, sealed and painted entire dash, started assembly of various components and custom parts on dash
-Rebuilt instrument cluster, repainted gauge needles, tested gauges, replaced stock ammeter with Autometer voltmeter (which was a bit of a challenge), replaced stock bulbs with LED's, sealed cluster.
-Installed IPF H4 Halogen Headlight Housings with 100/170W Offroad head lights
. These technically aren't legal for street use, but who's going to know that haha.-Figured out wiring and customized automatic antenna from an old Toyota Supra of mine that was totaled out years ago. Had to customize the support bracket, reweld it on other side of solenoid, and drill a hole through the kickpanel. Should be a pretty clean install.
I can see my skills improving and it's amazing what you can accomplish once you have a decent set of tools, a welder, and a little imagination.
Here's a picture of the finished dashboard with glovebox/speaker grill relocated to allow glovebox to open up with rollcage, custom toggle switch row on left side, and modification to allow a modern stereo to fit in dash.
Closeup of heavy-duty LED toggle switches, which will power auxiliary offroad lights on front bumper, rear flood lights, train horn, and onboard electric air compressor.
Closeup of custom stereo installation.
Here's a shot of my rebuilt instrument cluster, looks pretty decent but not perfect (like everything else).
Here's a shot of the IPF H4 housings, look pretty good. They are a bit flatter than the stock headlights.
Here's the automatic antenna.
OP
OP
mavman427
Jr. Member
Took a day off from work today and spent pretty much the whole day installing a 1" Wild Horses body lift. It took a long time and was pretty frustrating indeed. Here are some observations that I made as the day progressed.
1. It's a little scary working under a Bronco body that is propped up on a couple of 4"x4"s on top of my floor jack.
2. It hurts when you hit yourself on the knuckle with a hammer.
3. It hurts even worse when you hit yourself on the wrist with a hammer.
4. It really is a b*$ch working in a 1-car garage, I can't wait to get a place of my own with a 3-car (minimum) garage.
5. A sharp crack when I was jacking up my body turned out to my fan going through my fan shroud, doh!
6. Holy mother of god it is tough to get the sleeve out once you drop it in the frame (Spent the next 3 hours fishing it out from the back of the Bronco, I almost shed a tear when I saw it drop out of the rear frame horn).
7. I pretty much hate the PO's of this Bronco. The rear frame horns are hacked up with plate welded in, making it all but impossible to get the stock body mounts out or the new body mounts in. About a half hour with the air chisel took care of this problem.
8. Couldn't help but think that this will all be worth it the first time I get to actually drive this.
Anyway, the little F'ers are finally in. All I need to do is torque everything down. Pics coming soon. Lots of other work going on concurrently.
OP
OP
mavman427
Jr. Member
I used the Bronco Graveyard heater duct, it's a pretty nice upgrade to the stock heater hose. Can't wait to fire up the heater, it's going to be exciting.
Entourage
Full Member
The Dash turned out really nice! Very impressed. Gauges and Heater box look new. Very nice work.
OP
OP
mavman427
Jr. Member
Thanks for the kind words! I'll post some updated pictures soon, there has been a flurry of work going on over the past few months. It's getting close to being taken off of jack stands and set back on wheels again! I almost forgot this thing used to roll.
OP
OP
mavman427
Jr. Member
Update:
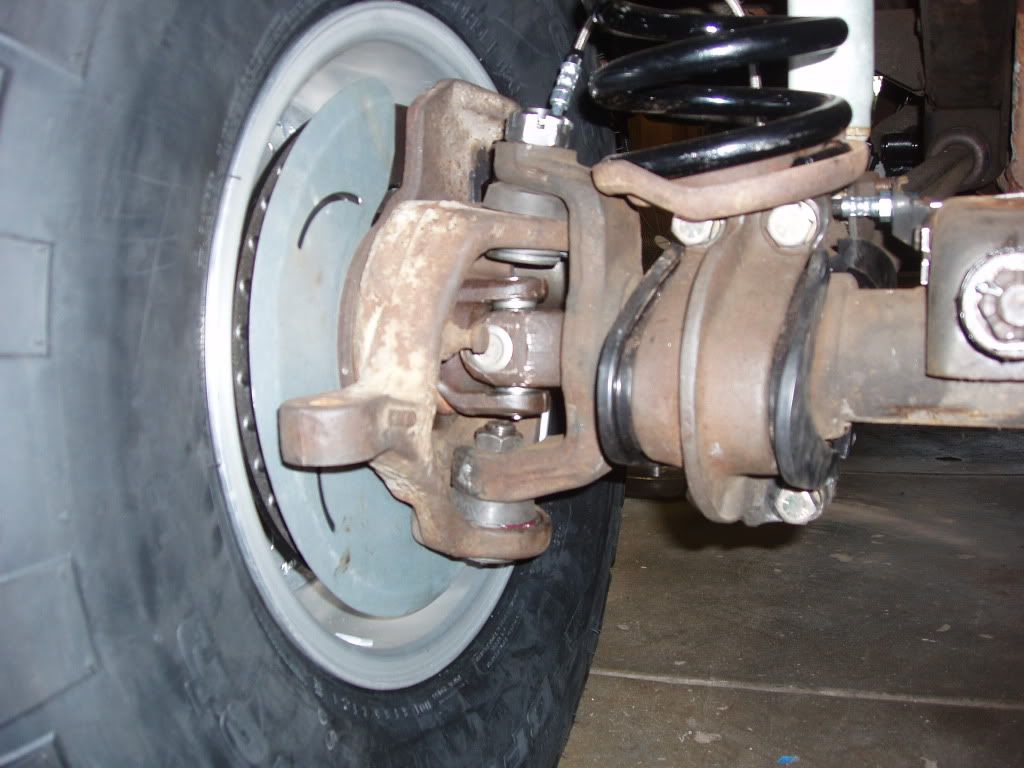
- Finished converting over to stock 76/77 disc brake setup, all new pads, rotors, stainless steel hoses and lines.
- Replaced axle U-joints, spindle seals + bearings, ball joints
- Replaced C-bushings with degreed bushings, replaced radius arm and trac bar bushings
- Completely rebuilt rear brakes, new brake cylinders and all hardware
- Installed new rear seals and axle bearings - installed with the ghetto shop press, a BFH and a long piece of angle iron...actually worked surprisingly well
- Installed leaf spring wedges to reduce driveline angle and minimize potential vibration
- Started installing my Tom's power disc brake setup and realized that I needed to finish my steering first as I won't have access to it once the booster and new master cylinder are installed.
-Mounted up my 35"x12.5"x15" BFG KM2's on American Racing AR-23's...they look awesome.
Here are some pics:
Here's what is left to do to get this thing back on the road:
- Cut off old U-joint, weld on new U-joint onto steering shaft
- Reinstall steering shaft/column
- Decide on steering linkage and install
- Finish plumbing power steering lines, cooler, etc.
- Finish installing power brake booster, master cylinder, lines, fill and bleed system
- Finish custom wiring harness
- Cut fenders and install warflares (painted white)
- Install Rampage white soft top
Still a ways to go, but I feel like I'm getting sort of close
- Finished converting over to stock 76/77 disc brake setup, all new pads, rotors, stainless steel hoses and lines.
- Replaced axle U-joints, spindle seals + bearings, ball joints
- Replaced C-bushings with degreed bushings, replaced radius arm and trac bar bushings
- Completely rebuilt rear brakes, new brake cylinders and all hardware
- Installed new rear seals and axle bearings - installed with the ghetto shop press, a BFH and a long piece of angle iron...actually worked surprisingly well
- Installed leaf spring wedges to reduce driveline angle and minimize potential vibration
- Started installing my Tom's power disc brake setup and realized that I needed to finish my steering first as I won't have access to it once the booster and new master cylinder are installed.
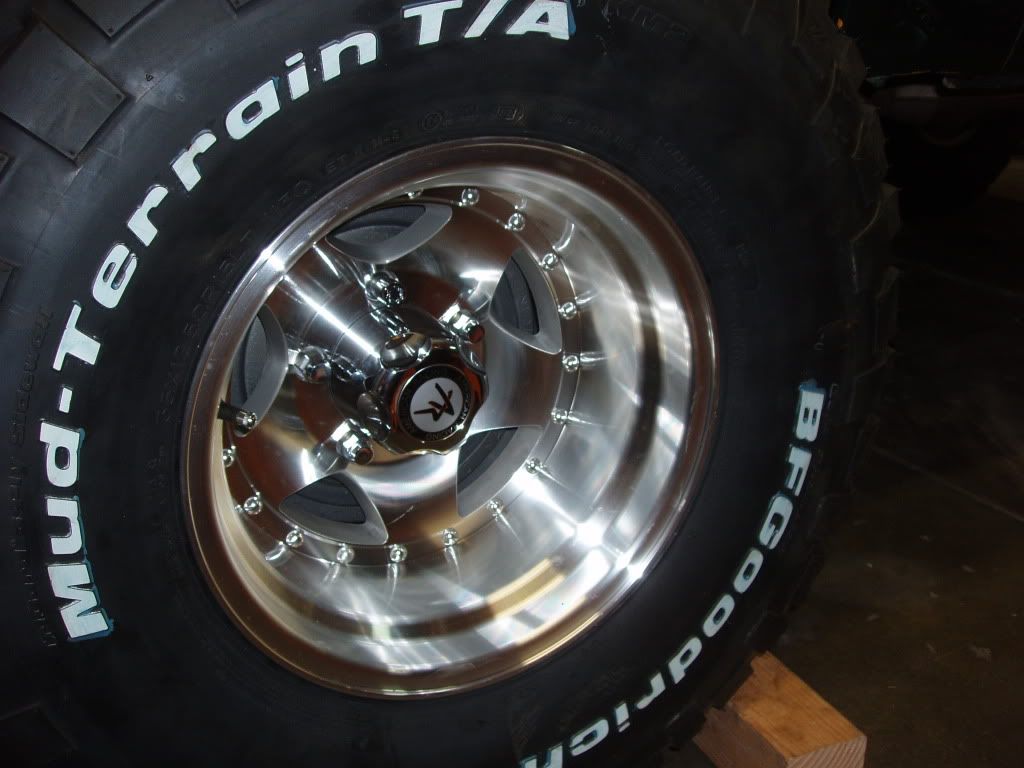
-Mounted up my 35"x12.5"x15" BFG KM2's on American Racing AR-23's...they look awesome.
Here are some pics:
Here's what is left to do to get this thing back on the road:
- Cut off old U-joint, weld on new U-joint onto steering shaft
- Reinstall steering shaft/column
- Decide on steering linkage and install
- Finish plumbing power steering lines, cooler, etc.
- Finish installing power brake booster, master cylinder, lines, fill and bleed system
- Finish custom wiring harness
- Cut fenders and install warflares (painted white)
- Install Rampage white soft top
Still a ways to go, but I feel like I'm getting sort of close
THE_74BEAST
Jr. Member
Looking real good! I could look at rebuild post all day long. Some of you guys have MAD fabricating skills!!!! I love those tires/rims....
OP
OP
mavman427
Jr. Member
Update:
- Cut off old U-joint, welded on new U-joint onto steering shaft, repainted
- Reinstalled steering shaft/column
- Installed Wildhorses 3-way adjustable steering linkage w/ F-150 ball joints (knuckles turned out to be from an F-150, not a 76-77 Bronco as I previously thought)
- Installed new Tom's power brake booster and master cylinder setup, proportioning valve, and stainless steel brake lines (except for the ones that came with the master cylinder (doh)
- Filled up master cylinder and bled the hell out of the whole system, brake pedal feels great - very firm
- Installed all new U-joints & CV joints in front and rear driveshafts, reinstalled
Things still left to do to get it driveable (Getting close!!):
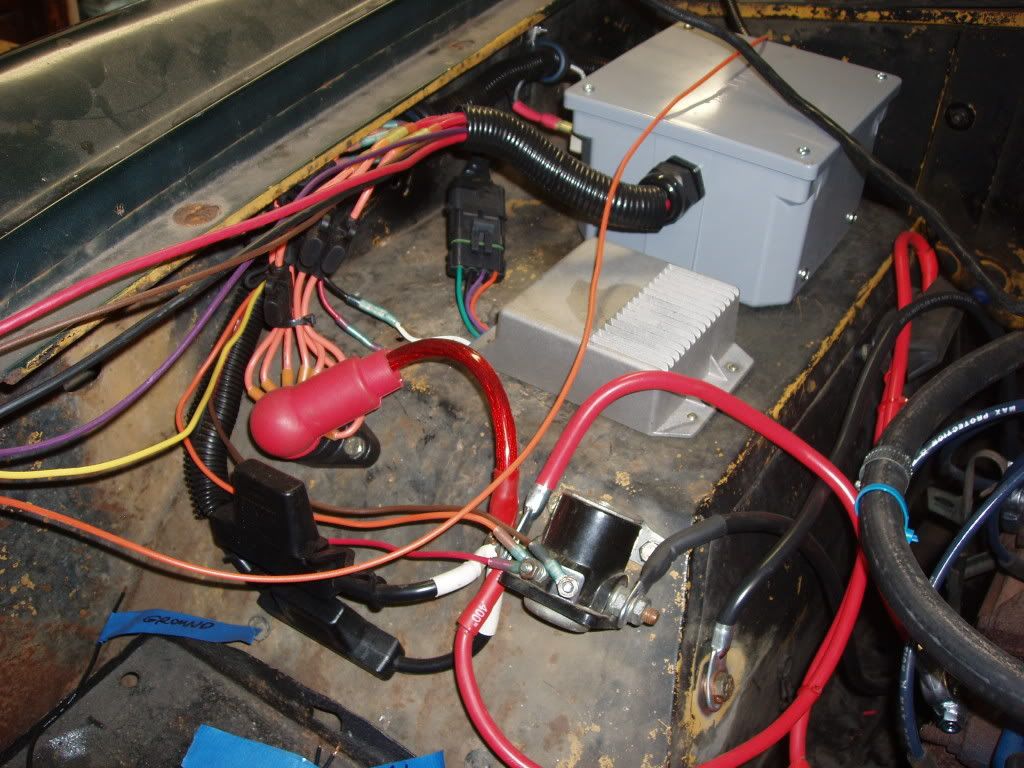
- Finish custom wiring harness - I can only wait to see what kind of electrical gremlins there are from wires going to the wrong places, etc. Since I built the entire harness from scratch, I'm sure a made a couple of mistakes.
- Cut fenders
Things that will be nice to do, but will come later:
- Install warflares (painted white)
- Install Rampage white soft top
- Rebuild and install Koenig front PTO winch/bumper
- Install Logan rear bumper (need to drop gas tanks and fix rear frame horns that the PO so kindly destroyed)
Here are some pics:

Tom's power brake booster & master cylinder setup surrounded by bird's nest of wires
Power steering pump, re-welded steering shaft, surrounded by bird's nest of wires
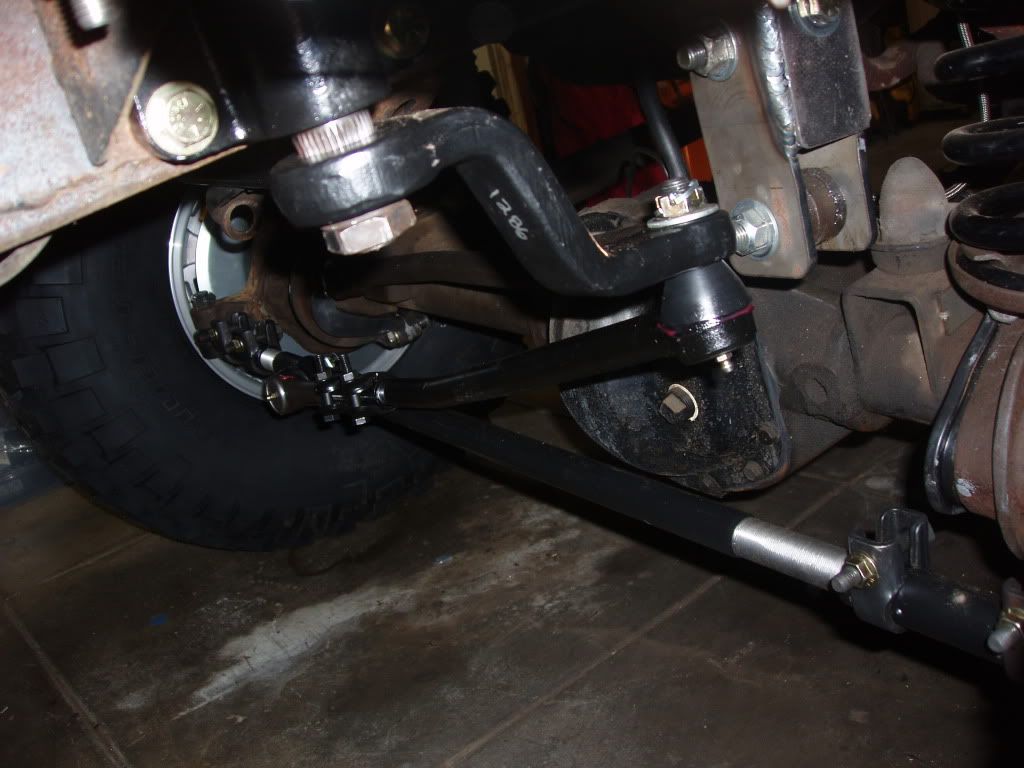
New Wildhorses 3-way adjustable steering linkage w/ F-150 ball joints
- Cut off old U-joint, welded on new U-joint onto steering shaft, repainted
- Reinstalled steering shaft/column
- Installed Wildhorses 3-way adjustable steering linkage w/ F-150 ball joints (knuckles turned out to be from an F-150, not a 76-77 Bronco as I previously thought)
- Installed new Tom's power brake booster and master cylinder setup, proportioning valve, and stainless steel brake lines (except for the ones that came with the master cylinder (doh)
- Filled up master cylinder and bled the hell out of the whole system, brake pedal feels great - very firm
- Installed all new U-joints & CV joints in front and rear driveshafts, reinstalled
Things still left to do to get it driveable (Getting close!!):
- Finish custom wiring harness - I can only wait to see what kind of electrical gremlins there are from wires going to the wrong places, etc. Since I built the entire harness from scratch, I'm sure a made a couple of mistakes.
- Cut fenders
Things that will be nice to do, but will come later:
- Install warflares (painted white)
- Install Rampage white soft top
- Rebuild and install Koenig front PTO winch/bumper
- Install Logan rear bumper (need to drop gas tanks and fix rear frame horns that the PO so kindly destroyed)
Here are some pics:
Tom's power brake booster & master cylinder setup surrounded by bird's nest of wires
Power steering pump, re-welded steering shaft, surrounded by bird's nest of wires
New Wildhorses 3-way adjustable steering linkage w/ F-150 ball joints
Last edited:
OP
OP
mavman427
Jr. Member
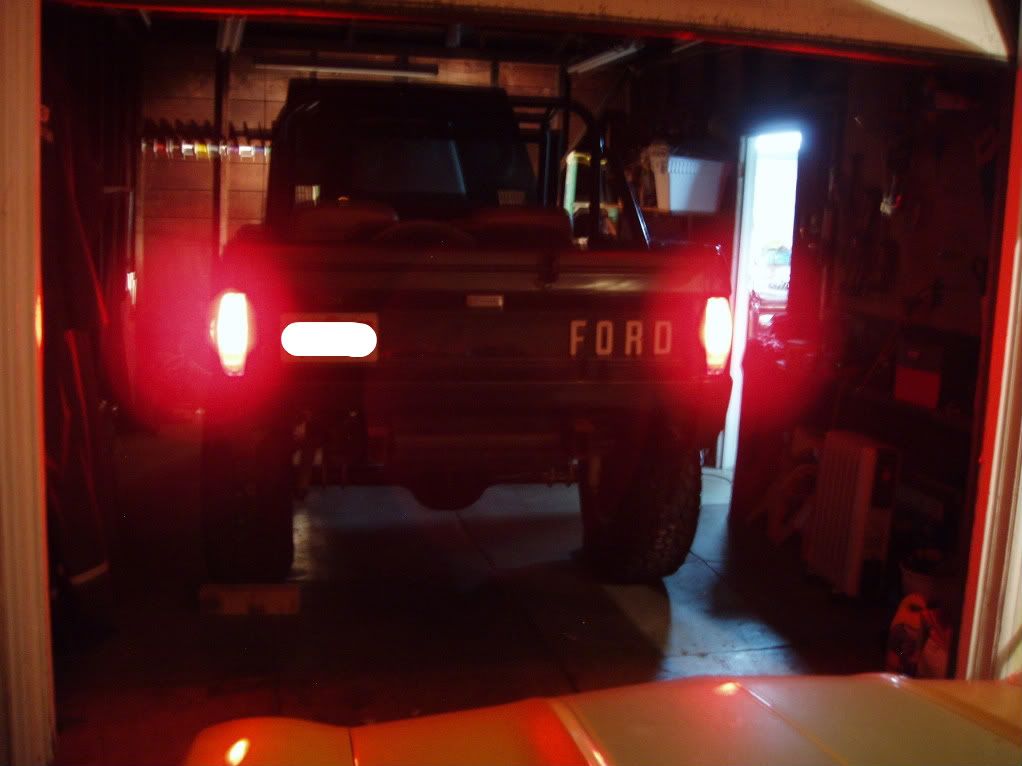
After about a year and a half of tearing my Bronco apart, I got it back together enough to get it running today. It was a great feeling. Started right up and ran great after sitting that long, pretty amazing.
She's not going to be a beauty queen by any stretch of the imagination, but she will be a mechanically sound, offroad-capable driver with some pretty cool mods. Still need to tie up a few loose ends on the wiring harness and a bunch of other stuff, but she's close to being back on the road again.
Here are the latest things I've done:
- Changed all fluids & filters
- Installed & tensioned new V-belts
- Installed new radiator & heater hoses
- Installed new heater valve
- Installed new distributor cap rotor
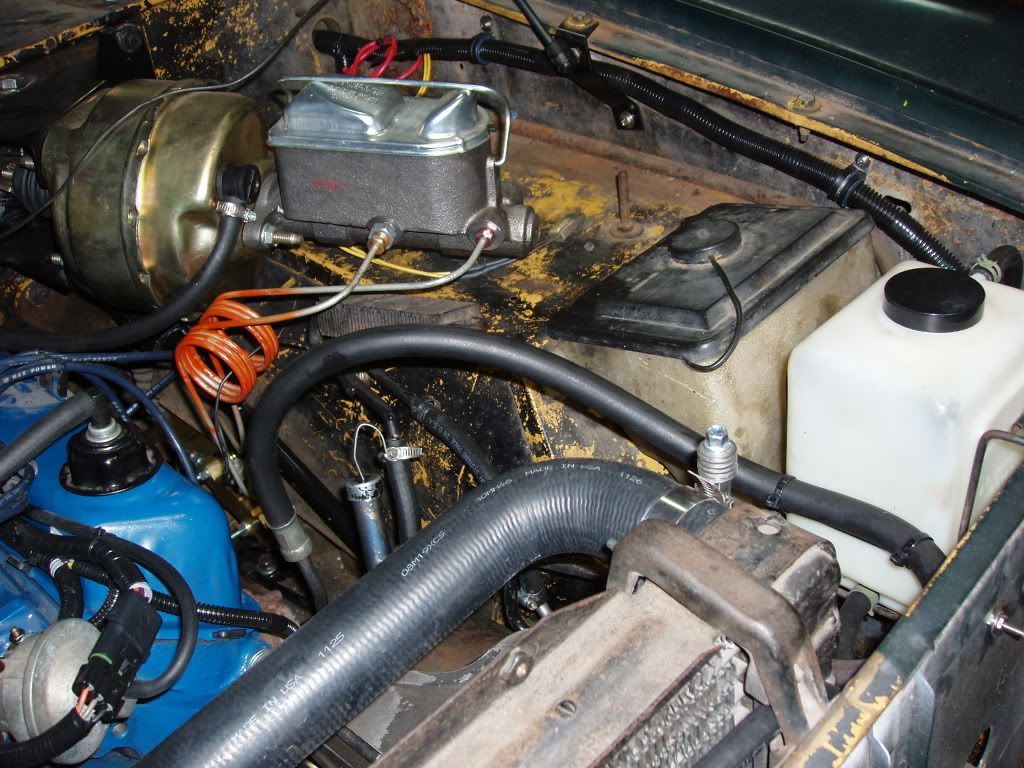
- Finished installing all power steering lines
- Installed coolant recovery reservoir & line
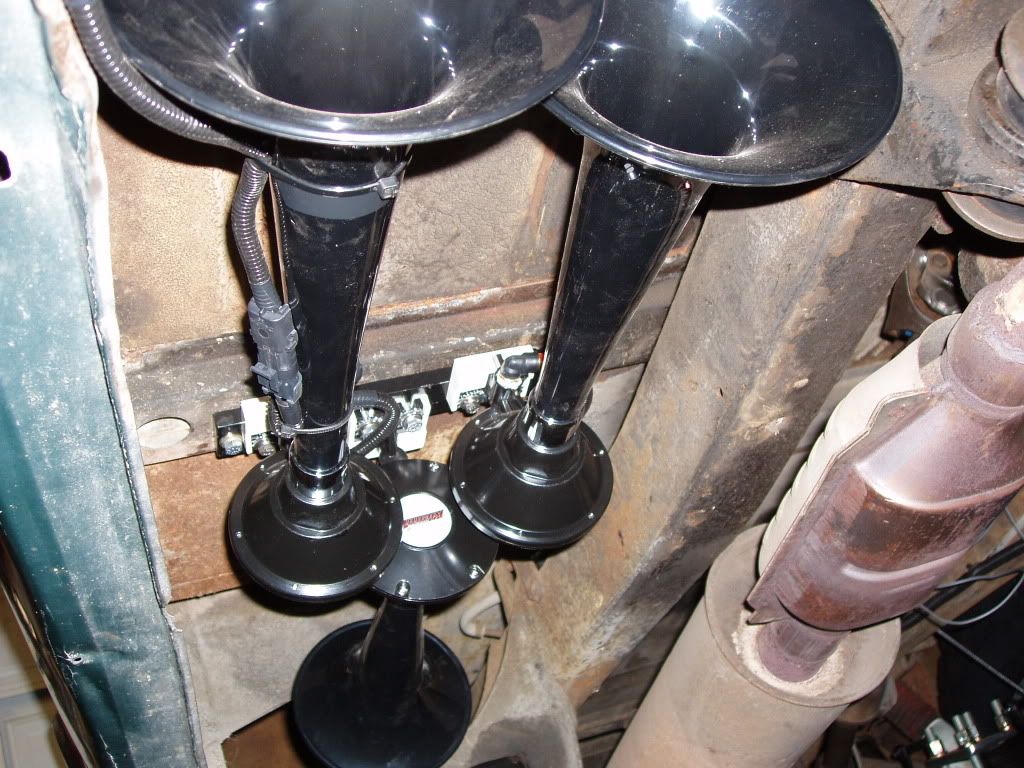
- Installed big ass train horn (look out retarded drivers!)
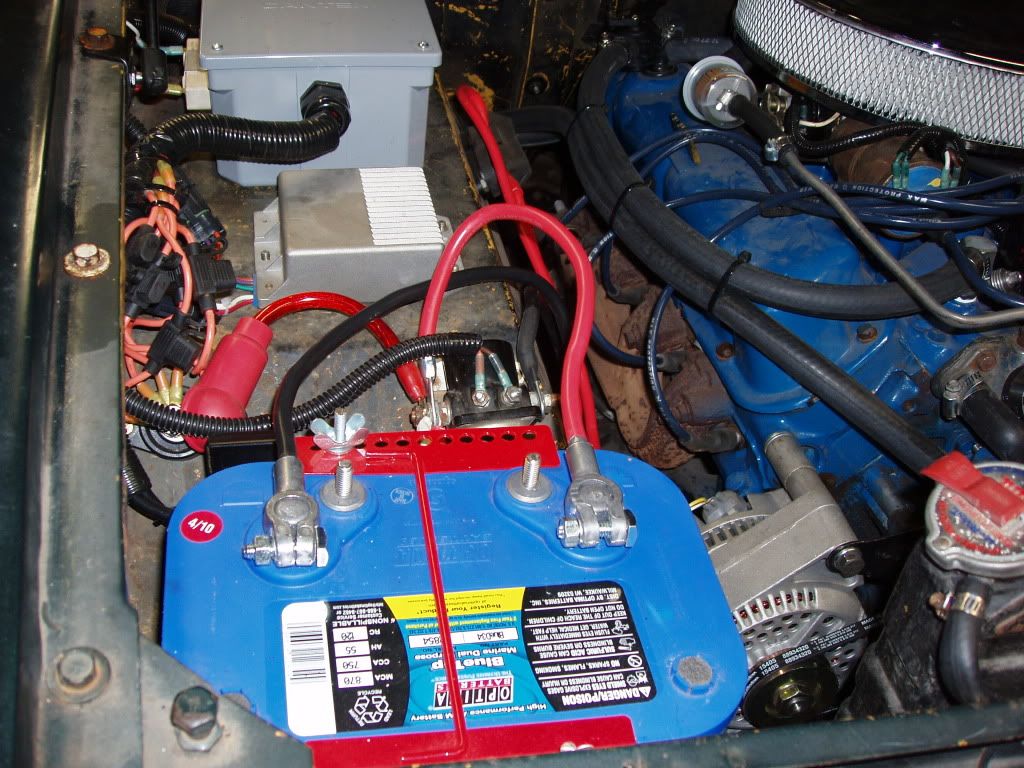
- Basically finished installing custom wiring harness & worked out most bugs
- Installed all new exterior light bulbs (they are VERY bright)
- Fired the BEAST up!!
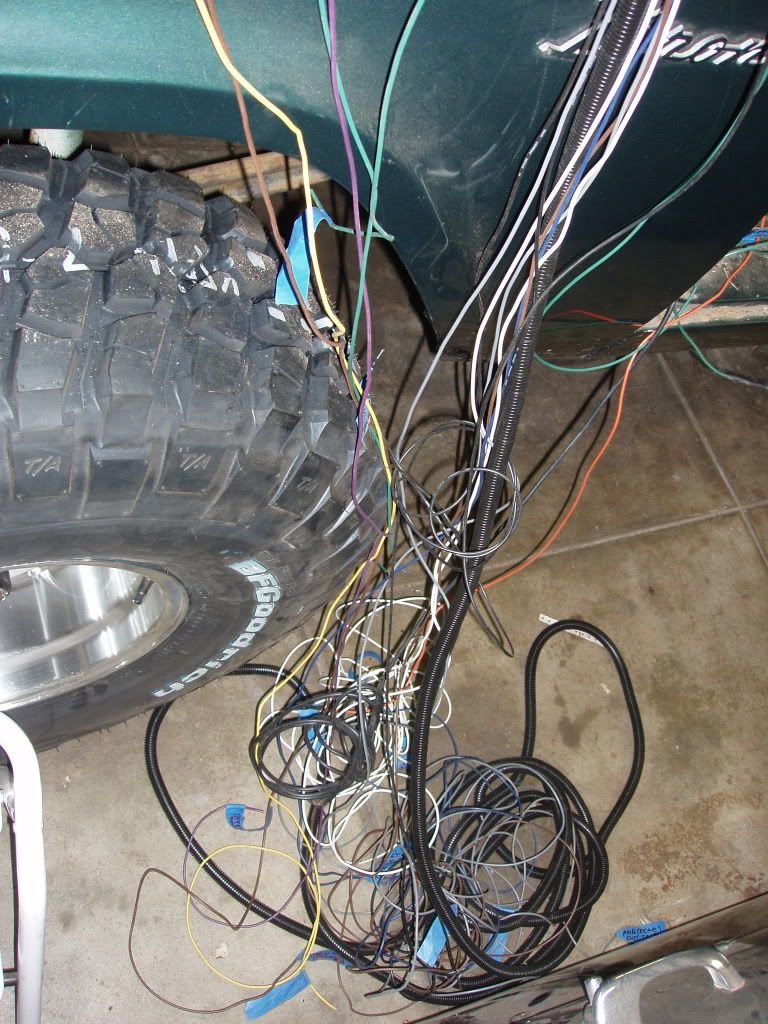
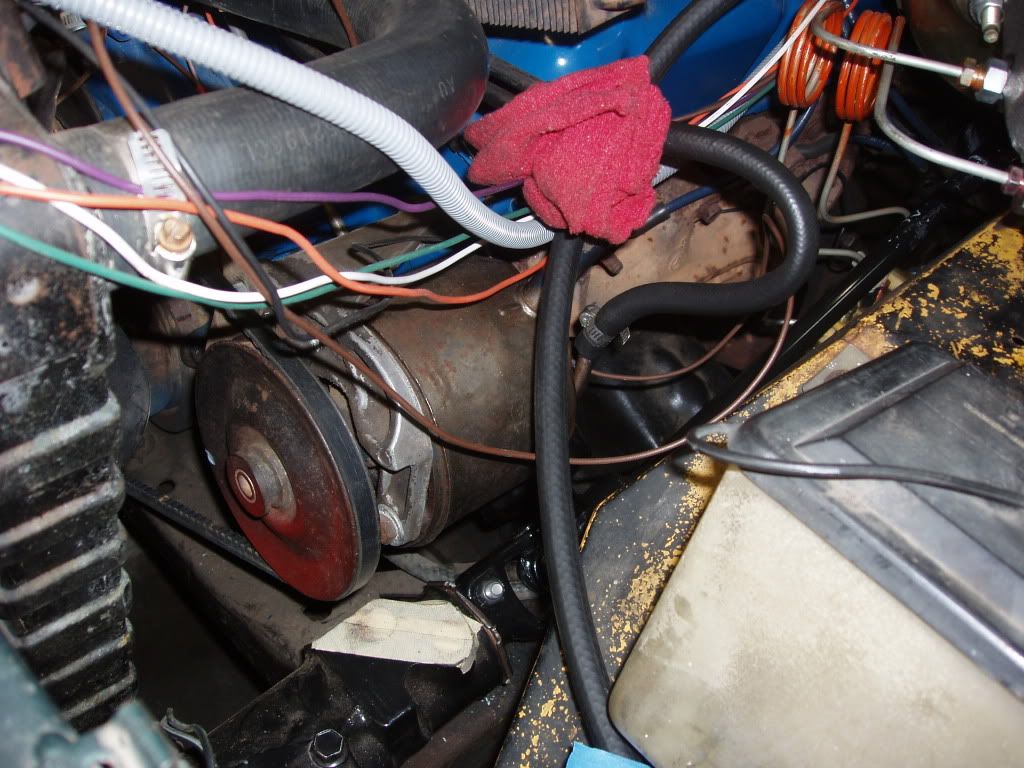
Here are some pics of where she stands right now:
Dash basically complete:
Wiring basically done:
Coolant recovery/power steering/power brake installation complete:
Those new light bulbs are really bright!
And last, but not least...the attitude-adjusting train horn:
She's not going to be a beauty queen by any stretch of the imagination, but she will be a mechanically sound, offroad-capable driver with some pretty cool mods. Still need to tie up a few loose ends on the wiring harness and a bunch of other stuff, but she's close to being back on the road again.
Here are the latest things I've done:
- Changed all fluids & filters
- Installed & tensioned new V-belts
- Installed new radiator & heater hoses
- Installed new heater valve
- Installed new distributor cap rotor
- Finished installing all power steering lines
- Installed coolant recovery reservoir & line
- Installed big ass train horn (look out retarded drivers!)
- Basically finished installing custom wiring harness & worked out most bugs
- Installed all new exterior light bulbs (they are VERY bright)
- Fired the BEAST up!!
Here are some pics of where she stands right now:
Dash basically complete:
Wiring basically done:
Coolant recovery/power steering/power brake installation complete:
Those new light bulbs are really bright!
And last, but not least...the attitude-adjusting train horn:
stupidboy
My wifes porn star.
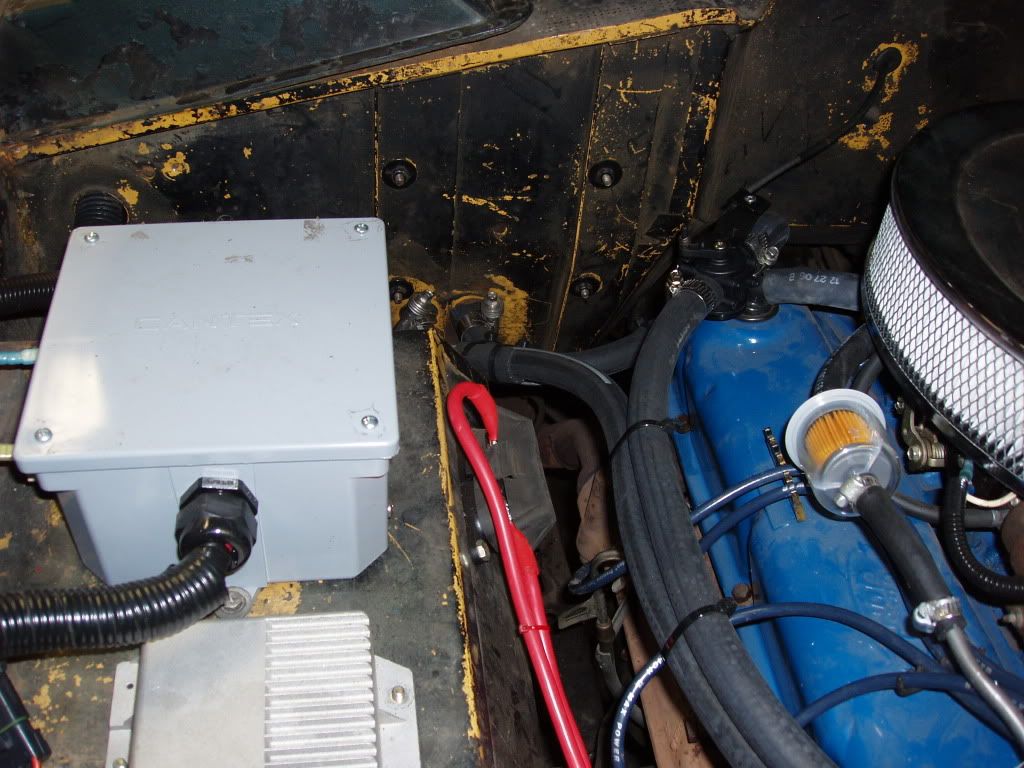
Nice work, what is the big grey electrical box housing inside of it? Where did you get it? Gives me and Idea. Keep up the good work.
when are you going to cut it? you should post up a video of you cutting those rear quarters. some of the members on here will scream.
This is an understatement.........
JDJ
englewoodcowboy
Lick Creek Restorations
- Joined
- Jul 25, 2010
- Messages
- 4,200
Great build! Keep up the good work.. all these rigs wrapping up are making me jealous... I am not evenready to start tearing into mine yet and it isnt even driveable.... Have to finish my sons B2 first then mine goes into the barn.