• Welcome to ClassicBroncos! - You are currently viewing the forums as a GUEST. To take advantage of all the site features, please take a moment to register. It's fast, simple and absolutely free. So please join our community today!
    If you have problems registering or can't log into your account, please contact Admin.

Opinions on New dash layout

JWMcCrary

Contributor
Bronco Guru
Joined
Oct 14, 2004
Messages
5,001
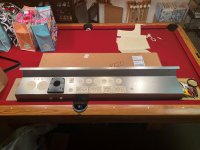
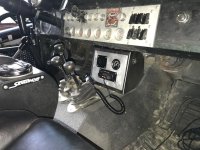
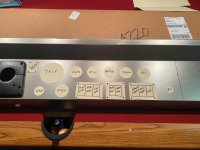
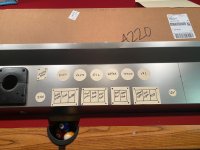
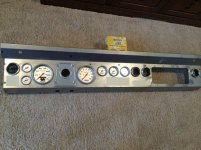
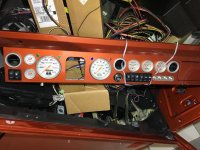
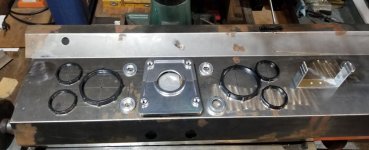
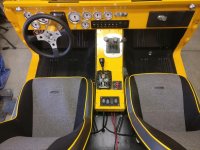
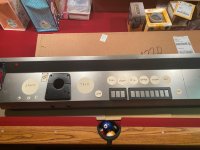
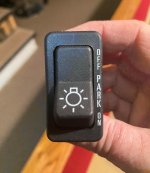
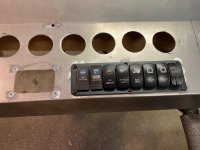
Planning a refresh on my 73 this spring, part of that includes reworking the dash using a new dash overlay. I'm tired of all the aluminum look (since 2005) and plan on having it all Forest Green, which is the color of the Bronco and everything else black. I have a new ididit steering column that will be going in that has the Hazzard or flashers built in. I'm removing the heater and everything associated with it. Never gets driven in dead of winter, even if it did with no doors or top not much good anyway. Pretty much a mild+ trail rig. The piece labeled Holley Base is the arm that my Holley EFI monitor is on, You can see it in the last pic. Intent is mount it and aim the monitor above the steering column where my tach is now. A lot of the gauges are redundant but I already have them and I like still having the analog gauges. the only gauge I didn't have was the speedometer. Using the old plastic column cover for layout, will be using a black billet cover but its currently on backorder. Keeping the ignition switch but everything else will be rocker switches. I'm hoping to cut holes for the switches and not use the mounting plates, but I made my templates using the dimensions of the plates in case I screw up and have to use them. I want the switches in groups slightly spaced apart rather than all tight together.

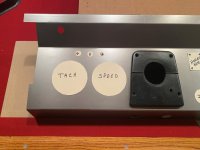
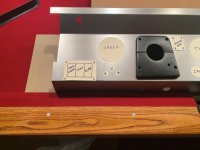
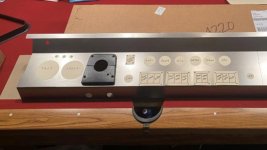
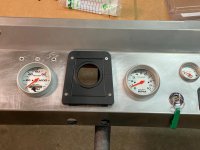
I like the layout with the speedo and tach both to the left of the steering wheel...BUT, I've never seen another one like that in all my searching so wondering if I'm missing something????
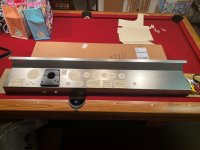
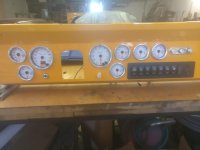
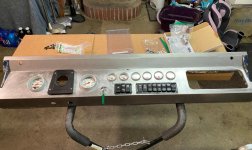
I did a 2nd layout with the speedo left and the tach right just in case but I'm not in love with the look on the drivers sde of the steering wheel.

Thoughts opinions welcome. My templates are as accurate as possible cutting them by hand with scissors but everything is laid out by eyeballing so I know there will be some tweaking. I did measure and mark a line where the Tuffy glove box comes to.
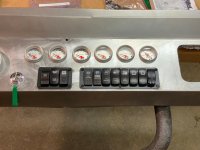
 

Attachments

  • 1ST - Pic 1.jpg
    1ST - Pic 1.jpg
    95.6 KB · Views: 242
  • Dash from 2005.jpg
    Dash from 2005.jpg
    123.3 KB · Views: 239
  • 2ND - Pic 3.jpg
    2ND - Pic 3.jpg
    89.4 KB · Views: 193
  • 2ND - Pic 1.jpg
    2ND - Pic 1.jpg
    88.9 KB · Views: 197
  • 1ST - Pic 3.jpg
    1ST - Pic 3.jpg
    91.9 KB · Views: 258
  • 1ST - Pic 2.jpg
    1ST - Pic 2.jpg
    74.8 KB · Views: 214
  • 2ND - Pic 2.jpg
    2ND - Pic 2.jpg
    87.5 KB · Views: 161

Yeller

Contributor
Bronco Guru
Joined
Mar 27, 2012
Messages
6,270
Loc.
Rogers County Oklahoma

Attachments

  • FAEE0F10-F007-4AF3-8AD9-9409B812CD8E.jpg
    FAEE0F10-F007-4AF3-8AD9-9409B812CD8E.jpg
    49.3 KB · Views: 105

No Hay

Bronco Guru
Joined
Jun 4, 2014
Messages
1,657
It's going to look great.

As your "trail rig," I like pics 4 and 5 with all controls in one general (forward) location.

If a street rig, it would look full or busy, and some switches could moved to a console more out of sight.
 

.94 OR

Contributor
Bronco Guru
Joined
Jul 5, 2009
Messages
1,765
What kind of seatbelts do you run?

I installed harnesses in mine years ago and realized I couldn't reach any of the switches that were placed very far from the steering wheel.

I ended up building an overhead console for the stereo and switches so I could reach them without adjusting in the drivers seat.
 
OP
OP
JWMcCrary

JWMcCrary

Contributor
Bronco Guru
Joined
Oct 14, 2004
Messages
5,001
I would rather have the speedo and tack on the same side so you can see them both in a quick glance.

Thank You, that's what I want and like the best. It just puzzles why I don't see any others like that.....

And yes, you have been known to torpedo my budget for a project, lol.
But not this time....I hope.
 
OP
OP
JWMcCrary

JWMcCrary

Contributor
Bronco Guru
Joined
Oct 14, 2004
Messages
5,001
What kind of seatbelts do you run?

I have 2 sets of seatbelts. I have a 3 point (shoulder strap) that I use when driving on the hwy. The strap across my shoulder drives me nuts on he trail so several years ago I added 3 inch lap belts and use that when on the trail.
 

AZ73

Contributor
Bronco Guru
Joined
Mar 28, 2012
Messages
3,546
Having built a similar one make sure you look at clearance behind your top center gauges for the defrost ducts. Also don't forget to account for the trim rings on the gauges. Not sure if you cut your templates for the cut-out hole size or the bezel size. I also found it useful to put a grounding bar in the back of the dash. All the switches and gauges have lights which need to be grounded and real estate is in short supply back there. Can't find a better picture at the moment but you get the idea.

Here's the build and a first test with the gauges:

https://classicbroncos.com/forums/showpost.php?p=2728528&postcount=141
 

Attachments

  • dash 2.jpg
    dash 2.jpg
    130 KB · Views: 119
  • dash.jpg
    dash.jpg
    116.3 KB · Views: 146
Last edited:
OP
OP
JWMcCrary

JWMcCrary

Contributor
Bronco Guru
Joined
Oct 14, 2004
Messages
5,001
Thanks for the info, non issue for defrost duct as the heater is being deleted.
I have a small panel with fuses and relays I’m adding behind the dash on the firewall that has grounding points. My goal is to contain the bulk of the wiring under/behind the dash to clean up the mess I have under the hood now, too many redundant wires and some that are no longer even being used.
 

nvrstuk

Contributor
Just a Bronco driver for over 50 yrs!
Joined
Jul 31, 2001
Messages
8,998
Like Yeller said...quick glances are important.

I am so dang practical over glitz or useless "pretty" stuff that I'm on the edge of the spectrum there I think. lol

Water and oil gauges are extremely important. They should be able to be read by barely taking your eye off the road. Along with speed & tach - tach is less important for auto since you can set shift points and rev limiter points easily

Guys that put speedo's over towards the std radio mounting location aren't considering the amount of time your eyes are off the road to read it...same with oil/water temp guages...

If you need to turn on a switch you need to be able to reach it with your harness on.
If it's an important switch you should be able to locate it 100% of the time in the dark while driving, that includes bumping along on a trail...

I guess I have more of a "racers mentality" rather than a "looks cool" one. lol

Nice looking
 
Last edited:

Seattle66

Contributor
Full Member
Joined
Dec 4, 2012
Messages
223
I like the layout with the Tac and Speedo on opposite sides of the steering column. Not sure what kind of roll cage you have, but I would be concerned that putting them both on the left side of the steering column could cause some overlap of a roll cage bar on the far left gauge.

I am actually working on my dash right now. I am installing a set of SpeedHut Gauges. I have about 60% of the cutouts done. I have uploaded a pic of my layout. The U bracket on the right represents a gauge style Marine Stereo I am installing. To the right of that will be the three switches for temp, heater fan, defrost.
 

Attachments

  • Dash_Layout_1.jpg
    Dash_Layout_1.jpg
    60 KB · Views: 97
Last edited:

Dbteak

Sr. Member
Joined
May 23, 2006
Messages
438
I have the same number of gauges and not as many switches. This is how mine turned out.
 

Attachments

  • -8299907673766078776.jpg
    -8299907673766078776.jpg
    57.4 KB · Views: 118
  • IMG_20201126_151655.jpg
    IMG_20201126_151655.jpg
    123.5 KB · Views: 137
OP
OP
JWMcCrary

JWMcCrary

Contributor
Bronco Guru
Joined
Oct 14, 2004
Messages
5,001
I think this is what I have decided on. Haven't cut anything yet, waiting on the black billet steering column cover from WH that was backordered, it just shipped Friday so I may be able to get to work on this in a few days.
The mounting for the arm that my Holley EFI monitor goes on was moved to the drivers side, I want to keep my dash pad but if I can make I work I am going to put it on the underside along that panel where the windshield bolts go through and right above the column.
Tried cutting a few practice holes for the rocker switches and decided the black panels are better for my nerves.

I found this headlight switch on eBay, it's an OEM International switch. The direction of the wording means it will be installed with OFF and ON in opposite directions of the other switches. I think I can live with that, hopefully. If not I can scratch the wording off and flip it over.
 

Attachments

  • 4th - Pic 1.jpg
    4th - Pic 1.jpg
    97.3 KB · Views: 69
  • Headlight rocker switch.jpg
    Headlight rocker switch.jpg
    87.6 KB · Views: 51

sprdv1

Contributor
REBEL
Joined
Mar 8, 2007
Messages
81,824

SP73

Full Member
Joined
Jun 25, 2017
Messages
165
Beware of that IH headlight switch! I had an International 2674 (big truck) with that same switch. I lost count of how many of those I’ve had to replace!
 
OP
OP
JWMcCrary

JWMcCrary

Contributor
Bronco Guru
Joined
Oct 14, 2004
Messages
5,001
Beware of that IH headlight switch! I had an International 2674 (big truck) with that same switch. I lost count of how many of those I’ve had to replace!


No experience with it, thanks for the heads up. Not sure how it could be worse than the cheapo rocker switches though. Hoping I have better luck
 

sprdv1

Contributor
REBEL
Joined
Mar 8, 2007
Messages
81,824
No experience with it, thanks for the heads up. Not sure how it could be worse than the cheapo rocker switches though. Hoping I have better luck

Good luck brother.. You got skills. And I got faith in ya
 
OP
OP
JWMcCrary

JWMcCrary

Contributor
Bronco Guru
Joined
Oct 14, 2004
Messages
5,001
Thanks for all the replies....final decision was made and here it is. Decided not to use the IH light switch, I already have H4 painless headlights so the headlights are already on relays, grabbed a double throw switch that I didn't have to modify the mount. Since I have USB in a rocker style switch I decided not to put the 12V/cigar type plug on the dash, I will put it in the cubby under the dash on the side. Nice to have it but don't expect it to be used much. Going back without the dash pad so that opens up other options to keep the Holley EFI monitor mount off the face of the dash. The small gauges are just sitting in tight holes, enough hole saw walk that they are not perfect but there is enough meat that I can tweak the holes to get them lined up little bit better, although not bad as is. Ignition switch bezel is a royal pain, used small files and dremel and it's about as close to perfect fitting as I could get it. Rather than sheet metal screws for the rocker switch panels I used nutserts, another thing that there is no forgiveness on alignment, but with a small round file you can open the holes a little in the direction to get them lined up and the head of the screw covers it. Used 10-24.
Next is to strip the old dash underneath and then use the 3M panel bond to permanently attach the overlay. After that shoot some epoxy primer on it and then it sits until time to paint the rest of it.
The overlay fits pretty good, I would say it's probabaly as good as you can get with the tolerances of these old trucks. however the crease above the column opening and the crease below is just a tad bigger than the dash, enough that I have a small 1/8" inch gap at the bottom of the column cover, I don't think you would ever notice after installed but I should be able to do a little body work to handle while securing with the panel bond.
 

Attachments

  • IMG_3406.jpg
    IMG_3406.jpg
    100.8 KB · Views: 76
  • IMG_3404.jpg
    IMG_3404.jpg
    86.3 KB · Views: 78
  • IMG_3408.jpg
    IMG_3408.jpg
    93.2 KB · Views: 67
  • IMG_3409.jpg
    IMG_3409.jpg
    94.6 KB · Views: 76
  • IMG_3410.jpg
    IMG_3410.jpg
    115 KB · Views: 66
Top