SC, forget all that brake stuff, get it runnin', you can gear it down or just bounce of trees to slow it down!!!;D ;D


Community
Message Forum
Photo Gallery
Event Calendar
Book Reviews
Bronco Wallpaper
Bronco FAQ
Link Back to CB!
Photo Gallery
Event Calendar
Book Reviews
Bronco Wallpaper
Bronco FAQ
Link Back to CB!
Buy / Sell


Bronco Tech
3 Arm Wiper Setup
Fix Motor Mount
Roll Cage Braces
Throttle Body 65mm
Wheel Alignment
Heat Riser Replacement
Vent Window Repair
Center Console Mount
Straighten Bumper
Ford 6R80 6 spd
More Tech...
Fix Motor Mount
Roll Cage Braces
Throttle Body 65mm
Wheel Alignment
Heat Riser Replacement
Vent Window Repair
Center Console Mount
Straighten Bumper
Ford 6R80 6 spd
More Tech...

Install the app
-
Welcome to ClassicBroncos! - You are currently viewing the forums as a GUEST. To take advantage of all the site features, please take a moment to register. It's fast, simple and absolutely free. So please join our community today!If you have problems registering or can't log into your account, please contact Admin.
You are using an out of date browser. It may not display this or other websites correctly.
You should upgrade or use an alternative browser.
You should upgrade or use an alternative browser.
Project "BOB - Big Orange Bronco" Wheeling pics addded
- Thread starter SC74
- Start date
744x4
Sr. Member
The reason he went with the H-Boost setup was because we narrowed the ft end too much and the angled bracket and booster wouldnt fit under the ft end without lots of cutting.OOPS now the H-boost just barely fits under the hood and you can actually push down on the hood and feel it touching the cap.Almost another OOPs.He He
Mill KNOB
Bronco Guru
The reason he went with the H-Boost setup was because we narrowed the ft end too much and the angled bracket and booster wouldnt fit under the ft end without lots of cutting.OOPS now the H-boost just barely fits under the hood and you can actually push down on the hood and feel it touching the cap.Almost another OOPs.He He
Keith still looks good.. Yall do great work.. The top of the booster at least push out the dent on the hood..;D
OP
OP
- Joined
- May 24, 2004
- Messages
- 3,413
Keith still looks good.. Yall do great work.. The top of the booster at least push out the dent on the hood..;D
shhhhhhh... you're not supposed to tell all of our secrets!!
744x4
Sr. Member
Hell we were lucky it worked where I drilled the big assed hole.He He. Once the hood pins are in there will be plenty of clerance as that side is sitting low to begin with by about 1/4 in in the ft.
OP
OP
- Joined
- May 24, 2004
- Messages
- 3,413
I took a several week break from working on the Bronco but got back on it this weekend. I had a near death experience on Friday evening - cutting the tack welds off of the arm brackets with no trac-bar is not a good idea - while I was under the truck it sprung about 1.5 feet to the drivers side and the springs looked like spaghetti noodles. I was cutting the tacks loose so that we could rotate the pinion up some and get a better driveline angle before final welding it.
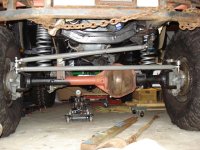
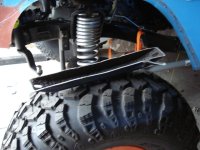
Yesterday we got the cage weld on brackets burned on for good and the axle back under the truck ;D . Today I played around with the steering to get the angles more parallel. I moved the drag link to the top of the drop pitman arm and tacked a homeade trac-bar riser in place. I've got a stock trac bar in in for now and may even leave it - see no reason why it won't be ok after I do some extra welding on the factor trac bar bracket for extra safety.
I have a concern about the trac bar riser - it sits directly under the frame and there's only 6" between the top of riser and bottom of frame. I see that becoming a problem when I stuff the pass front tire ?:?
Here are a couple pics.
Attachments
Mill KNOB
Bronco Guru
Robert man be careful . Glad to see you getting to work on your Bronco.. So still trying to figure out what to do with trac bar problem...
. Glad to see you getting to work on your Bronco.. So still trying to figure out what to do with trac bar problem...
OP
OP
- Joined
- May 24, 2004
- Messages
- 3,413
Looks great! So did you decide not to cut and rotate the inner "C"s afterall?
I am, just not right now. I've got everything welded so that the pinion is where I want it and I can always rotate the inner c's later. Part of me is curious to how it will handle with negative caster. After all, I don't plan on driving this on the highway - maybe some short trips on pavement around the house, but nothing over 40 mph.
OP
OP
- Joined
- May 24, 2004
- Messages
- 3,413
Robert man be careful
I think I'm good to go except my concern about the riser being so close to the bottom of the frame.
I need a measurement from somebody with WH tracbar riser - I assume it is directly under the frame also - how much room is between the top of riser and bottom of frame (will obviously vary depending on amount of lift). Does anybody ever have problems with them hitting?
OP
OP
- Joined
- May 24, 2004
- Messages
- 3,413
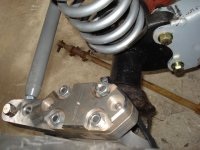
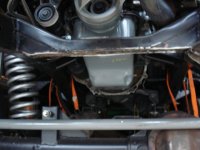
I finished the trac bar riser and got it welded onto the truck. I also finished my trac-bar and got the welded inserts in them and mounted rather than using the stock bar - now it's at least adjustable. I went ahead and ordered a trac bar drop bracket from WH with some new hood pins ;D so that should help my angles a little more. The top of the riser is capped off flat and I tapped it for a bump stop.
Attachments

OP
OP
- Joined
- May 24, 2004
- Messages
- 3,413
I'm going to switch back to the stock pitman arm - the drag link is too flat on the bottom of the drop arm. The stock arm is basically the same as moving it to the top of the dropped arm. Since I'm running high steer arms and the drag link is going directly to the arm rather than to the tie-rod, I was afraid that the drag link would get into the front x-member when the suspension cycled.
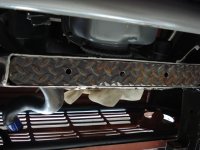
Today I cut the bottom half of the x-member off and welded a 3/16" plate back in. Much more room now
My trac bar was not on during the pics (springs leaning!)- had to take it off to get room to cut, but you can see the riser welded in place.
Today I cut the bottom half of the x-member off and welded a 3/16" plate back in. Much more room now
My trac bar was not on during the pics (springs leaning!)- had to take it off to get room to cut, but you can see the riser welded in place.
Attachments
OP
OP
- Joined
- May 24, 2004
- Messages
- 3,413
Looks good bud. Too bad you are on the opposite coast. I'd love to go wheel with you when you get it done. Keep up the good work!
Thanks Patrick! I feel a trip to Moab with some of the other east coast guys in the future.
rjlougee
Bronco Guru
- Joined
- Dec 26, 2001
- Messages
- 1,959
Thanks Patrick! I feel a trip to Moab with some of the other east coast guys in the future.
Think you'll have it ready by this coming May? That's the next MBS. I'd like to check it out in person as well.
Joe
blazinchuck
Bronco Guru
- Joined
- Jul 14, 2005
- Messages
- 3,319
damn that things is comin along...keep it up guys!!!;D
OP
OP
- Joined
- May 24, 2004
- Messages
- 3,413
Think you'll have it ready by this coming May? That's the next MBS. I'd like to check it out in person as well.
Joe
I hope to have it together by May - depending on my job really and if I can swing buying coilovers, gears, and lockers by then. There's no way I could make it to Moab this May though - hopefully 2010 ;D
OP
OP
- Joined
- May 24, 2004
- Messages
- 3,413
Driveshafts
I haven't been working really hard on the truck the past several weeks, but have gotten a few odds and ends taken care of.
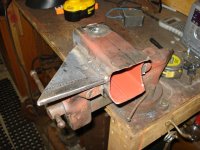
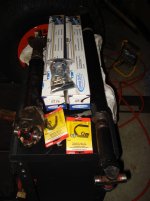
Here are my modified drive shafts thanks to Carolina Driveline - top notch driveshaft shop! The only reason I have not installed them is because I have to remove my tranny cross-member to notch it for the shifter cable.
Also in the pic are James Duff long travel shocks for the front - now I need to bend a hoop for them. The bag on the shocks are the hood pins from Wild Horses. One of my next steps is fabbing a battery tray and hood pin mounts.
I haven't been working really hard on the truck the past several weeks, but have gotten a few odds and ends taken care of.
Here are my modified drive shafts thanks to Carolina Driveline - top notch driveshaft shop! The only reason I have not installed them is because I have to remove my tranny cross-member to notch it for the shifter cable.
Also in the pic are James Duff long travel shocks for the front - now I need to bend a hoop for them. The bag on the shocks are the hood pins from Wild Horses. One of my next steps is fabbing a battery tray and hood pin mounts.
Attachments
OP
OP
- Joined
- May 24, 2004
- Messages
- 3,413
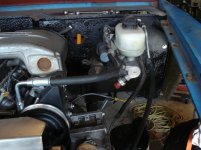
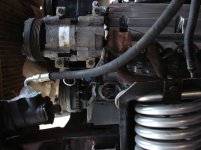
I got off early this past Friday and ended up at Cline Hydraulics in downtown Greenville to get hoses made for the hydroboost. I was hoping to use the stock powerstroke hydroboost hoses and use adaptors to the pump and box, but now Ford uses specialty fittings that makes it impossible to adapt to. I ended up getting them to change ends on both of the powerstroke hoses.
Once I figure out how I'm going to mount the PS reservoir (hood clearance issues ?:? ) then I'll finish the low pressure return lines and add a fluid cooler to it.
Once I figure out how I'm going to mount the PS reservoir (hood clearance issues ?:? ) then I'll finish the low pressure return lines and add a fluid cooler to it.
Attachments
OP
OP
- Joined
- May 24, 2004
- Messages
- 3,413
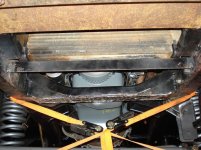
Radiator Mounts
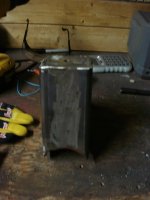
I used some 1.5x1.5x1/8" angle to mount the lower radiator mounts to. I'm using the stock "C" mounts and Bronco radiator. There's just enough room for the hood to close and plenty of clearance for the fan.
I'll weld two tabs on the upper core support tube to bolt the upper radiator mounts to.
I used some 1.5x1.5x1/8" angle to mount the lower radiator mounts to. I'm using the stock "C" mounts and Bronco radiator. There's just enough room for the hood to close and plenty of clearance for the fan.
I'll weld two tabs on the upper core support tube to bolt the upper radiator mounts to.
Attachments

Similar threads
- Replies
- 116
- Views
- 20K
City: Canterbury
Price: $20000
- Replies
- 2
- Views
- 105
- Locked
City: campbell
Price: $1234
- Replies
- 0
- Views
- 245
City: Tuscaloosa
Price: $20000
- Replies
- 1
- Views
- 145
- Replies
- 2
- Views
- 163