• Welcome to ClassicBroncos! - You are currently viewing the forums as a GUEST. To take advantage of all the site features, please take a moment to register. It's fast, simple and absolutely free. So please join our community today!
    If you have problems registering or can't log into your account, please contact Admin.

Project "BOB - Big Orange Bronco" Wheeling pics addded

OP
OP
SC74

SC74

Contributor
Bronco Guru
Joined
May 24, 2004
Messages
3,413
Bondo

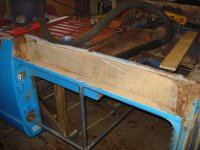
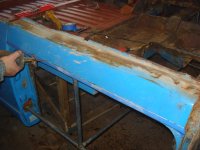
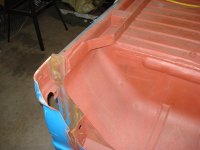
I also welded up the seam in the rear where the tail light corners connect to the Body.One had a 1/4 in gap and the other had 1/2 in gap and both quarters were filled with Bondo.I didnt know Bondo burned like it did as it made it hard to weld with the fire F&%$ing everything up.Did I mention I hate BONDO and believe people who fill a vehicle should DIE.There is a reason to use filler but it should be a 1/16th or less reason.

Here are a couple shots of the bondo Keith is talking about. This is the rear corners - some places were thicker than this (like between the rear corner and rear fender).
 

Attachments

  • BONDO 1.JPG
    BONDO 1.JPG
    87.8 KB · Views: 238
  • BONDO 2.JPG
    BONDO 2.JPG
    78.1 KB · Views: 208
OP
OP
SC74

SC74

Contributor
Bronco Guru
Joined
May 24, 2004
Messages
3,413
More progress today....

Finished cleaning the under-body and getting it primed. Wow am I glad that is over with!

Keith came over and started cleaning up some of the welds in the rear wheel wells and cut the rear fender to match the inner well opening. These came out really well and took a sharp edge out that would slice a tire. We've still got some cutting to do in the wheel well area, but gotta get it all welded up from the inside first.

Next the bondo filled rocker panels came off. One had already been replaced by the PO, but STILL had bondo repair. Someone has abused the heck out of this Bronco before - one of the body mounts is smashed, the body corner braces were all bent, and the bondo trail is endless.

I plan on using 2x4 rock sliders so went ahead and cut the sheet-metal to match it. We went ahead and cut the rear quarter out the same so that the slider will go the entire length.

Here are the pics ;D
 

Attachments

  • DSC00439.JPG
    DSC00439.JPG
    106.8 KB · Views: 172
  • DSC00438.JPG
    DSC00438.JPG
    119.9 KB · Views: 183
  • DSC00436.JPG
    DSC00436.JPG
    122 KB · Views: 153
  • DSC00435.JPG
    DSC00435.JPG
    110.9 KB · Views: 157
  • DSC00434.JPG
    DSC00434.JPG
    104.2 KB · Views: 138
  • DSC00440.JPG
    DSC00440.JPG
    85 KB · Views: 138
OP
OP
SC74

SC74

Contributor
Bronco Guru
Joined
May 24, 2004
Messages
3,413
We got the tub flipped back over right-side up tonight.

I hate to say it, but I'm frustrated :mad: Now that the 30+ years of crap is cleaned off of the bottom, I can see daylight through A LOT more holes than were there before. It looks like there's going to be more body work on the floor than I anticipated :(
 
OP
OP
SC74

SC74

Contributor
Bronco Guru
Joined
May 24, 2004
Messages
3,413
Working in the Tub

We got a lot done today ;D

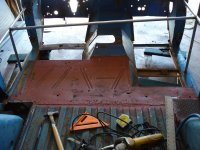
We started by cleaning the tub where the seats mount since it had its share of rust. I got some 16 gauge sheet metal and we cut it to fit and extended the back portion into the bed body lines so that it would have some meat to weld to. That went well until we ran out of gas on the welder, but we had gotten all of the spot welds done and were working on the plate in front of the rear wheel well when it went south.

No gas to weld so we cut / grinded / wire wheeled a bunch more to get things ready for next weekend. I got both floor pan cross-members cleaned up and all of the spot welds ground down while Keith worked on two steel plates that will connect the tubed front clip to the fire-wall. Our plan is to make the entire front clip removable with fenders and grill attached to make it easy to get to things and work on the motor in the future. The tubed front clip will connect to the firewall at these points, to the front body mounts, and the front shock hoop if necessary. We also got brackets like the e-brake and old front core support brackets cut off. I also worked on grinding the welds in one of the rear wheel wells - by the time a bed liner is sprayed in you'll never be able to see the welds.

We did a test fit of the new front floor pans and with a little tweaking they'll be welded in as soon as we get some gas. The body is much more rigid after adding the sheet-metal on the floor and after a bed-liner is sprayed the rough edges should be hidden.

Here are some pictures!
 

Attachments

  • DSC00455.JPG
    DSC00455.JPG
    98.6 KB · Views: 199
  • DSC00454.JPG
    DSC00454.JPG
    114.4 KB · Views: 226
  • DSC00453.JPG
    DSC00453.JPG
    94.1 KB · Views: 310
  • DSC00450.JPG
    DSC00450.JPG
    105 KB · Views: 154
  • DSC00448.JPG
    DSC00448.JPG
    113.7 KB · Views: 198
  • DSC00446.JPG
    DSC00446.JPG
    71 KB · Views: 170
  • DSC00445.JPG
    DSC00445.JPG
    89.8 KB · Views: 170
  • DSC00443.JPG
    DSC00443.JPG
    124.4 KB · Views: 202
  • DSC00456.JPG
    DSC00456.JPG
    108.6 KB · Views: 262
  • DSC00458.JPG
    DSC00458.JPG
    95.9 KB · Views: 230
OP
OP
SC74

SC74

Contributor
Bronco Guru
Joined
May 24, 2004
Messages
3,413
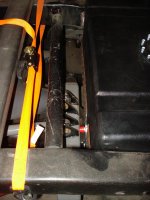
I went ahead and ordered a fuel cell that came in this week - an RCI 16 gallon plastic cell. The dimensions are supposed to be 23"x17"x11" so it would fit perfectly between the frame rails, but the plastic is not square at all and it's more like 23.5" long which makes it very tight between the frame rails, but doable with some persuasion.

The re-located cross-member is going to have to be taken out to make room for the fuel cell. My goal is to have it completely under the bed. Today we made a mount for the fuel cell that will bolt to the bottom of the frame rails and will mount very similar to a stock tank. We made it 4.5" below the bottom of the frame. That 4.5" plus the 4" of frame leaves 2.5" above the frame that I'll lose between the body mount and 1 or 2" body lift. Now we just gotta figure out what to do for a rear cross-member - can't use the fuel cell mount since it will be bolt-on for removal purposes.

Plan is to use the two top fitting for rollover valve and pick-up and run the return line to the bottom fitting.

Anybody know of creative fuel pick-up ideas to eliminate starving the pickup when off-camber?. I found some things about a Holley kit but that part is now discontinued (two pickups - one for each side of the cell - they tied together with a valve to eliminate air getting into the line).

Once I clean up the welds we'll bolt it in and start plumbing the frame for brakes and fuel.
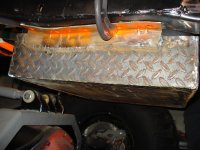
Here are some pics of the fuel cell and the mount we made for it.
 

Attachments

  • DSC00462.JPG
    DSC00462.JPG
    111.3 KB · Views: 159
  • DSC00459.JPG
    DSC00459.JPG
    139.1 KB · Views: 152
OP
OP
SC74

SC74

Contributor
Bronco Guru
Joined
May 24, 2004
Messages
3,413
Got some test fitting done for the fuel cell. The new cross-member came out to make some room and it is TIGHT, but it's gonna work ;D

The cell isn't pushed all the way down in the pics, but you get the idea. The pickup will be inside the channel where the rear body bolts are which will allow for room to add a 90 deg bend. 2" of body lift will clear it and no bed space lost :D

It will still mount from the bottom just like the stock tank, but we had to make some different angle iron brackets to match the contour of the frame. 5 bolts in each side better hold it up there!

Still got some grinding and cleaning to do on it and drill some drain plugs, but it's not far from being bolted on so we can start plumbing the fuel lines up.

Here are some pics.
 

Attachments

  • DSC00464.JPG
    DSC00464.JPG
    142.3 KB · Views: 162
  • DSC00465.JPG
    DSC00465.JPG
    121.8 KB · Views: 139
  • DSC00466.JPG
    DSC00466.JPG
    127.9 KB · Views: 195
OP
OP
SC74

SC74

Contributor
Bronco Guru
Joined
May 24, 2004
Messages
3,413
Anybody know of creative fuel pick-up ideas to eliminate starving the pickup when off-camber?. I found some things about a Holley kit but that part is now discontinued (two pickups - one for each side of the cell - they tied together with a valve to eliminate air getting into the line).

Found these - it says that they made them for Holley before Holley discontinued that part number.

http://www.autoperformanceengineering.com/

Look under fuel pickups.

MP_single.jpg
 
OP
OP
SC74

SC74

Contributor
Bronco Guru
Joined
May 24, 2004
Messages
3,413
We got some more work done on the fuel cell mounting today - all done with it except tapping the frame to bolt it on.

The pics show how we bent the angle iron to match the contour of the frame - each side has 5 bolts to hold it up (orange paint to mark holes to drill in pics).

It's a TIGHT fit, but it's in there :eek: It'll clear with a 2" body lift, but we'll probably go 2-1/2 to be safe. The pickup line fits perfectly in the channel that the body mount bolts go to.
 

Attachments

  • DSC00476.JPG
    DSC00476.JPG
    105.3 KB · Views: 98
  • DSC00475.JPG
    DSC00475.JPG
    133.9 KB · Views: 134
  • DSC00474.JPG
    DSC00474.JPG
    105 KB · Views: 98
  • DSC00469.JPG
    DSC00469.JPG
    112.1 KB · Views: 98
  • DSC00468.JPG
    DSC00468.JPG
    110.9 KB · Views: 94
OP
OP
SC74

SC74

Contributor
Bronco Guru
Joined
May 24, 2004
Messages
3,413
Floor Pans

Both Floor pans are in :D

We tapped the frame for the fuel cell so it is in now ready to be plumbed up after I spend some money at Summit.

The floor pans required a little massaging, but overall fit very well. I don't have any pics of them primed, but after ground the spot welds down and primed them you can't even tell it's a new pan except around the edges, but nothing a bed liner won't hide.

Here are some pics!!!!
 

Attachments

  • DSC00479.JPG
    DSC00479.JPG
    94.8 KB · Views: 129
  • DSC00481.JPG
    DSC00481.JPG
    111.9 KB · Views: 162
  • DSC00482.JPG
    DSC00482.JPG
    115.4 KB · Views: 133
  • DSC00483.JPG
    DSC00483.JPG
    120.6 KB · Views: 139
OP
OP
SC74

SC74

Contributor
Bronco Guru
Joined
May 24, 2004
Messages
3,413
Here's a few pics of them primered. Still got to work the edges a little but for the most part I hope the bedliner I spray will cover the rough edges.

I've also got to go back and clean the rest of the metal that is rusty before spraying for good.
 

Attachments

  • P1000346.JPG
    P1000346.JPG
    105.3 KB · Views: 97
  • P1000345.JPG
    P1000345.JPG
    103.1 KB · Views: 117
  • P1000344.JPG
    P1000344.JPG
    98.7 KB · Views: 111
  • P1000343.JPG
    P1000343.JPG
    96.1 KB · Views: 124

joe

Bronco Guru
Joined
Sep 9, 2001
Messages
1,932
lookin great Robert!

i just wish you'd hurry up and get that thing done so i can haul my junk down there to give ya'll somethin to do. ;D seein as you do such good work and all. :cool:
 
OP
OP
SC74

SC74

Contributor
Bronco Guru
Joined
May 24, 2004
Messages
3,413
lookin great Robert!

i just wish you'd hurry up and get that thing done so i can haul my junk down there to give ya'll somethin to do. ;D seein as you do such good work and all. :cool:

Thanks Joe! ;D
 
OP
OP
SC74

SC74

Contributor
Bronco Guru
Joined
May 24, 2004
Messages
3,413
The patching continues....
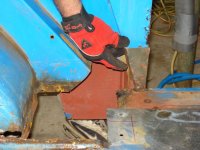
Got more work done on the drivers side where the old charcoal cannister used to go and around the edge of the door lip to the striker post. We also welded in some 3/4" x 3/4" angle iron along the wheel well to bed to strengthen and hide all of the holes in that body line.

Once again, I'm relying on the bed liner to cover up the rough areas that's hard to get to and grind. Bed liner is ordered and should come in this week, but there's probably a day left of work in the bed and a day more on the underside before it's time to spray the under-body and set it up on the chassis

Here's the pics...
 

Attachments

  • DSC00491.JPG
    DSC00491.JPG
    136.3 KB · Views: 175
  • DSC00489.JPG
    DSC00489.JPG
    104.5 KB · Views: 136
  • DSC00488.JPG
    DSC00488.JPG
    116.5 KB · Views: 207
  • DSC00487.JPG
    DSC00487.JPG
    109.2 KB · Views: 159
  • DSC00486.JPG
    DSC00486.JPG
    103.3 KB · Views: 151
  • DSC00485.JPG
    DSC00485.JPG
    107.2 KB · Views: 159
OP
OP
SC74

SC74

Contributor
Bronco Guru
Joined
May 24, 2004
Messages
3,413
Time for an update!!!

The past couple weekends has been a lot of filling holes and grinding them smooth. I went ahead and welded the wheel wells on the bottom side of the angle iron that we put in along the inside bottom of the rear fender wells. It needed it, plus we were able to grind it down to give it a smooth radius lip there and clean it up a lot.

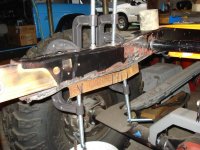
The first pic shows how we altered the rear support channel. The tire is still rear of the center of the wheel well and I need all the room I can get in the back of the well. The front will have plenty of room - in fact it may look weird with so much room up front. We had to get rid of any sharp edges that may rub the tires so we bought a little room and smoothed it out by modifying the channel.

The rest of the pics are the rock sliders - 2x4x.188 wall. We used a 3/4x3/4 square stock to make it even with the existing body molding. The lip from the door opening comes over it about 1/2 inch and should blend in well after some liner is on it. The front corner is dobbed to allow room for the front fender to bolt on.
 

Attachments

  • DSC00492.JPG
    DSC00492.JPG
    87.4 KB · Views: 112
  • DSC00495.JPG
    DSC00495.JPG
    114.1 KB · Views: 108
  • DSC00496.JPG
    DSC00496.JPG
    109.8 KB · Views: 111
  • DSC00497.JPG
    DSC00497.JPG
    126.1 KB · Views: 155
  • DSC00500.JPG
    DSC00500.JPG
    81.3 KB · Views: 186

broncobedone

Jr. Member
Joined
Mar 16, 2008
Messages
128
Loc.
Commerce ,Georgia
I just got back from River Rock ORV Park in Georgia , And there was not one bronco there that would come close to comparing to this ! Can't wait to see it done and maybe I will get to see it in action 1 day .
 
OP
OP
SC74

SC74

Contributor
Bronco Guru
Joined
May 24, 2004
Messages
3,413
Thanks mp and broncobedone! I've been getting it ready to spray a bedliner on the under-body and just got in from taping it off. Hopefully we'll have time one evening after work this week to shoot it to it. If so I'll get some pics up of the finished underbody later this week! I'm pumped - once that is done we can set it on the frame!!!!! ;D
 

Silverhorse

Bronco Guru
Joined
Aug 25, 2006
Messages
1,029
Loc.
Pensacola
Really enjoying the build! I see you have some experts on board. Joe and Keith;D I just got some coil buckets from Keith for my 4 link. Don't worry I'll be asking a thousand questions once that begins!:eek:
 
Top